
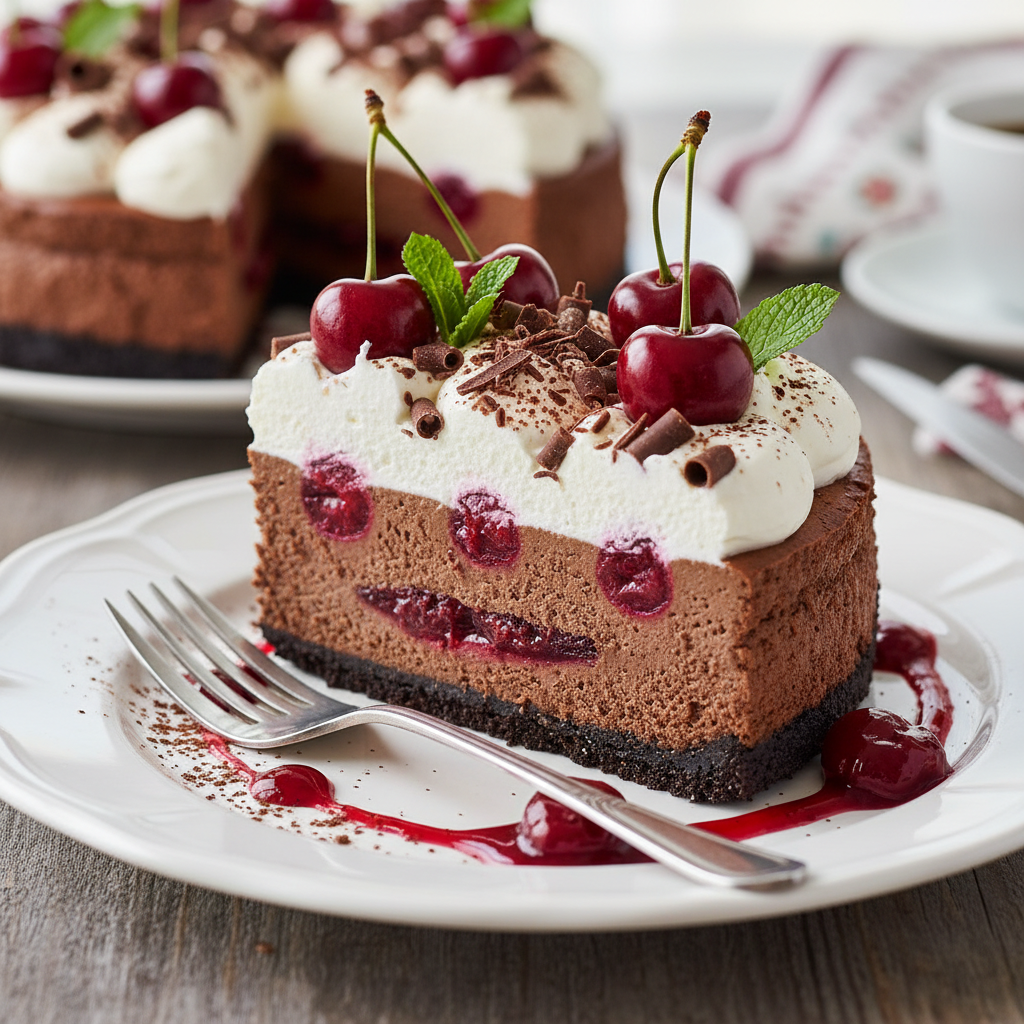
Prepare your palate for a truly exceptional dessert experience: the Black Forest Cheesecake Symphony. This isn't just a cheesecake; it's a culinary masterpiece that marries the beloved elements of classic Black Forest cake with the smooth, luxurious indulgence of a creamy cheesecake. Imagine a rich chocolate cookie crust, a velvety dark chocolate cheesecake filling, crowned with a bright, tangy cherry topping and finished with a swirl of delicate whipped cream and chocolate shavings. It’s a symphony of textures and flavors that promises to impress and delight at any gathering.
Why This Black Forest Cheesecake is a Must-Try
The beauty of this recipe lies in its harmonious balance. The deep, intense chocolate notes of the cheesecake perfectly complement the sweet-tart burst of the cherries. The light, airy whipped cream provides a refreshing contrast, creating a dessert that feels both rich and wonderfully balanced. It’s a sophisticated twist on a timeless favorite, showcasing the best of German-inspired baking combined with a classic American dessert.
The Perfect Dessert for Any Occasion
- Show-Stopping Presentation: With its distinct layers and elegant garnishes, this cheesecake is visually stunning and will be the star of any dessert table.
- Complex Flavors, Simple Joy: While it looks elaborate, the steps are straightforward, making it achievable for home bakers of all skill levels.
- Make-Ahead Marvel: This cheesecake needs time to chill, making it an ideal candidate for preparing a day or two in advance. Less stress on the day of your event!
- Unforgettable Taste: The iconic combination of chocolate and cherry is elevated in this creamy, dreamy form. Learn more about the origins of Black Forest gateau on Wikipedia.
Essential Tips for Cheesecake Perfection
Crafting a flawless cheesecake requires a few key considerations. Firstly, ensure all your dairy ingredients, especially the cream cheese and eggs, are at room temperature. This helps create a smooth, lump-free batter and prevents over-mixing. Over-mixing can incorporate too much air, leading to cracks during baking. Gently mix just until combined.
A slow and steady baking process is also crucial. Cheesecakes are delicate, and rapid temperature changes are their enemy. Baking at a moderate temperature and allowing the cheesecake to cool gradually in the oven after baking will significantly reduce the risk of cracks. For other impressive desserts that are easier than they look, consider making Bright & Zesty Lemon Custard Cake or even some Irresistible Carrot Cake Cookies with Cream Cheese Frosting.
Ingredients Matter
For a dessert this special, don't skimp on quality. Use a good brand of full-fat cream cheese for the creamiest texture and a rich cocoa powder for deep chocolate flavor. While a Quality Chef's Knife might not be directly involved in cheesecake batter, a good set of kitchen tools always makes the baking process more enjoyable and efficient for other recipe prep!
Recipe: Black Forest Cheesecake Symphony
FAQs
What is a Black Forest Cheesecake Symphony?
The Black Forest Cheesecake Symphony is a decadent dessert that combines the rich flavors of traditional Black Forest cake (chocolate, cherries, and cream) with the creamy texture of a classic cheesecake. It typically features a chocolate cookie crust, a rich chocolate cheesecake filling, a vibrant cherry topping, and a delicate whipped cream layer.
Can I make Black Forest Cheesecake ahead of time?
Absolutely! Cheesecakes often taste even better the next day as the flavors have more time to meld. You can prepare this Black Forest Cheesecake 1-2 days in advance and store it, covered, in the refrigerator until ready to serve. This also helps ensure a perfectly firm texture.
How do I prevent cracks in my cheesecake?
To prevent cracks, ensure all cream cheese is at room temperature before mixing to avoid over-beating, which incorporates too much air. Bake gently, and allow the cheesecake to cool slowly. Turning off the oven and letting the cheesecake cool inside with the door slightly ajar can significantly help. Avoid sudden temperature changes.


What type of cherries are best for the topping?
While canned cherry pie filling is convenient and works wonderfully, you can also make your own topping using fresh or frozen tart cherries. Simply simmer the cherries with a little sugar and cornstarch until thickened for a homemade touch. A splash of kirsch (cherry liqueur) can enhance the authentic Black Forest flavor.

Black Forest Cheesecake Symphony
- Total Time: 7 hours (includes chilling)
- Yield: 12 servings 1x
- Diet: Vegetarian
Description
A decadent dessert combining rich chocolate cheesecake with a luscious cherry topping and fluffy whipped cream, all atop a chocolate cookie crust.
Ingredients
1½ cups chocolate cookie crumbs (e.g., Oreo, without filling)
¼ cup granulated sugar
6 tablespoons unsalted butter, melted
3 (8-ounce) packages cream cheese, softened
1½ cups granulated sugar
½ cup unsweetened cocoa powder
4 large eggs, room temperature
½ cup sour cream, room temperature
1 teaspoon vanilla extract
1 (21-ounce) can cherry pie filling
1½ cups heavy cream, very cold
¼ cup powdered sugar
½ teaspoon vanilla extract
2 ounces chocolate, shaved or grated, for garnish
Instructions
Step 1: Preheat your oven to 350°F (175°C). Lightly grease a 9-inch springform pan. Wrap the bottom and sides of the springform pan with heavy-duty aluminum foil to prevent any water bath leakage (if using, otherwise for easier handling).
Step 2: For the crust, combine chocolate cookie crumbs and ¼ cup granulated sugar in a medium bowl. Pour in the melted butter and mix until crumbs are thoroughly moistened. Press the mixture evenly into the bottom of the prepared springform pan. Bake for 8-10 minutes, then remove and let cool slightly.
Step 3: Reduce oven temperature to 325°F (160°C).
Step 4: In a large mixing bowl, beat the softened cream cheese with 1½ cups granulated sugar until smooth and creamy, scraping down the sides of the bowl as needed.
Step 5: Gradually beat in the cocoa powder until fully incorporated and no streaks remain.
Step 6: Add the eggs one at a time, beating on low speed just until each egg is combined. Do not overmix.
Step 7: Stir in the sour cream and 1 teaspoon vanilla extract until just blended.
Step 8: Pour the cheesecake filling over the cooled crust in the springform pan. If using a water bath, carefully place the foil-wrapped springform pan into a larger roasting pan, and add hot water to the roasting pan until it reaches halfway up the sides of the springform pan.
Step 9: Bake for 55-65 minutes, or until the edges are set and the center slightly jiggles when gently shaken. Turn off the oven, crack the door open, and let the cheesecake cool in the oven for 1 hour.
Step 10: Remove the cheesecake from the oven and water bath (if used), unwrap the foil, and let cool completely on a wire rack. Once cool, cover loosely with plastic wrap and refrigerate for at least 4-6 hours, or preferably overnight.
Step 11: Once chilled, carefully remove the sides of the springform pan. Spread the cherry pie filling evenly over the top of the cheesecake.
Step 12: For the whipped cream topping, in a large, very cold mixing bowl, beat the heavy cream, powdered sugar, and ½ teaspoon vanilla extract on high speed until stiff peaks form.
Step 13: Pipe or spread the whipped cream around the edge of the cheesecake, or completely cover the cherry topping. Garnish with chocolate shavings or grated chocolate before serving.
Notes
For an extra touch of Black Forest flavor, you can add a tablespoon of kirsch (cherry liqueur) to the cherry pie filling or fold it into the whipped cream. Ensure your cream cheese is very soft; taking it out of the fridge at least 2 hours before baking is recommended.
- Prep Time: 30 minutes
- Cook Time: 1 hour
- Category: Dessert
- Method: Baking, Chilling
- Cuisine: American, German-inspired
Nutrition
- Serving Size: 1 slice
- Calories: 480 kcal
- Sugar: 40g
- Sodium: 210mg
- Fat: 28g
- Saturated Fat: 17g
- Unsaturated Fat: 9g
- Trans Fat: 0g
- Carbohydrates: 55g
- Fiber: 2g
- Protein: 7g
- Cholesterol: 120mg
Related posts:
 The Ultimate Reese's Peanut Butter Poke Cake: Decadent & Easy
 Irresistible Peach Cobbler Donut Hand Pies: Your New Favorite Dessert!
 Irresistible Butterscotch Bars with Butterscotch Chips: Your New Favorite Easy Dessert!
 Irresistible Pistachio Pudding Sugar Cookie Bars: Your New Favorite Green Treat!

Leave a Reply