
Introduction to Bunny Butt Cookies
Bunny Butt Cookies are the ultimate way to bring a smile to your guests' faces during the spring season. These charming treats have become a viral sensation for a reason: they perfectly blend the nostalgia of a classic sugar cookie with the playful spirit of Easter morning. Whether you are hosting a large family gathering or just looking for a fun weekend project with the kids, these cookies provide the perfect canvas for creativity. The combination of a buttery base, soft marshmallow textures, and the slight crunch of shredded coconut makes for a multi-sensory experience that delights both children and adults alike.
Creating Bunny Butt Cookies requires a bit of patience during the decorating phase, but the results are undeniably worth the effort. There is something profoundly joyful about seeing a platter full of little rabbits 'diving' into a field of green frosting or coconut grass. This recipe focuses on a sturdy yet tender cookie base that won't crumble under the weight of the decorations, ensuring your bunnies look perfect from the oven to the dessert table. As we dive into this guide, we will explore the nuances of cookie chemistry and the best techniques for achieving that iconic fluffy tail look.
Why You’ll Love It
You will absolutely adore these Bunny Butt Cookies because they offer a unique combination of visual appeal and classic flavor. While many holiday treats prioritize looks over taste, this recipe ensures the cookie itself is a standout, using high-quality vanilla and almond extracts for a professional finish. Furthermore, these cookies are incredibly photogenic, making them a hit on social media and a great conversation starter at any potluck. The decorating process is also an excellent way to bond with family members, as even young children can help with the marshmallow feet or the coconut tails.
Another reason to love these Bunny Butt Cookies is their versatility. While they are naturally associated with Easter, the techniques learned here can be applied to various animal-themed treats throughout the year. The soft, pillowy marshmallows used for the feet add a delightful chewiness that contrasts beautifully with the crisp edges of the sugar cookie. If you enjoy making themed desserts, you might also find inspiration in The Most Magical Easter Sugar Cookies: Soft, Pillowy, and Irresistible or perhaps try a shortcut with The Most Magical & Chewy Easter Cake Mix Cookies That Will Melt Your Soul for your next event.
The Rich Tradition of Easter Baking
Baking for the spring equinox and Easter has roots that stretch back centuries. Traditionally, these celebrations involved heavy breads and symbolic shapes representing new life, such as eggs and lambs. The bunny, or Easter Hare, became a popular motif in the 17th century, symbolizing fertility and the arrival of spring. Over time, these symbols transitioned from savory breads to sweet pastries and eventually to the creative Bunny Butt Cookies we see today. In modern baking, the focus has shifted toward 'deconstructed' designs that emphasize a sense of humor and modern aesthetics.
Understanding the cultural significance of the rabbit in spring lore adds an extra layer of appreciation when you prepare Bunny Butt Cookies. It is a nod to the changing of the seasons and the simple joys of nature. When you present these cookies, you are participating in a long lineage of bakers who have sought to capture the essence of spring through flour, sugar, and heat. The evolution of the 'bunny butt' design specifically highlights the playful, less formal side of contemporary pastry art, moving away from stiff, ornate icing toward something tactile and interactive.
The Science of the Perfect Cookie Base
To ensure your Bunny Butt Cookies are successful, you must understand the role of fats and sugars in the baking process. Using unsalted butter at cool room temperature is critical; if the butter is too soft, the cookies will spread too much in the oven, losing the circular shape needed for the bunny's body. According to the principles of Sugar Cookie chemistry, the creaming process aerates the butter, creating tiny pockets of air that expand when heated. This gives the cookie its characteristic rise without needing excessive leavening agents.
The ratio of flour to moisture is also paramount for Bunny Butt Cookies. We use a higher protein all-purpose flour to provide enough structure to support the decorations. When you add the egg and extracts, you are introducing emulsifiers that bind the fat and water together, creating a smooth, workable dough. Over-mixing once the flour is added can lead to excess gluten development, making the cookies tough rather than tender. Aim for a dough that is just combined—this will ensure that every bite of your Bunny Butt Cookies is melt-in-your-mouth perfection.
Mastering the Marshmallow Decorating Technique
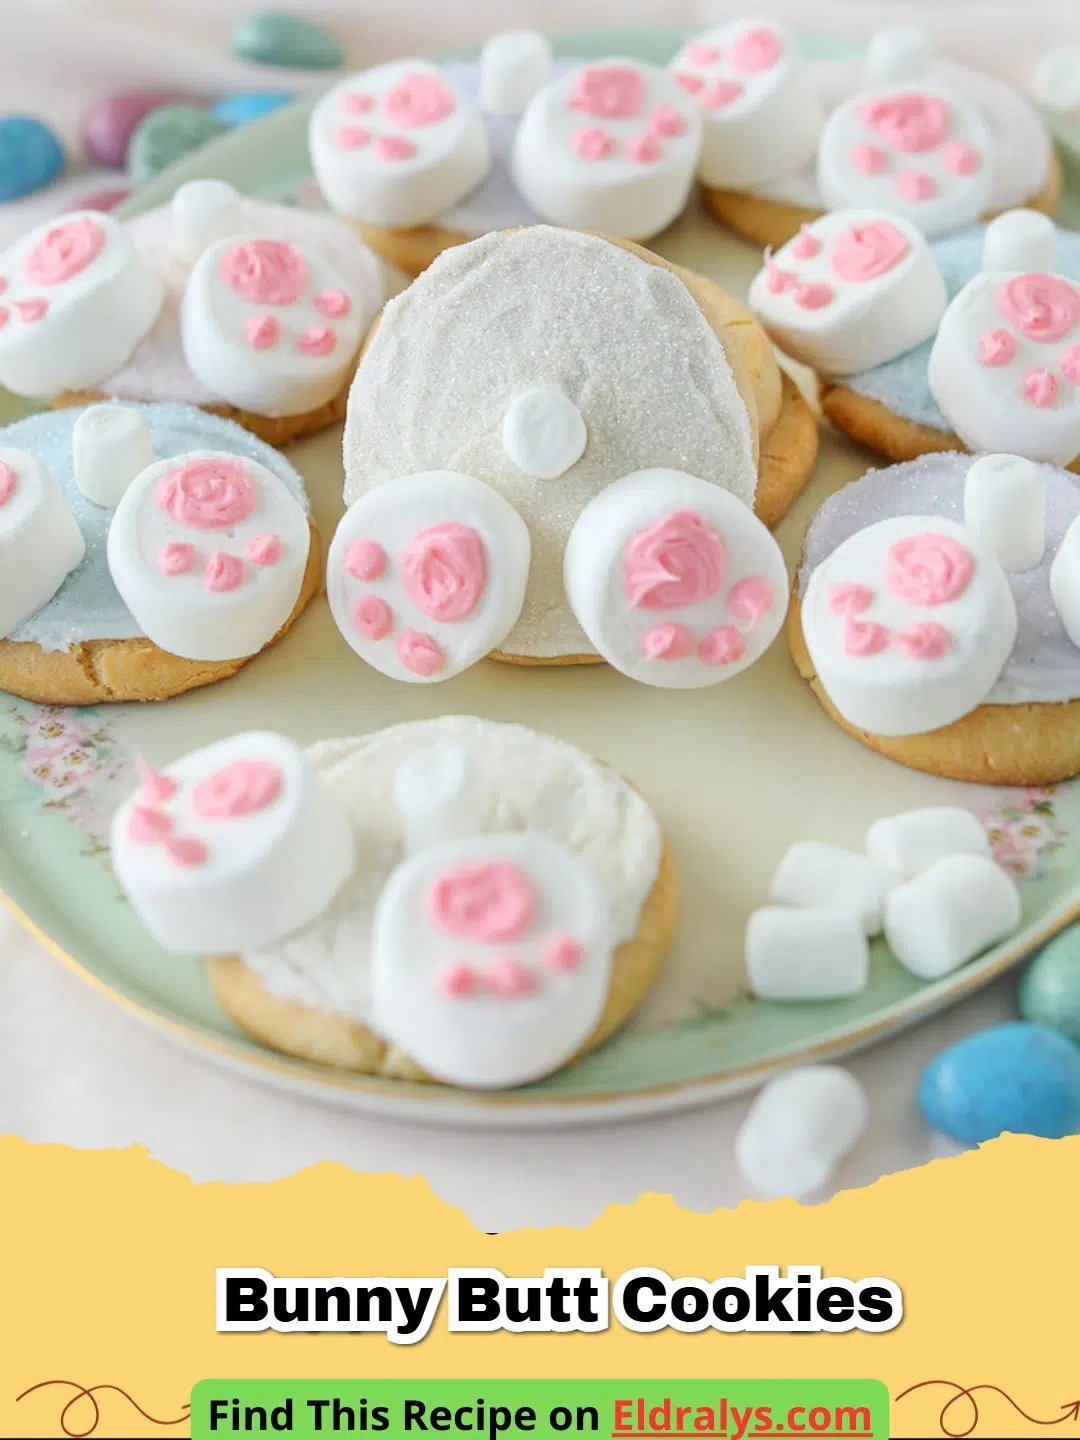
The defining feature of Bunny Butt Cookies is the adorable pair of feet poking out from the back. To achieve this, we use standard marshmallows cut in half. The sticky interior of the cut marshmallow serves as the perfect surface for attaching the 'pads' of the feet. You can use pink decorating gel or small pieces of pink fondant to create the toes. The key is scale; the feet should be large enough to be noticed but not so large that they overshadow the cookie body itself.
When assembling your Bunny Butt Cookies, timing is everything. If you apply the marshmallows while the cookies are still slightly warm, the bottoms will melt just enough to create a natural bond. However, be careful not to do this too soon, or the marshmallow will lose its shape entirely. For the tail, a mini marshmallow dipped in white chocolate and then rolled in shredded coconut creates a realistic, fuzzy appearance. This attention to detail is what separates a standard cookie from a masterpiece that will be remembered long after the last crumb is gone.
Ingredients
Gather the following high-quality ingredients to begin your Bunny Butt Cookies journey. Using fresh leavening agents and real butter will significantly impact the final flavor profile.
- 3 cups all-purpose flour
- 1 cup unsalted butter, softened
- 1 cup granulated sugar
- 1 large egg
- 1.5 teaspoons vanilla extract
- 0.5 teaspoon almond extract
- 1 teaspoon baking powder
- 0.5 teaspoon salt
- 12 standard marshmallows (for feet)
- 12 mini marshmallows (for tails)
- 1 cup shredded sweetened coconut
- Pink decorating icing or gel
Notes and Substitutions
If you have a nut allergy, feel free to omit the almond extract and double the vanilla. For a gluten-free version of these Bunny Butt Cookies, use a 1:1 gluten-free baking flour blend. You can also substitute the shredded coconut with white sprinkles if you prefer a different texture for the tails.
Equipment
- Standing mixer or hand mixer
- Large mixing bowl
- Whisk
- Measuring cups and spoons
- Baking sheets
- Parchment paper
- Rolling pin
- Circular cookie cutter (approx 3 inches)
- Piping bags for the pink icing
Instructions
Follow these steps carefully to create your Bunny Butt Cookies. Precision in the baking time is the secret to keeping them soft and white.
- Step 1: Preheat your oven to 350°F (175°C) and line two large baking sheets with parchment paper to prevent sticking.
- Step 2: In a large bowl, whisk together the flour, baking powder, and salt until well combined, then set aside.
- Step 3: Cream the softened butter and granulated sugar together in your mixer on medium-high speed until the mixture is light and fluffy, usually about 3-4 minutes.
- Step 4: Add the egg, vanilla extract, and almond extract to the butter mixture, beating until fully incorporated and smooth.
- Step 5: Gradually add the dry ingredients to the wet ingredients at low speed, mixing until the dough just comes together without overworking it.
- Step 6: Roll the dough out on a floured surface to a thickness of 1/4 inch and use your circular cutter to cut out the cookie bodies.
- Step 7: Place the dough circles on the baking sheets and bake for 8-10 minutes, or until the edges are just set but the cookies remain pale.
- Step 8: While the cookies cool slightly, cut the large marshmallows in half crosswise and pipe three small pink dots for toes and one large pink oval for the heel on the cut side.
- Step 9: Press two marshmallow halves onto the lower half of each warm cookie to form the feet.
- Step 10: Dip a mini marshmallow into a bit of frosting, roll it in shredded coconut, and press it above the feet to create the fluffy tail.
Pro Tips for Success
To keep your Bunny Butt Cookies looking professional, ensure your dough is chilled for at least 30 minutes before rolling. This prevents the cookies from losing their circular shape. When decorating, use a toothpick to help place the pink gel dots if the piping bag is too difficult to control. If the marshmallows aren't sticking well, a tiny dot of melted white chocolate acts as a powerful 'glue'. Always let the cookies cool completely on a wire rack before moving them into storage containers, as residual steam can make the marshmallow feet soggy. Finally, toast your coconut slightly if you want a 'brown bunny' variation for added flavor and visual depth.


Serving, Storage & Variations
Serve your Bunny Butt Cookies on a platter of green-tinted coconut to mimic grass for a beautiful display. These treats are best enjoyed within 3 days but can be stored in an airtight container for up to a week. For a fun variation, you can dye the cookie dough pastel colors using food coloring before baking. Another popular twist is to use chocolate sugar cookies for 'muddy' bunnies, which pairs excellently with the white coconut tails. If you are shipping these, ensure they are packed tightly with parchment separators to protect the delicate marshmallow feet. These cookies also freeze well; just bake the base and freeze, then decorate once thawed for the freshest results.
Nutrition Information
| Nutrient | Amount |
|---|---|
| Calories | 285 kcal |
| Protein | 3g |
| Carbohydrates | 42g |
| Fat | 12g |
| Sugar | 22g |
| Sodium | 115mg |
Note: The nutritional information provided is an estimate based on standard ingredients and serving sizes.
Conclusion
Making Bunny Butt Cookies is a delightful way to celebrate the spirit of spring and show off your baking creativity. These cookies are guaranteed to be the star of your Easter basket or dessert table, offering a perfect blend of cute aesthetics and delicious, buttery flavor. By following our pro tips and using high-quality ingredients, you can ensure that your holiday treats are as successful as they are adorable. We hope this guide inspires you to get into the kitchen and start a new baking tradition that your family will cherish for years to come. Happy baking!
FAQs
Can I make Bunny Butt Cookies ahead of time?
Yes, you can bake the sugar cookie base up to 3 days in advance. However, for the best texture and appearance, we recommend adding the marshmallow feet and coconut tails within 24 hours of serving.
How do I get the coconut to stick to the cookie?
The best way to attach the 'tail' is by using a small dab of royal icing or melted white chocolate. Simply dip a small marshmallow in the icing, then into the shredded coconut before pressing it onto the cookie.
What is the best way to store these cookies?
Store your cookies in a single layer in an airtight container at room temperature. If you must stack them, place a sheet of parchment paper between the layers to prevent the decorations from smudging.

Festive Bunny Butt Cookies
- Total Time: 55 minutes
- Yield: 24 cookies 1x
- Diet: Vegetarian
Description
An adorable and delicious Easter sugar cookie decorated with marshmallow feet and a coconut tail.
Ingredients
3 cups all-purpose flour
1 cup unsalted butter, softened
1 cup granulated sugar
1 large egg
1.5 teaspoons vanilla extract
0.5 teaspoon almond extract
1 teaspoon baking powder
0.5 teaspoon salt
12 standard marshmallows
12 mini marshmallows
1 cup shredded sweetened coconut
Pink decorating icing
Instructions
Step 1: Preheat oven to 350°F and line baking sheets with parchment paper.
Step 2: Whisk together flour, baking powder, and salt in a medium bowl.
Step 3: Cream butter and sugar until light and fluffy.
Step 4: Mix in the egg and extracts until smooth.
Step 5: Gradually blend in dry ingredients until dough forms.
Step 6: Roll dough to 1/4 inch thickness and cut into 3-inch circles.
Step 7: Bake for 8-10 minutes and cool slightly on the pan.
Step 8: Cut marshmallows in half and decorate with pink icing to look like paws.
Step 9: Attach marshmallow feet and coconut-covered mini marshmallow tails to the cookies.
Notes
Ensure cookies are slightly warm when attaching marshmallows for a better bond.
- Prep Time: 45 minutes
- Cook Time: 10 minutes
- Category: Dessert
- Method: Baking
- Cuisine: American
Nutrition
- Serving Size: 1 cookie
- Calories: 285 kcal
- Sugar: 22g
- Sodium: 115mg
- Fat: 12g
- Saturated Fat: 7g
- Unsaturated Fat: 4g
- Trans Fat: 0g
- Carbohydrates: 42g
- Fiber: 1g
- Protein: 3g
- Cholesterol: 35mg
Related posts:
 The Ultimate Cowboy Steak with Truffle Honey Butter That Will Melt Your Heart
 The Most Irresistible Honey Garlic Steak Bites That Will Melt Your Heart
 The Most Divine High Protein Sugar-Free Monkey Bread That Will Melt Your Soul
 The Most Legendary Authentic Thai Crying Tiger (Sua Rong Hai) Steak Recipe That Will Heal Your Soul

Leave a Reply