
Introduction to the Perfect Snack
Burger bombs are the ultimate snack for anyone who believes that a cheeseburger is more than just a meal; it is an emotional experience. These handheld delights take all the classic components of a juicy cheeseburger and encapsulate them inside a soft, pillowy dough that acts as a vessel for pure flavor. Imagine biting into a warm roll only to find a molten core of cheddar cheese and savory, perfectly seasoned ground beef. This recipe for burger bombs has become a staple at tailgates, birthday parties, and quiet Friday nights alike because it combines convenience with high-impact flavor profiles. Whether you are a novice in the kitchen or a seasoned home chef, mastering the art of the stuffed burger snack is a guaranteed way to win over any crowd. The magic lies in the contrast between the crispy, golden exterior and the succulent, flavorful interior that explodes with every bite.
Why You’ll Love It
You will absolutely fall in love with these burger bombs because they offer a unique twist on the traditional burger without the mess of buns and toppings sliding around. They are incredibly versatile, allowing you to customize the filling to suit your personal preferences, whether you want to add bacon, jalapeños, or even mushrooms. Additionally, the portability of burger bombs makes them the perfect appetizer for gatherings where people are mingling and standing. They pack a massive amount of protein and comfort into a small package, making them satisfying enough for a main course or light enough for a snack. The garlic parmesan glaze on top adds a layer of sophisticated flavor that elevates the dish from simple finger food to a gourmet experience. It is a nostalgic meal that brings back memories of backyard BBQs but with a modern, convenient twist that fits into any lifestyle.
The Cultural Evolution of Handheld Stuffed Foods
The concept of stuffing meat into dough is not new; it traces back centuries through various cultures across the globe. From the Cornish pasty to the South American empanada, humans have always sought ways to make meat more portable. These modern burger bombs are essentially the American evolution of this ancient tradition, combining the beloved flavors of the hamburger with the ease of a pocket sandwich. The history of the hamburger itself is a journey through industrialization and fast-food culture, but the bomb version brings it back to the home kitchen. It represents a shift toward appetizers that can be prepared in bulk and served without the need for utensils. By merging the techniques of baking and grilling, we create a hybrid dish that satisfies both the craving for bread and the desire for high-quality protein. This evolution is a testament to the creativity of home cooks who want to maximize taste while minimizing cleanup time.
Selecting the Perfect Ingredients for Success
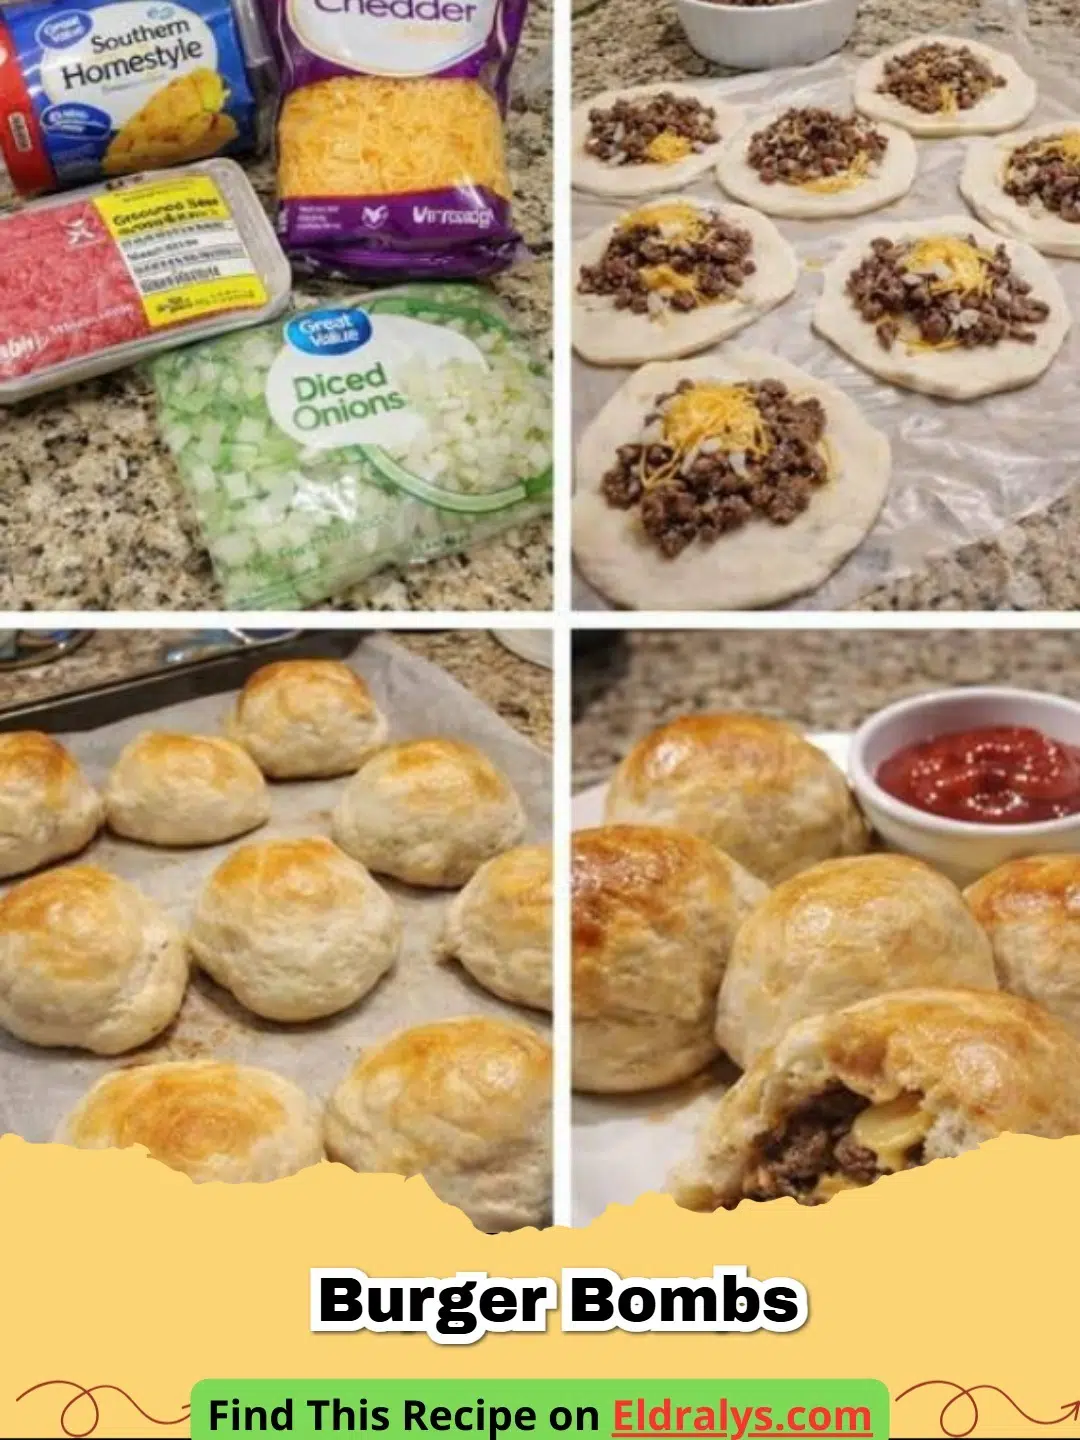
To ensure your burger bombs reach their full potential, you must start with the highest quality ingredients. The beef should ideally be a 80/20 ground chuck blend to ensure enough fat for a juicy interior without making the dough soggy. If you prefer a lighter option, ground turkey or even a plant-based substitute can be used, though you may need to adjust the seasoning to compensate for the leaner profile. For the cheese, a sharp cheddar provides the best flavor contrast, but pepper jack is excellent for those who crave a bit of heat. The dough is another critical component; while refrigerated biscuits are the quickest route, using a cold-fermented pizza dough can provide a chewier, more satisfying texture. Don't forget the aromatics like garlic and onions, which provide a foundational depth of flavor that carries the beef. Every ingredient plays a role in creating that perfect balance of salt, fat, and acidity that makes this dish so memorable.
Ingredients
For this recipe, you will need 1 pound of lean ground beef, 1 tablespoon of olive oil, and half of a small yellow onion, finely diced. You will also require 2 cloves of minced garlic, 1 teaspoon of Worcestershire sauce, and a teaspoon each of salt and black pepper. For the casing, use 2 cans of refrigerated large biscuits (usually 8 per can) or 1 pound of pizza dough. For the cheesy center, use 8 ounces of sharp cheddar cheese cut into small cubes. To finish the burger bombs, prepare a glaze using 4 tablespoons of melted unsalted butter, 1 teaspoon of garlic powder, and 2 tablespoons of freshly grated parmesan cheese. You may also include a teaspoon of dried parsley for color and a touch of herbal notes.
Notes and Substitutions
If you find yourself without canned biscuits, you can use frozen dinner rolls that have been thawed and slightly risen. For a low-carb alternative, consider wrapping the filling in large cabbage leaves or using a keto-friendly fathead dough. You can also swap the cheddar for mozzarella if you are looking for a more neutral cheese pull, similar to what you might find in The Most Irresistible Garlic Parmesan Cheeseburger Bombs That Will Melt Your Heart. If you want a smokier flavor, add a drop of liquid smoke or a teaspoon of smoked paprika to the beef mixture during the browning process.
Equipment
To make this recipe successfully, you will need a large non-stick skillet to brown the beef and a colander to drain any excess grease. A large rimmed baking sheet lined with parchment paper or a silicone mat is essential to prevent sticking. You will also need a small mixing bowl for the glaze and a pastry brush to apply the garlic parmesan butter. A sharp knife for dicing the cheese and onions is also required.
Mastering the Wrapping Technique
The most common mistake when making burger bombs is not sealing the dough properly, leading to cheese leakage during the baking process. To prevent this, ensure that your beef filling is completely cooled before placing it on the raw dough. Heat causes the dough to soften and tear, making it difficult to pinch together. When you place the cube of cheese and the meat on the dough circle, gather the edges and pull them toward the center. Twist the gathered dough slightly and press it firmly into the base of the bomb. Always place the burger bombs seam-side down on the baking sheet to use the weight of the ball to help seal the bottom. This ensures that the pressure from the steam and melting cheese stays contained, resulting in a perfect, uniform shape. Practicing this pinch-and-twist method will make your appetizers look professional and keep all that delicious filling inside where it belongs.
Instructions
- Step 1: Preheat your oven to 375°F (190°C) and line a large baking sheet with parchment paper or a silicone baking mat to ensure your burger bombs don't stick.
- Step 2: In a large skillet over medium-high heat, add the olive oil and sauté the finely diced onions for 3-4 minutes until they are translucent and soft.
- Step 3: Add the ground beef to the skillet and cook until it is fully browned, breaking it up into small crumbles with a spatula as it cooks.
- Step 4: Stir in the minced garlic, Worcestershire sauce, salt, and pepper, then continue cooking for another 2 minutes before removing the pan from the heat.
- Step 5: Drain the beef mixture thoroughly in a colander and let it cool for at least 10 minutes; this prevents the dough from becoming too soft to handle.
- Step 6: Flatten each biscuit or piece of dough into a 4-inch circle, then place a tablespoon of the beef mixture and a cube of cheddar cheese in the center of each.
- Step 7: Carefully gather the edges of the dough and pinch them together to seal the filling inside, then place the burger bombs seam-side down on the prepared baking sheet.
- Step 8: In a small bowl, whisk together the melted butter, garlic powder, parmesan cheese, and dried parsley, then brush this mixture generously over the top of each bomb.
- Step 9: Bake for 12-15 minutes or until the tops are a deep golden brown and the dough is cooked through.
- Step 10: Remove from the oven and allow them to rest for 5 minutes before serving so the cheese can set slightly.
Pro Tips
For the best results with your burger bombs, always make sure the ground beef is as dry as possible after cooking; excess moisture or grease will create steam inside the dough, which can lead to blowouts. If you are using store-bought dough, keep it in the refrigerator until the exact moment you are ready to stuff it, as cold dough is much easier to manipulate. To achieve an even more intense flavor, try brushing the bombs with the garlic butter halfway through the baking time as well as before they go in. For those who enjoy a bit of crunch, you can sprinkle a few sesame seeds on top of the glaze to mimic a traditional burger bun. Finally, if you are a fan of the classic burger experience, try serving these alongside The Ultimate Juicy Classic Cheeseburger at your next party for a fun comparison of styles.
Perfect Pairings: Dips and Sides
While burger bombs are spectacular on their own, they truly shine when paired with the right condiments. A classic fry sauce—made from mayonnaise, ketchup, and a splash of pickle brine—is a fantastic dipping option that reinforces the burger theme. For a more sophisticated palate, try a spicy sriracha aioli or a tangy honey mustard dip. If you are serving these as a full meal, a side of crispy sweet potato fries or a fresh garden salad can provide a nice textural contrast. Pickles are also a natural companion; whether they are sliced and served on the side or diced and mixed directly into the beef filling, they add a necessary acidity that cuts through the richness of the cheese and beef. For drinks, a cold craft beer or a zesty lemonade pairs perfectly with the savory, salty notes of the garlic and parmesan.
Serving, Storage & Variations
Serve your burger bombs while they are still warm to ensure the cheese is at its peak meltiness. If you have leftovers, they can be stored in an airtight container in the refrigerator for up to 3 days. To reheat, avoid the microwave if possible, as it can make the dough chewy; instead, place them in a 350°F oven for 5-7 minutes to restore the crispy exterior. For a variation, try the "Bacon Blue" version by replacing the cheddar with blue cheese crumbles and adding cooked bacon bits to the beef. Another popular twist is the "Pizza Bomb," using pepperoni, mozzarella, and a side of marinara sauce. You can also experiment with different glazes, such as an everything bagel seasoning or a spicy buffalo butter, to keep the recipe fresh and exciting for your family.
Nutrition Information
| Nutrient | Amount |
|---|---|
| Calories | 385 kcal |
| Protein | 18g |
| Carbohydrates | 24g |
| Fat | 22g |
Note: The nutritional information provided above is an estimate based on standard ingredient portions and may vary depending on the specific brands or substitutions used.


Conclusion
Mastering the recipe for burger bombs is a fantastic way to bring the joy of a backyard barbecue into a convenient, bite-sized format. These savory treats are sure to be the star of your next gathering, offering a perfect balance of textures and flavors that appeal to all ages. By following the tips regarding dough handling and beef preparation, you can create a professional-grade appetizer in your own kitchen. We hope you enjoy making and eating these as much as we do. Happy cooking, and don't forget to share your favorite variations with your friends and family!
FAQs
Can I make burger bombs in an air fryer?
Yes, you can cook them at 350u00b0F (175u00b0C) for about 8-10 minutes or until the dough is golden brown and the internal cheese is fully melted.
What type of dough is best for this recipe?
Store-bought refrigerator biscuit dough or pizza dough works best for convenience, but homemade yeast dough provides a superior artisan texture.
Can I freeze burger bombs before baking?
Absolutely! Assemble the bombs and freeze them on a baking sheet before transferring them to a freezer bag. Bake from frozen, adding an extra 5-7 minutes to the cook time.

Garlic Parmesan Burger Bombs
- Total Time: 35 minutes
- Yield: 16 bombs 1x
- Diet: High-Protein
Description
A savory handheld appetizer featuring seasoned ground beef and melted cheddar cheese wrapped in buttery garlic dough.
Ingredients
1 lb ground beef (80/20 mix)
1/2 small yellow onion, finely diced
2 cloves garlic, minced
1 tsp Worcestershire sauce
1 tsp salt
1 tsp black pepper
2 cans (16.3 oz each) refrigerated biscuits
8 oz sharp cheddar cheese, cubed
4 tbsp unsalted butter, melted
1 tsp garlic powder
2 tbsp grated parmesan cheese
1 tsp dried parsley
Instructions
Step 1: Preheat oven to 375°F (190°C) and line a baking sheet with parchment paper.
Step 2: In a skillet, brown the ground beef with onions over medium-high heat until no longer pink.
Step 3: Stir in garlic, Worcestershire sauce, salt, and pepper; cook for 2 minutes, then drain thoroughly.
Step 4: Flatten each biscuit into a circle. Place a tablespoon of beef and a cube of cheese in the center.
Step 5: Pinch the edges of the dough together to seal and place seam-side down on the baking sheet.
Step 6: Mix melted butter, garlic powder, parmesan, and parsley; brush over the bombs.
Step 7: Bake for 12-15 minutes until golden brown and serve warm.
Notes
Ensure the meat is fully drained to prevent the dough from getting soggy.
- Prep Time: 20 minutes
- Cook Time: 15 minutes
- Category: Appetizer
- Method: Baking
- Cuisine: American
Nutrition
- Serving Size: 2 bombs
- Calories: 385 kcal
- Sugar: 3g
- Sodium: 650mg
- Fat: 22g
- Saturated Fat: 11g
- Unsaturated Fat: 9g
- Trans Fat: 0g
- Carbohydrates: 24g
- Fiber: 1g
- Protein: 18g
- Cholesterol: 55mg


Leave a Reply