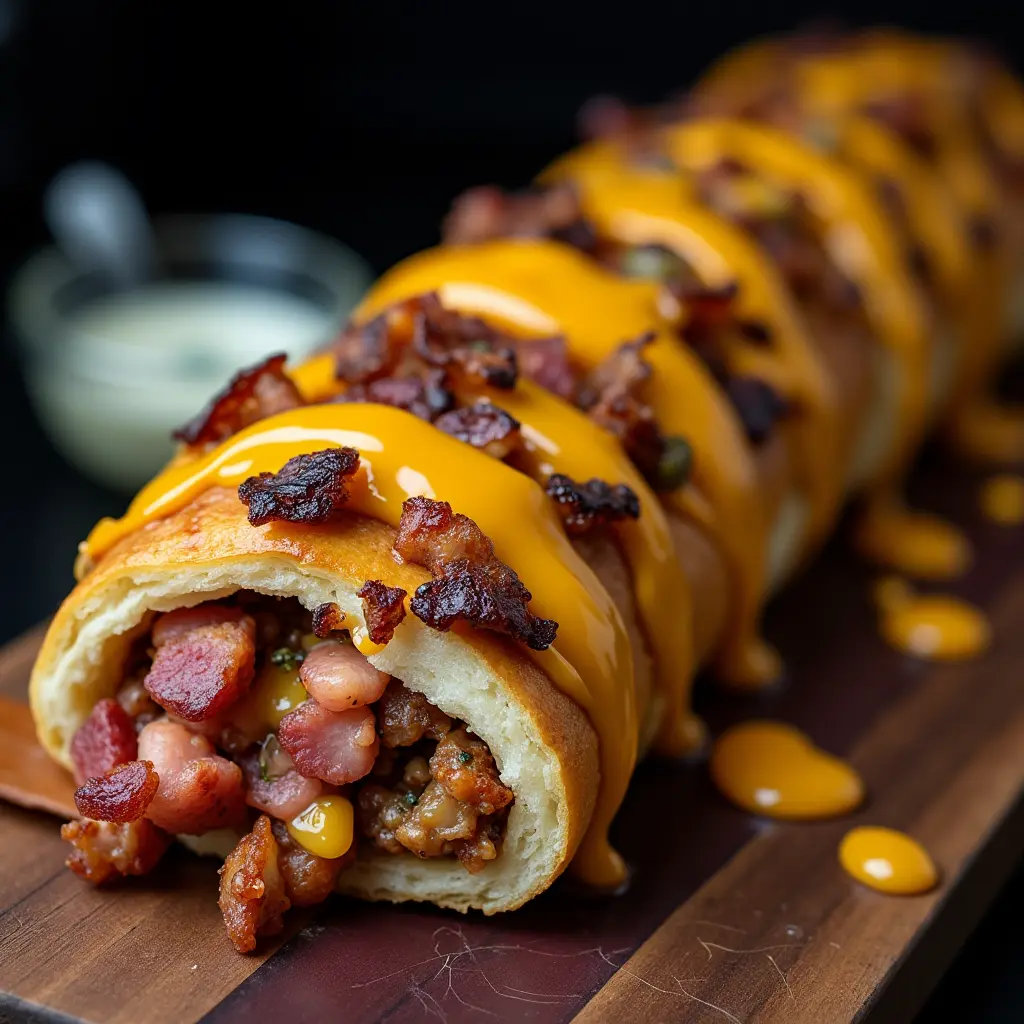
Are you ready for a taste sensation that brings together all the best elements of a juicy cheeseburger, crispy bacon, and warm, garlicky bread? Look no further than these incredible Garlic Butter Bacon Cheeseburger Rollups! They are a fantastic way to enjoy a classic flavor profile in a fun, shareable package, making them perfect for any gathering, game day, or a playful family dinner.
Imagine flaky crescent roll dough, golden-brown and glistening with savory garlic butter, encasing a hearty filling of seasoned ground beef, melty cheddar cheese, and bits of smoky bacon. Each bite is a delightful explosion of flavor and texture that will have everyone reaching for another. This recipe is designed to be straightforward and rewarding, ensuring you get maximum deliciousness with minimal fuss.
Why You'll Love These Cheeseburger Rollups
These rollups aren't just delicious; they're also incredibly versatile and easy to make, fitting perfectly into a busy weeknight or a relaxed weekend get-together. Here's why they're sure to become a new favorite:
- Quick & Convenient: With simple ingredients and minimal prep, these come together in under 30 minutes.
- Packed with Flavor: The combination of seasoned beef, sharp cheddar, savory bacon, and aromatic garlic butter is simply irresistible.
- Crowd-Pleaser: They're an instant hit at parties, potlucks, or as a fun appetizer for movie night. Everyone loves a good cheeseburger in a bite-sized form!
- Customizable: Easily adapt the filling to suit your taste preferences.
Essential Ingredients for Your Rollups
You'll be amazed at how a few pantry staples can create such an extraordinary dish. Here's what you'll need:
- 1 lb ground beef
- 1 cup shredded cheddar cheese
- 1/2 cup cooked bacon, chopped (about 4-6 slices)
- 1 tablespoon Worcestershire sauce
- 1 teaspoon garlic powder
- Salt and pepper to taste
- 1 can (8 oz) refrigerated crescent roll dough
- 1/4 cup unsalted butter, melted
- 2 cloves garlic, minced
- Optional: chopped fresh parsley for garnish
For best results, make sure your bacon is nice and crispy before chopping it. The texture contrast adds so much to the rollups!
Step-by-Step Guide to Perfection
Let's get cooking! Follow these easy steps to create your own batch of Garlic Butter Bacon Cheeseburger Rollups:
Step 1: Preheat Your Oven
Preheat your oven to 375°F (190°C). Line a baking sheet with parchment paper for easy cleanup. This prevents sticking and makes transfer simple.
Step 2: Brown the Ground Beef
In a large skillet over medium heat, cook the ground beef until it's fully browned and no pink remains, which usually takes about 5-7 minutes. Once cooked, be sure to drain any excess grease to prevent soggy rollups.
Step 3: Season the Beef
Remove the skillet from the heat. Stir in the Worcestershire sauce, garlic powder, and a generous pinch of salt and pepper to taste. Allow the mixture to cool slightly – this helps the cheese melt properly and prevents the crescent dough from tearing when filling.
Step 4: Combine Filling Ingredients
In a mixing bowl, combine the cooled seasoned beef mixture with the shredded cheddar cheese and chopped bacon. Mix everything thoroughly until all components are well distributed. For another savory meal idea featuring ground beef, check out our Cheesy Ground Beef and Rice Casserole for Family Dinners.
Step 5: Prepare the Crescent Rolls
Unroll the can of crescent roll dough on your prepared baking sheet or a clean work surface. Separate the dough into individual triangles. If you prefer a more seamless rollup, you can pinch the perforated seams together to form solid rectangles.
Step 6: Fill and Roll
Place a generous spoonful of the beef, bacon, and cheese mixture onto the wide end of each crescent roll triangle. Carefully roll up the dough tightly, starting from the wide end and moving towards the point. This ensures a secure rollup that holds all that delicious filling.
Step 7: Make the Garlic Butter
In a small microwave-safe bowl, melt the unsalted butter. Mince two cloves of fresh garlic and stir them into the melted butter. This fragrant garlic butter is key to the rollups' amazing flavor and golden crust.
Step 8: Brush and Bake
Arrange the filled rollups on your prepared baking sheet. Using a pastry brush, generously coat the tops of each rollup with the garlic butter mixture. Bake in the preheated oven for 12-15 minutes, or until they turn a beautiful golden brown and the filling is bubbly. For more garlic-infused goodness, try these Garlic Butter Steak Bites & Spicy Cajun Alfredo Twisted Pasta.
Step 9: Cool and Serve
Once baked, let the rollups cool on the baking sheet for a few minutes before serving. This allows the cheese to set slightly, making them easier to handle. Garnish with fresh chopped parsley if desired for a touch of color. Enjoy your irresistible garlic butter bacon cheeseburger rollups!
Tips and Variations
- Cheese Swaps: Experiment with different cheeses like pepper jack for a spicy kick, mozzarella for an extra gooey texture, or a sharp provolone.
- Add Veggies: Finely dice some onion, bell pepper, or even mushrooms and sauté them with the ground beef for added flavor and nutrients.
- Spice It Up: A dash of cayenne pepper or a pinch of red pepper flakes in the beef mixture will add a welcome heat.
- Dipping Sauces: While great on their own, these rollups are even better with a variety of dipping sauces. Try a homemade burger sauce, a creamy barbecue ranch, or simply ketchup and mustard. The versatility makes them even more like a classic cheeseburger experience.
Storage and Reheating
Have leftovers? No problem! These rollups store and reheat beautifully:
- Storage: Store any leftover rollups in an airtight container in the refrigerator for up to 3 days.
- Freezing: To freeze, assemble the rollups but do not bake. Place them on a baking sheet and freeze until solid, then transfer to a freezer-safe bag. Bake from frozen at 375°F (190°C), adding about 5-10 extra minutes to the baking time, or until golden brown and heated through.
- Reheating: For best results, reheat baked rollups in the oven at 350°F (175°C) for 10-15 minutes, or in an air fryer at 325°F (160°C) for 5-7 minutes, until warmed through and crispy.
Final Thoughts
These Garlic Butter Bacon Cheeseburger Rollups are a true culinary gem – simple to make, bursting with flavor, and universally loved. Whether you're whipping them up for a party or a family meal, they're guaranteed to impress. Don't hesitate to give this recipe a try; you'll be glad you did!
FAQs
Can I make these Garlic Butter Bacon Cheeseburger Rollups ahead of time?
Yes, you can prepare the filling and assemble the rollups in advance. Store them covered in the refrigerator for up to 24 hours. For best results, brush with garlic butter just before baking.
What are some good dipping sauces for these rollups?
These rollups are fantastic with classic burger condiments like ketchup and mustard, or even a creamy ranch dressing. For a spicy kick, try a sriracha mayo!
Can I add other ingredients to the cheeseburger filling?
Absolutely! Feel free to customize the filling with finely diced pickles, caramelized onions, or a touch of chopped jalapeu00f1os for added flavor and texture. Ensure any additions are finely diced so the rollups stay together.
Garlic Butter Bacon Cheeseburger Rollups
- Total Time: 30 minutes
- Yield: 8 rollups 1x
- Diet: Non-vegetarian
Description
Flaky crescent rolls filled with seasoned ground beef, crispy bacon, and melted cheddar cheese, brushed with aromatic garlic butter, creating a deliciously addictive snack or meal.
Ingredients
1 lb ground beef
1 cup shredded cheddar cheese
1/2 cup cooked bacon, chopped (about 4-6 slices)
1 tablespoon Worcestershire sauce
1 teaspoon garlic powder
Salt and pepper to taste
1 can (8 oz) refrigerated crescent roll dough
1/4 cup unsalted butter, melted
2 cloves garlic, minced
Optional: chopped fresh parsley for garnish
Instructions
Step 1: Preheat your oven to 375°F (190°C). Line a baking sheet with parchment paper for easy cleanup.
Step 2: In a large skillet over medium heat, cook the ground beef until browned and cooked through, about 5-7 minutes. Drain any excess grease.
Step 3: Stir in the Worcestershire sauce, garlic powder, salt, and pepper. Remove from heat and let cool slightly.
Step 4: In a mixing bowl, combine the cooked beef mixture with shredded cheddar cheese and chopped bacon. Mix until well combined.
Step 5: Unroll the crescent roll dough and separate it into triangles. Pinch the seams together to create a solid sheet if using traditional crescent rolls.
Step 6: Place a generous spoonful of the beef mixture at the wide end of each triangle. Roll up tightly, starting from the wide end and rolling toward the point.
Step 7: In a small bowl, mix the melted butter and minced garlic.
Step 8: Place the rollups on the prepared baking sheet. Brush the tops with the garlic butter mixture. Bake in the preheated oven for 12-15 minutes, or until golden brown.
Step 9: Allow the rollups to cool for a few minutes before serving. Garnish with chopped parsley if desired. Enjoy your delicious garlic butter bacon cheeseburger rollups!
Notes
For an extra kick, add a pinch of red pepper flakes to the garlic butter. Serve warm with your favorite dipping sauces like ketchup, mustard, or ranch.
- Prep Time: 15 minutes
- Cook Time: 15 minutes
- Category: Appetizer, Main Course
- Method: Baking
- Cuisine: American
Nutrition
- Serving Size: 1 rollup
- Calories: 350 kcal
- Sugar: 2g
- Sodium: 450mg
- Fat: 25g
- Saturated Fat: 10g
- Unsaturated Fat: 12g
- Trans Fat: 0.5g
- Carbohydrates: 20g
- Fiber: 1g
- Protein: 18g
- Cholesterol: 80mg





Leave a Reply