
Are you following a ketogenic diet but sorely missing the convenience of a good old sandwich? The struggle is real when you're craving something satisfying, quick, and easy to hold, but bread is off-limits. Fear not, fellow keto warriors! Today, we're diving into a culinary revelation that will change your low-carb life: Keto No-Bread Cheese Roll-Ups. These ingenious creations use melted cheese as a flexible, delicious 'wrapper' for all your favorite sandwich fillings, making them the ultimate guilt-free lunch, snack, or even a light dinner.
Why You'll Love These Keto No-Bread Cheese Roll-Ups
Imagine a world where you don't have to sacrifice flavor or convenience to stay in ketosis. These cheese roll-ups offer exactly that. They are:
- Incredibly Easy: With minimal ingredients and straightforward steps, you'll have these ready in under 20 minutes.
- Customizable: The beauty of these roll-ups lies in their versatility. Any deli meat, cheese, or veggie combo you love in a traditional sandwich can find a home here.
- Low-Carb & Keto-Friendly: Say goodbye to carb-heavy bread and hello to savory, fat-fueled goodness that keeps you feeling full and satisfied.
- Portable: Perfect for meal prep, lunchboxes, picnics, or a grab-and-go snack when you're on the move.
What Makes These Roll-Ups a Game Changer for Keto?
Beyond being delightfully delicious, these cheese roll-ups address a common pain point for those on a keto diet: finding quick, satisfying, and portable meals. They leverage the natural properties of cheese – melting into a pliable sheet and firming up as it cools – to create a sturdy, edible wrap. This innovative approach means you get all the flavors and textures of a classic sandwich without any of the added carbs from bread. Plus, mastering your knife skills for perfect deli slices and fresh vegetables is easier with a quality chef's knife, making the prep work a breeze.
Customizable Fillings
Whether you're a fan of classic ham and cheese, a spicy salami and provolone combo, or a turkey and avocado delight, these wraps are your canvas. We'll give you a starting point, but don't hesitate to experiment with your favorites!
Quick & Easy Preparation
Forget complicated baking or elaborate cooking. These roll-ups come together with just a few minutes in the oven and a quick assembly, making them perfect for busy weekdays or impromptu cravings.
Ingredients You'll Need (and Smart Swaps!)
The core of this recipe is simple, focusing on high-quality cheese and your choice of fillings. Here's what you'll typically need:
- Cheese Slices: Colby Jack is fantastic for its melty texture and mild flavor, but cheddar, mozzarella, or provolone work equally well.
- Cooked Bacon: Adds a salty crunch and rich flavor. Pre-cooked bacon makes this even faster!
- Deli Meat: Ham, turkey, or salami are classic choices. Look for low-sodium, high-quality options.
- Fresh Veggies: Crisp lettuce and juicy tomato slices add freshness and a satisfying crunch.
- Optional Dressings: A dab of mayo, mustard, or ranch can elevate the flavor profile.
Feel free to get creative with your fillings! Think sliced avocado, pickles, jalapeños, or a sprinkle of everything bagel seasoning on the cheese before baking for an extra flavor kick.
Step-by-Step Guide: How to Make Keto No-Bread Cheese Roll-Ups
Ready to transform simple cheese into a marvelous meal? Follow these easy steps for perfect roll-ups every time.
Preparing Your Cheese Base
The secret to a great cheese roll-up is starting with a perfectly melted cheese sheet. Laying the slices slightly overlapping ensures they meld into one cohesive piece.
The Perfect Bake
Baking the cheese at the right temperature for just enough time is crucial. You want it melted, slightly golden, and pliable, not crispy (unless that's what you're going for!).
Filling & Rolling Your Masterpiece
Timing is key here! You want the cheese warm enough to be flexible but cool enough to handle. Don't be afraid to experiment with how you layer your fillings.
Tips for the Best Keto Cheese Roll-Ups
- Parchment Paper is Your Friend: Seriously, don't skip it! It prevents sticking and makes transferring the cheese a breeze.
- Don't Overbake: Watch your cheese carefully. You want it melted and slightly bubbly, not fully crisped into a cracker (unless, again, that's your goal!).
- Cool Slightly: Letting the cheese cool for a couple of minutes makes it easier to handle and less likely to break when rolling.
- Layer Smart: Place sturdier fillings (like deli meat) first, then softer ones (like lettuce and tomato) to help maintain the roll's structure.
- Roll Tightly: A snug roll keeps everything together beautifully.
Serving Suggestions & Pairings
These versatile roll-ups are fantastic on their own, but they also pair wonderfully with other keto-friendly sides:
- A crisp side salad with a vinaigrette dressing.
- A bowl of low-carb soup.
- Fresh vegetable sticks like cucumber, bell peppers, or celery with a creamy dip.
- Some olives or pickles for an extra tangy bite.
Storage Tips
While best enjoyed fresh, you can prepare these roll-ups a few hours ahead of time. Store them wrapped tightly in plastic wrap or in an airtight container in the refrigerator. If making ahead, consider adding very wet ingredients like tomato right before serving to prevent sogginess. The cheese may firm up significantly when cold, but it's still delicious!


Frequently Asked Questions (FAQ)
We've answered some common questions about making these delicious Keto No-Bread Cheese Roll-Ups.
Ready to ditch the bread and embrace a world of savory, satisfying low-carb goodness? These Keto No-Bread Cheese Roll-Ups are about to become your new go-to. Easy, versatile, and incredibly tasty, they prove that eating keto can be exciting and convenient. Happy rolling!
FAQs
What kind of cheese is best for Keto No-Bread Cheese Roll-Ups?
Colby Jack is a fantastic choice for its melty texture and mild flavor. However, cheddar, mozzarella, or provolone slices also work wonderfully, so feel free to use your favorite or what you have on hand!
Can I make these cheese roll-ups ahead of time?
Yes, you can! These roll-ups are best enjoyed fresh, but you can prepare them a few hours in advance. Store them wrapped tightly in plastic wrap or in an airtight container in the refrigerator. For best results, add very wet fillings like tomato just before serving to prevent sogginess.
What are some good variations for fillings?
The possibilities are endless! Beyond deli meat, bacon, lettuce, and tomato, consider adding sliced avocado, pickles, jalapeu00f1os, spinach, a smear of cream cheese, or a sprinkle of everything bagel seasoning on the cheese before baking for extra flavor.
Are these suitable for a vegetarian diet?
Absolutely! You can easily make these vegetarian by omitting the bacon and deli meats. Fill them with sliced avocado, grilled vegetables (like bell peppers or zucchini), spinach, tomato, and a spread of pesto or cream cheese for a delicious meat-free option.

Keto No-Bread Cheese Roll-Ups
- Total Time: 18 minutes
- Yield: 3-4 roll-ups 1x
- Diet: Keto, Low-Carb, Gluten-Free
Description
These simple, savory no-bread cheese roll-ups are a perfect low-carb, keto-friendly alternative to traditional sandwiches, packed with your favorite fillings.
Ingredients
6 slices Colby Jack cheese (or cheddar, mozzarella, or provolone)
3-4 slices cooked bacon, crumbled or halved
4-6 slices deli meat (ham, turkey, or salami)
2-3 large lettuce leaves
2-3 thin slices tomato
Optional: 1 tablespoon mayo, mustard, or ranch dressing
Instructions
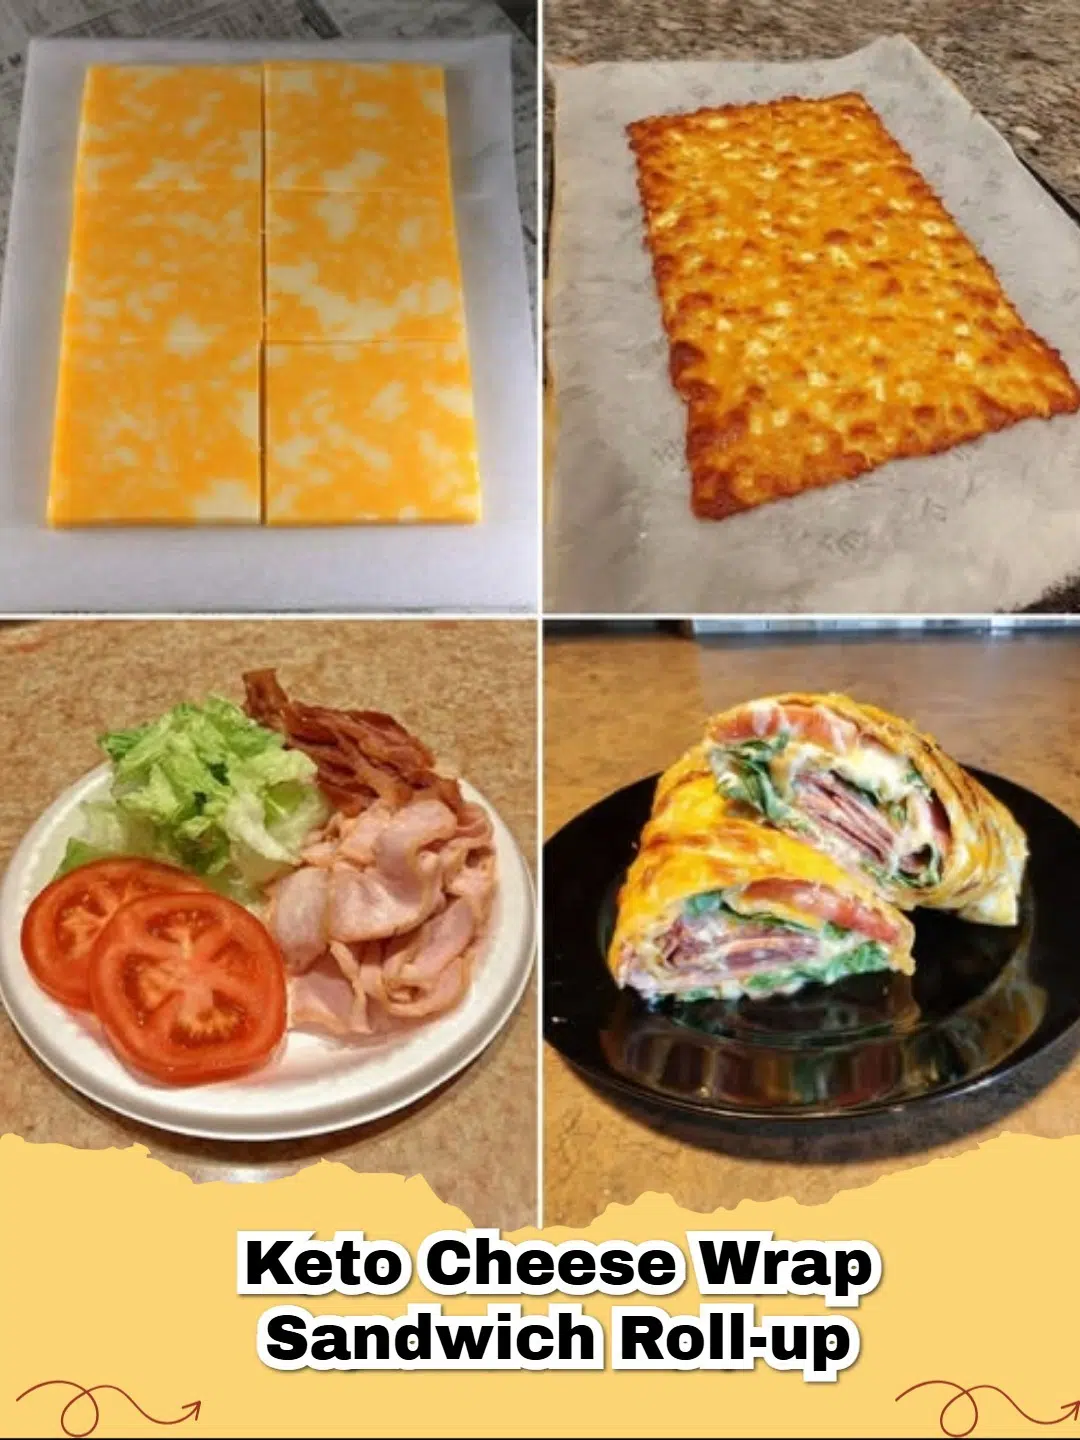
Step 1: Prepare your baking sheet. Line a baking sheet with parchment paper, which prevents sticking and makes cleanup easy.
Step 2: Form the cheese base. Lay out the 6 cheese slices in a rectangular shape on the parchment paper, ensuring they slightly overlap to create a solid sheet.
Step 3: Preheat and bake the cheese. Preheat your oven to 375°F (190°C). Once preheated, bake the cheese for 6-8 minutes, or until the cheese is melted together, golden at the edges, and slightly bubbly.
Step 4: Cool the cheese. Carefully remove the baking sheet from the oven. Let the melted cheese cool for 2-3 minutes on the parchment paper. It should still be pliable but firm enough to handle.
Step 5: Add your fillings. While the cheese is still warm and flexible, carefully transfer it (still on the parchment paper) to a clean work surface. Arrange the cooked bacon, deli meat, lettuce leaves, and tomato slices across one end of the cheese sheet. If using, spread mayo, mustard, or ranch dressing lightly over the cheese before adding fillings.
Step 6: Roll up and enjoy. Starting from the end with the fillings, carefully roll the cheese sheet tightly into a log, using the parchment paper to assist you. Once rolled, gently slice the roll-up in half or into smaller pieces if desired. Serve immediately and enjoy your delicious keto no-bread cheese roll-ups!
Notes
For best results, allow the cheese to cool just enough so it's easy to handle but still warm and pliable for rolling. Avoid overfilling, as this can make the roll-ups difficult to close. Experiment with different spices like a pinch of garlic powder or onion powder on the cheese before baking for extra flavor.
- Prep Time: 10 minutes
- Cook Time: 8 minutes
- Category: Lunch, Snack, Appetizer
- Method: Baking, Assembling
- Cuisine: American
Nutrition
- Serving Size: 1 roll-up
- Calories: 320 kcal
- Sugar: 1g
- Sodium: 750mg
- Fat: 25g
- Saturated Fat: 12g
- Unsaturated Fat: 10g
- Trans Fat: 0g
- Carbohydrates: 3g
- Fiber: 1g
- Protein: 20g
- Cholesterol: 90mg


Leave a Reply