
Welcome to Clara's Recipes, where we celebrate delicious food that's easy to make and even easier to enjoy! Today, we're diving into a dessert that's guaranteed to be a crowd-pleaser: the No-Bake Butterfinger Lush. This spectacular layered treat brings together a delightful combination of textures and flavors, from a crunchy cookie crust to creamy, dreamy fillings, all topped with your favorite crisp, peanut-buttery candy.
If you're looking for a dessert that requires minimal effort but delivers maximum impact, you've found it. Perfect for potlucks, family gatherings, or just a sweet indulgence after a long day, this Butterfinger Lush recipe is so simple to assemble, even beginner bakers will feel like pros. No oven required, just a bit of chilling time and a whole lot of delicious anticipation!
Why You'll Love This No-Bake Butterfinger Lush
This isn't just another no-bake dessert; it's a symphony of flavors and textures designed to delight. Here's why this Butterfinger Lush will become a go-to in your recipe collection:
- Effortlessly Easy: With no baking involved, most of the work is simply mixing and layering. It's perfect for warm weather or when you need a fantastic dessert without heating up your kitchen.
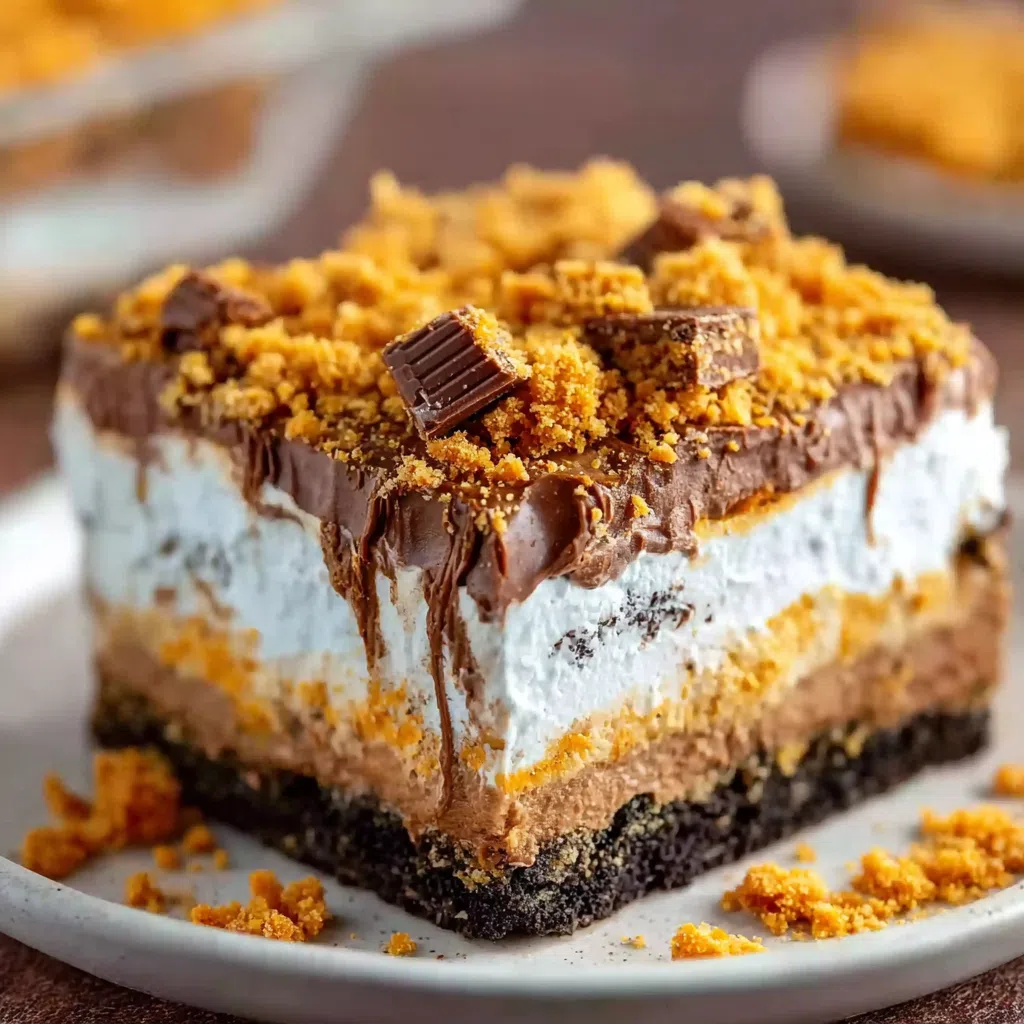
- Decadent Layers: Each forkful offers a journey through a crunchy chocolate cookie crust, a tangy-sweet cream cheese layer, smooth vanilla and chocolate puddings, and a generous sprinkle of crushed Butterfinger candy.
- Make-Ahead Friendly: This dessert needs time to chill and set, making it an ideal candidate for preparing a day in advance. This frees up your time when you're hosting!
- Crowd-Pleaser: Who can resist the appeal of Butterfinger candy? This dessert is a guaranteed hit with both kids and adults, offering a nostalgic and incredibly satisfying flavor profile.
Ready to whip up this amazing treat? Let's get to the recipe!

Ingredients You'll Need
Gathering your ingredients is the first step to creating this layered masterpiece. You'll find most of these staples readily available at your local grocery store.
- For the Crust:
- 24 chocolate sandwich cookies (like Oreos)
- 5 tablespoons melted unsalted butter
- For the Cream Cheese Layer:
- 8 ounces cream cheese, softened
- ½ cup powdered sugar
- 8 ounces thawed whipped topping (like Cool Whip)
- For the Pudding Layer:
- One 3.4-ounce package vanilla instant pudding mix
- One 3.4-ounce package chocolate instant pudding mix
- 2¾ cups cold milk
- For the Topping:
- Remaining 8 ounces thawed whipped topping
- 1 cup crushed Butterfinger candy bars
Expert Tips for Success
While this recipe is straightforward, a few tips can elevate your No-Bake Butterfinger Lush from great to absolutely unforgettable:
- Softened Cream Cheese: Ensure your cream cheese is truly at room temperature. This will help you achieve a silky-smooth, lump-free cream cheese layer.
- Chill Between Layers: Though the recipe specifies a main chilling time, a quick 10-15 minute chill after the crust and cream cheese layers can help them set slightly, preventing layers from mixing when you add the next.
- Cold Milk for Pudding: Always use very cold milk for instant pudding. This helps it set quickly and properly.
- Gentle Folding: When incorporating the whipped topping into the cream cheese mixture, fold gently to maintain its airiness. This keeps the layer light and fluffy.
- Crushing Candy: For the best texture, don't crush the Butterfinger candy into a fine powder. Small, irregular chunks provide the most satisfying crunch. You can learn more about the iconic Butterfinger candy bar and its history.
Serving and Storage Suggestions
This lush is best served chilled. Use a sharp knife dipped in hot water and wiped clean between cuts for perfectly neat slices. You can garnish individual servings with extra Butterfinger crumbs or a drizzle of chocolate syrup.
Store any leftovers tightly covered in the refrigerator for up to 3-5 days. While it can be frozen for longer storage (up to 2 weeks), the texture of the whipped topping and crust may change slightly upon thawing. Thaw frozen lush in the refrigerator overnight before serving.

More No-Bake Delights and Layered Desserts
If you loved this No-Bake Butterfinger Lush, you're in for a treat! We have a fantastic collection of easy, no-bake, and layered desserts that are perfect for any occasion. For another fruity, creamy treat, be sure to check out our Fresh & Creamy Apple Salad, which brings a refreshing twist to dessert salads. Or, if you're a fan of citrus and cake, our Mandarin Orange Pineapple Cake is another light and flavorful option that's incredibly simple to prepare.


FAQs
Can I make this Butterfinger lush dessert gluten-free?
Yes, absolutely! To make this dessert gluten-free, simply substitute the chocolate sandwich cookies with a certified gluten-free alternative for the crust. Also, ensure that the instant pudding mixes you use are confirmed to be gluten-free.
What is the best way to crush Butterfinger candy bars evenly?
For the best results, place the Butterfinger candy bars in a sturdy, sealed plastic bag. Use a rolling pin to gently tap and crush them into small, even pieces. Aim for small chunks rather than a fine powder to retain that signature Butterfinger crunch in your lush.
How far in advance can I prepare this No-Bake Butterfinger Lush?
This dessert is fantastic for making ahead! You can fully assemble the No-Bake Butterfinger Lush up to 24 hours in advance. Just be sure to keep it covered and refrigerated. If you want the Butterfinger topping to have maximum crunch, you can add it just before serving.
Can I use homemade whipped cream instead of store-bought whipped topping?
Yes, homemade whipped cream works beautifully! For a stable whipped cream, combine 1 cup heavy cream with 2 tablespoons of powdered sugar and whip until stiff peaks form. For extra stability, you can add about 1 teaspoon of cornstarch before whipping.

No-Bake Butterfinger Lush Dessert
- Total Time: 4 hours 25 minutes
- Yield: 12 servings 1x
- Diet: Vegetarian
Description
A spectacular layered dessert featuring a chocolate cookie crust, a creamy cheesecake layer, rich vanilla and chocolate pudding, and a generous topping of crushed Butterfinger candy.
Ingredients
24 chocolate sandwich cookies
5 tablespoons melted butter
8 ounces cream cheese, softened
½ cup powdered sugar
8 ounces thawed whipped topping (for cream cheese layer)
One 3.4-ounce package vanilla instant pudding mix
One 3.4-ounce package chocolate instant pudding mix
2¾ cups cold milk
Remaining 8 ounces thawed whipped topping (for top layer)
1 cup crushed Butterfinger candy bars
Instructions
Step 1: Prepare the Crust. Crush 24 chocolate sandwich cookies into fine crumbs using a food processor or by placing them in a sealed bag and crushing with a rolling pin.
Step 2: Combine the crumbs with 5 tablespoons of melted butter until evenly moistened.
Step 3: Press the mixture firmly into the bottom of a 9x13-inch dish. Chill in the refrigerator for at least 15 minutes to set.
Step 4: Make the Cream Cheese Layer. In a medium bowl, beat 8 ounces of softened cream cheese with ½ cup of powdered sugar until the mixture is smooth and free of lumps.
Step 5: Gently fold in 8 ounces of thawed whipped topping until it is fully incorporated, being careful to maintain its airy texture.
Step 6: Spread this cream cheese mixture evenly over the chilled cookie crust using an offset spatula.
Step 7: Prepare the Pudding Layer. In a separate bowl, whisk together one 3.4-ounce package of vanilla instant pudding mix and one 3.4-ounce package of chocolate instant pudding mix with 2¾ cups of cold milk for two minutes, or until well combined.
Step 8: Allow the pudding mixture to rest for a few minutes until it begins to thicken slightly.
Step 9: Carefully pour the thickened pudding over the cream cheese layer, spreading it gently to create an even surface.
Step 10: Final Assembly. Spread the remaining 8 ounces of whipped topping evenly over the pudding layer.
Step 11: Sprinkle 1 cup of crushed Butterfinger candy bars generously and evenly over the top layer of whipped topping.
Step 12: Cover the dish and refrigerate for at least four hours, or preferably overnight, to allow the layers to set completely for easier slicing and optimal flavor.
Notes
For an extra rich flavor, you can add a teaspoon of vanilla extract to the cream cheese layer. Ensure all layers are chilled sufficiently to prevent them from mixing when serving.
- Prep Time: 25 minutes
- Cook Time: 0 minutes
- Category: Dessert
- Method: No-Bake, Chilling
- Cuisine: American
Nutrition
- Serving Size: 1 slice
- Calories: 400 kcal
- Sugar: 30g
- Sodium: 350mg
- Fat: 25g
- Saturated Fat: 15g
- Unsaturated Fat: 8g
- Trans Fat: 0.5g
- Carbohydrates: 45g
- Fiber: 2g
- Protein: 5g
- Cholesterol: 40mg


Leave a Reply