
Introduction to Easter Treats
No-Bake Easter Bunny Coconut Tails are the perfect way to welcome the arrival of spring with a burst of sweetness and whimsy. When the flowers begin to bloom and the weather turns warm, there is nothing quite like a festive dessert that brings a smile to everyone's face without requiring hours in a hot kitchen. These No-Bake Easter Bunny Coconut Tails are essentially sweet, coconut-filled truffles that mimic the fluffy tails of a bunny. They are soft, chewy, and incredibly easy to assemble, making them a fantastic project for parents and children to work on together during the holiday weekend. Whether you are hosting a large family gathering or looking for a cute addition to a themed dessert platter, these No-Bake Easter Bunny Coconut Tails will undoubtedly become a new favorite tradition. The combination of rich sweetened condensed milk and aromatic coconut creates a flavor profile that is both nostalgic and sophisticated. This recipe is designed to be foolproof, ensuring that even those who are new to dessert making can achieve professional and adorable results. Let us dive into the magic of creating these delightful No-Bake Easter Bunny Coconut Tails.
The Tradition of Easter Sweets and Whimsical Treats
Easter has always been a holiday deeply rooted in culinary traditions, from savory roasts to an endless array of sweets. Over the years, the focus has shifted toward treats that reflect the symbols of renewal and nature, such as eggs, chicks, and, most importantly, bunnies. No-Bake Easter Bunny Coconut Tails fit perfectly into this category by offering a playful nod to the Easter Bunny in a form that is as delicious as it is cute. Unlike traditional cakes that require baking and cooling, these No-Bake Easter Bunny Coconut Tails are modern iterations of the classic coconut macaroon or truffle, reimagined for the ease of busy families. Incorporating No-Bake Easter Bunny Coconut Tails into your celebration is a great way to add a handmade touch to the dessert table. You might also want to pair these with The Most Magical Bunny Bait Easter Snack Mix Your Family Will Adore for a complete themed experience. Creating these treats is more than just making a snack; it is about building memories and enjoying the creative process that comes with holiday preparation.
Why You’ll Love It
You will absolutely adore these No-Bake Easter Bunny Coconut Tails because they offer the perfect balance of convenience and charm. Since they are entirely no-bake, you can save your oven space for other Easter essentials like ham or side dishes. The texture of No-Bake Easter Bunny Coconut Tails is another highlight; they are dense, moist, and have a satisfying chew that only real coconut can provide. Furthermore, these No-Bake Easter Bunny Coconut Tails are highly customizable. You can leave them pure white to resemble classic bunny tails, or you can add a hint of pastel color to the outer coating for a more vibrant look. They also travel well, making them ideal for bringing to a potluck or church social. If you enjoy coconut-based holiday treats, you will find these quite similar in spirit to The Most Magical Coconut Cream Easter Egg Truffles Your Family Will Adore. Every bite of No-Bake Easter Bunny Coconut Tails delivers a concentrated burst of tropical flavor that feels light and refreshing after a heavy holiday meal.
Understanding Your Ingredients: The Magic of Coconut
When making No-Bake Easter Bunny Coconut Tails, the quality of the coconut is the most important factor. Using unsweetened coconut allows you to control the sugar level, especially since the sweetened condensed milk already provides a significant amount of sweetness. According to Britannica, many traditional holiday foods have specific regional significance, and coconut has long been a staple in southern and tropical dessert styles. For No-Bake Easter Bunny Coconut Tails, the mixture of shredded coconut and finely ground coconut creates a layered texture. The inner part of the No-Bake Easter Bunny Coconut Tails remains soft and creamy, while the outer coating provides a slightly drier, more authentic "tail" look. The butter adds a necessary richness and helps the No-Bake Easter Bunny Coconut Tails hold their shape once chilled. Using a high-quality vanilla extract is also essential, as it enhances the natural sweetness of the dairy and coconut components.
Ingredients
To ensure your No-Bake Easter Bunny Coconut Tails turn out perfectly, gather the following high-quality ingredients. The blend of textures is key here.
- 5 cups unsweetened shredded coconut (for the filling)
- 2 cups unsweetened coconut, finely shredded or desiccated (for the coating)
- 14 oz sweetened condensed milk (one standard can)
- 2 tbsp unsalted butter, melted and cooled to room temperature
- 1 tsp pure vanilla extract
- 1/4 cup confectioner’s sugar, sifted
- Liquid food coloring (optional, if you wish to color the outer tails)
Notes and Substitutions
If you only have access to sweetened coconut, you can still make No-Bake Easter Bunny Coconut Tails, but it is highly recommended to omit the confectioner's sugar to prevent them from becoming cloyingly sweet. For a gluten-free option, ensure your vanilla extract is certified gluten-free. If you want a dairy-free version of No-Bake Easter Bunny Coconut Tails, you can use condensed coconut milk and a vegan butter substitute. These modifications allow everyone to enjoy the magic of No-Bake Easter Bunny Coconut Tails regardless of dietary restrictions.
Equipment
Making No-Bake Easter Bunny Coconut Tails requires very minimal equipment. You will need a large mixing bowl, a sturdy spatula or wooden spoon, and a baking sheet lined with parchment paper. A small cookie scoop (about 1 tablespoon size) is very helpful for keeping the No-Bake Easter Bunny Coconut Tails uniform in size. Additionally, small bowls will be needed for the coating and any food coloring applications.
Instructions
Follow these steps to create the most enchanting No-Bake Easter Bunny Coconut Tails for your holiday guests.
- Combine the 5 cups of shredded coconut and sifted confectioner's sugar in a large bowl.
- Stir in the sweetened condensed milk, melted butter, and vanilla extract until a thick, sticky dough forms.
- Cover the bowl and refrigerate the mixture for at least 30 to 45 minutes to allow it to firm up.
- While the mixture chills, place the remaining 2 cups of fine coconut in a separate shallow bowl; add a drop of food coloring if desired.
- Scoop about a tablespoon of the chilled mixture and roll it between your palms to form a smooth ball.
- Immediately roll the ball in the fine coconut, pressing gently so the coconut adheres and creates a fluffy appearance.
- Place the finished tails on a parchment-lined tray and chill for another hour before serving.
A Detailed Guide to Coloring Your Coconut Tails
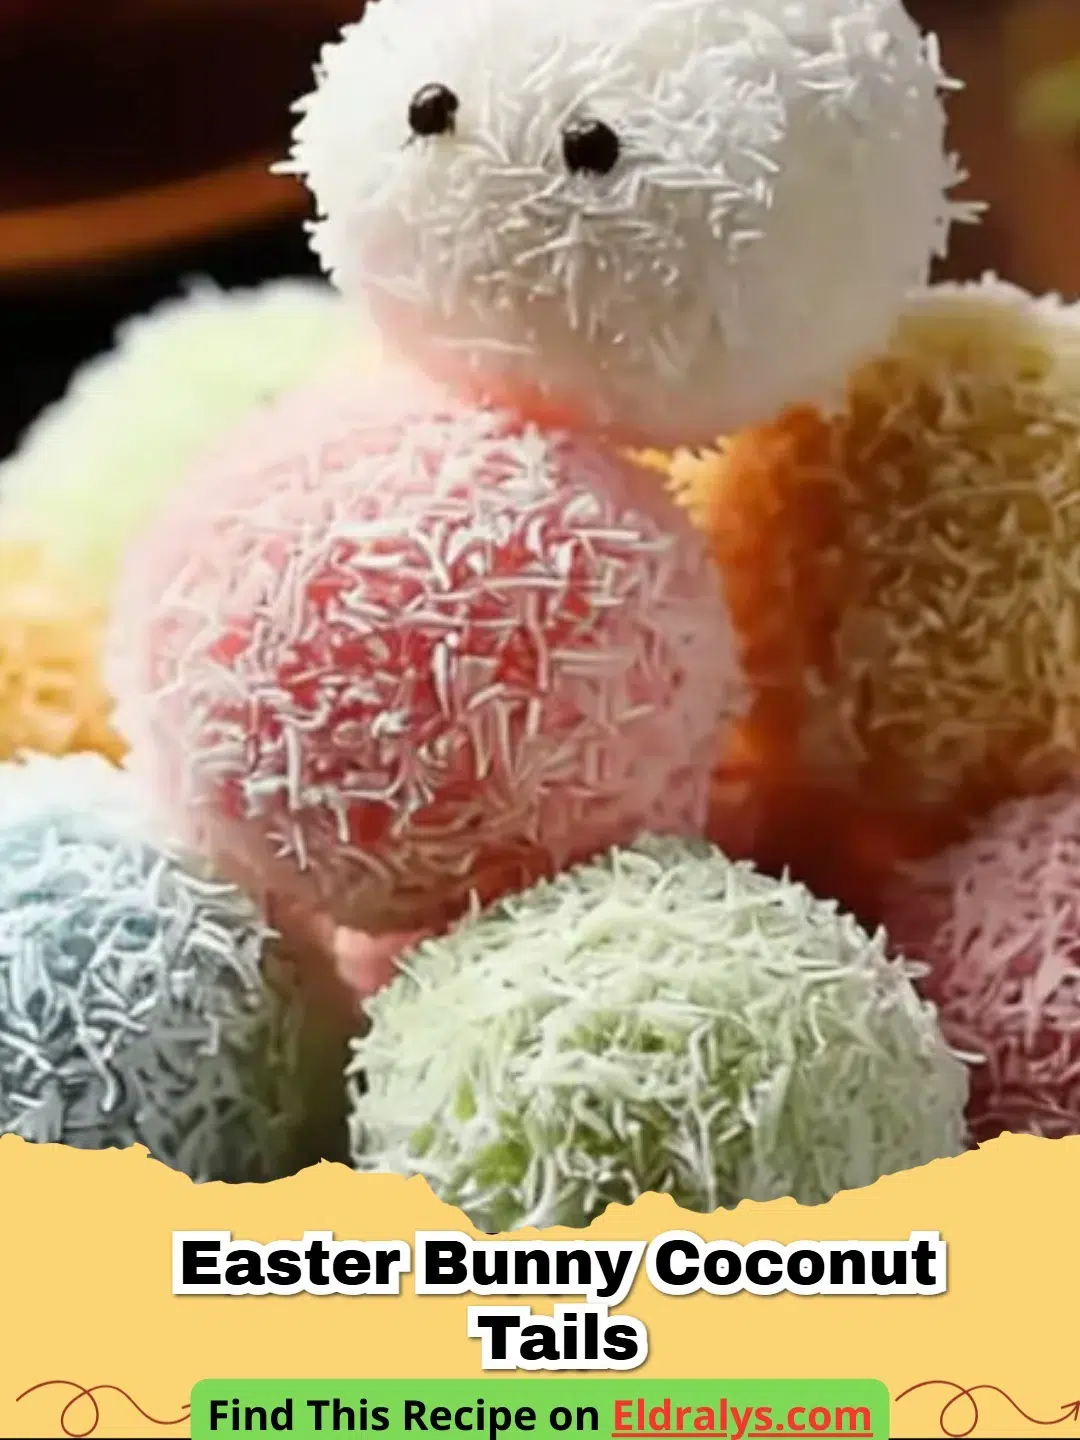
Coloring the outer layer of your No-Bake Easter Bunny Coconut Tails can add a beautiful decorative touch. To do this, place your fine coconut in a zip-top bag with one or two drops of liquid food coloring. Shake the bag vigorously until the color is evenly distributed. This method ensures that the No-Bake Easter Bunny Coconut Tails remain light and fluffy rather than clumped with moisture. You can make a variety of pastel tails—pink, blue, yellow, and green—to create a stunning visual display. When you arrange these colorful No-Bake Easter Bunny Coconut Tails on a platter, they look just like a collection of bunny tails found in a spring meadow. This step is completely optional, as the natural white of the coconut is classic and elegant for No-Bake Easter Bunny Coconut Tails.
Pro Tips
To get the best results with your No-Bake Easter Bunny Coconut Tails, always ensure your butter is cooled before adding it to the milk. If the butter is too hot, it can prevent the No-Bake Easter Bunny Coconut Tails from setting properly. If the mixture is too sticky to handle, lightly grease your hands with a tiny bit of butter or coconut oil. For a more intense flavor, you can toast the coconut used for the outer coating, though this will change the color to a golden brown. Remember to pack the mixture firmly when rolling your No-Bake Easter Bunny Coconut Tails to prevent them from crumbling. Using a cookie scoop is the best way to ensure every tail is the same size.
Serving, Storage & Variations
Serve your No-Bake Easter Bunny Coconut Tails on a decorative Easter platter or nestled inside small cupcake liners. These No-Bake Easter Bunny Coconut Tails look beautiful when placed alongside other spring desserts. For storage, keep the No-Bake Easter Bunny Coconut Tails in an airtight container in the refrigerator for up to 7 days. If you want to make them ahead of time, they can be frozen for up to 3 months; just thaw them in the fridge overnight before serving. For a fun variation, try adding a tiny piece of dried fruit or a chocolate chip in the center of each of your No-Bake Easter Bunny Coconut Tails for a surprise filling. You could also dip the bottom of each tail in white chocolate for extra decadence.
Troubleshooting Your Coconut Mixture
If you find that your No-Bake Easter Bunny Coconut Tails mixture is too dry, add an extra tablespoon of sweetened condensed milk until it holds together. Conversely, if it is too wet, add more shredded coconut. The humidity in your kitchen can sometimes affect the consistency of no-bake recipes. Chilling the mixture is the most critical step; if you skip this, the No-Bake Easter Bunny Coconut Tails will likely flatten into discs rather than remaining spherical. If the coconut coating is not sticking, your balls might have dried out on the surface; simply roll them between your hands again to bring the moisture to the surface before dipping.
Nutrition Information
| Nutrient | Amount |
|---|---|
| Calories | 165 kcal |
| Protein | 2g |
| Carbohydrates | 18g |
| Fat | 10g |
Note: The nutrition information provided is an estimate based on standard ingredient data and a serving size of one coconut tail. Actual values may vary depending on the specific brands used.


Conclusion
No-Bake Easter Bunny Coconut Tails are a delightful, stress-free addition to any spring celebration. With their soft texture and adorable appearance, they represent the best of holiday baking without the need for an oven. These No-Bake Easter Bunny Coconut Tails are sure to be a hit with both the young and the young at heart. We hope you enjoy making and sharing these No-Bake Easter Bunny Coconut Tails as much as your guests will enjoy eating them. Happy Easter and happy treat-making!
FAQs
Can I use sweetened coconut for the No-Bake Easter Bunny Coconut Tails?
Yes, you can use sweetened shredded coconut for No-Bake Easter Bunny Coconut Tails, but you may want to omit the confectioner's sugar to ensure they are not overly sweet.
How should I store these coconut tails?
Store your No-Bake Easter Bunny Coconut Tails in an airtight container in the refrigerator for up to one week. You can also freeze them for up to three months.
Can I make these treats vegan?
To make No-Bake Easter Bunny Coconut Tails vegan, substitute the sweetened condensed milk with sweetened condensed coconut milk and use a plant-based butter alternative.
How do I get the coconut to stick to the outside?
If the mixture has chilled for too long and the outside is dry, lightly dampen your hands with water or a tiny bit of condensed milk before rolling them in the shredded coconut.

No-Bake Easter Bunny Coconut Tails
- Total Time: 1 hour 5 minutes
- Yield: 24 tails 1x
- Diet: Vegetarian
Description
Whimsical and easy coconut truffles shaped like fluffy bunny tails, perfect for Easter celebrations.
Ingredients
5 cups unsweetened shredded coconut
2 cups unsweetened fine coconut (desiccated)
14 oz sweetened condensed milk
2 tbsp unsalted butter, melted and cooled
1 tsp pure vanilla extract
1/4 cup confectioner’s sugar
Liquid food coloring as needed
Instructions
Step 1: In a large mixing bowl, combine 5 cups of shredded coconut with the sifted confectioner's sugar.
Step 2: Pour in the sweetened condensed milk, melted butter, and vanilla extract. Stir until the mixture is fully combined and sticky.
Step 3: Cover the bowl with plastic wrap and refrigerate for 30-45 minutes to let the mixture firm up for easier rolling.
Step 4: Prepare the coating by placing the 2 cups of fine coconut in a shallow dish. If coloring, add food coloring to the coconut and mix well.
Step 5: Using a small scoop or tablespoon, take a portion of the chilled coconut mixture and roll it into a 1-inch ball.
Step 6: Roll the ball into the fine coconut until completely covered and fluffy in appearance.
Step 7: Place on a tray lined with parchment paper and chill for an additional 20 minutes before serving.
Notes
Ensure the butter is completely cooled before mixing to maintain the right consistency. For a lower sugar version, use unsweetened condensed milk alternatives.
- Prep Time: 20 minutes
- Cook Time: 0 minutes
- Category: Dessert
- Method: No-Bake
- Cuisine: American
Nutrition
- Serving Size: 1 tail
- Calories: 165 kcal
- Sugar: 15g
- Sodium: 30mg
- Fat: 10g
- Saturated Fat: 8g
- Unsaturated Fat: 1g
- Trans Fat: 0g
- Carbohydrates: 18g
- Fiber: 2g
- Protein: 2g
- Cholesterol: 5mg
Related posts:
 The Ultimate Cowboy Steak with Truffle Honey Butter That Will Melt Your Heart
 The Most Irresistible Honey Garlic Steak Bites That Will Melt Your Heart
 The Most Divine High Protein Sugar-Free Monkey Bread That Will Melt Your Soul
 The Most Legendary Authentic Thai Crying Tiger (Sua Rong Hai) Steak Recipe That Will Heal Your Soul

Leave a Reply