
Get ready to summon some seriously delicious Halloween spirit with these incredible Spooky Ghost Brown Butter Pumpkin Cookies! Forget basic treats; we're diving into a world where chewy pumpkin goodness meets the rich, nutty notes of brown butter and an adorable spooky twist. These cookies are not just a festive decoration; they are a flavor explosion that will have everyone reaching for more.
As the leaves turn and the air gets crisp, there's nothing quite like the cozy embrace of pumpkin and warm spices. But we're elevating that classic fall comfort with a simple yet transformative technique: browning butter. This adds an unparalleled depth that complements the pumpkin and maple notes beautifully. And for the spooky fun? A few simple steps transform these autumnal delights into charming ghost cookies that are perfect for trick-or-treaters and Halloween parties alike!
Why You'll Love These Spooky Ghost Pumpkin Cookies
These aren't just another cookie recipe; they're an experience! Here’s why these will become your new go-to Halloween favorite:
- Irresistible Flavor: The brown butter adds a complex, nutty depth that takes classic pumpkin cookies to a whole new level. Paired with warm spices and a hint of maple, it's fall perfection.
- Perfectly Chewy Texture: With just the right balance of crisp edges and a soft, chewy center, these cookies are incredibly satisfying.
- Kid-Friendly Decorating: Creating the little white chocolate ghosts is simple and a fantastic activity for kids (and adults!) of all ages.
- Festive and Fun: They look absolutely adorable on any Halloween dessert table and are sure to bring smiles to everyone's faces.
The Secret to Amazing Brown Butter Pumpkin Cookies
Two ingredients truly make these cookies sing: brown butter and pumpkin puree. Mastering these components will ensure your cookies are nothing short of spectacular.
Perfecting Your Brown Butter
Browning butter is easier than it sounds and yields incredible results. Place unsalted butter in a light-colored saucepan over medium heat. It will melt, then foam, and eventually, tiny amber-colored bits will form at the bottom while the butter itself turns a beautiful golden brown. Stir constantly, and once you smell a nutty aroma, immediately remove it from the heat and pour it into a separate bowl to stop the cooking. This prevents it from burning!
Choosing Your Pumpkin Puree
Make sure you’re using pure canned pumpkin puree, not pumpkin pie filling, which has added spices and sugar. For the best chewy texture, a thicker pumpkin puree is ideal. If your puree seems watery, you can gently blot some of the excess moisture with a paper towel before adding it to the batter.
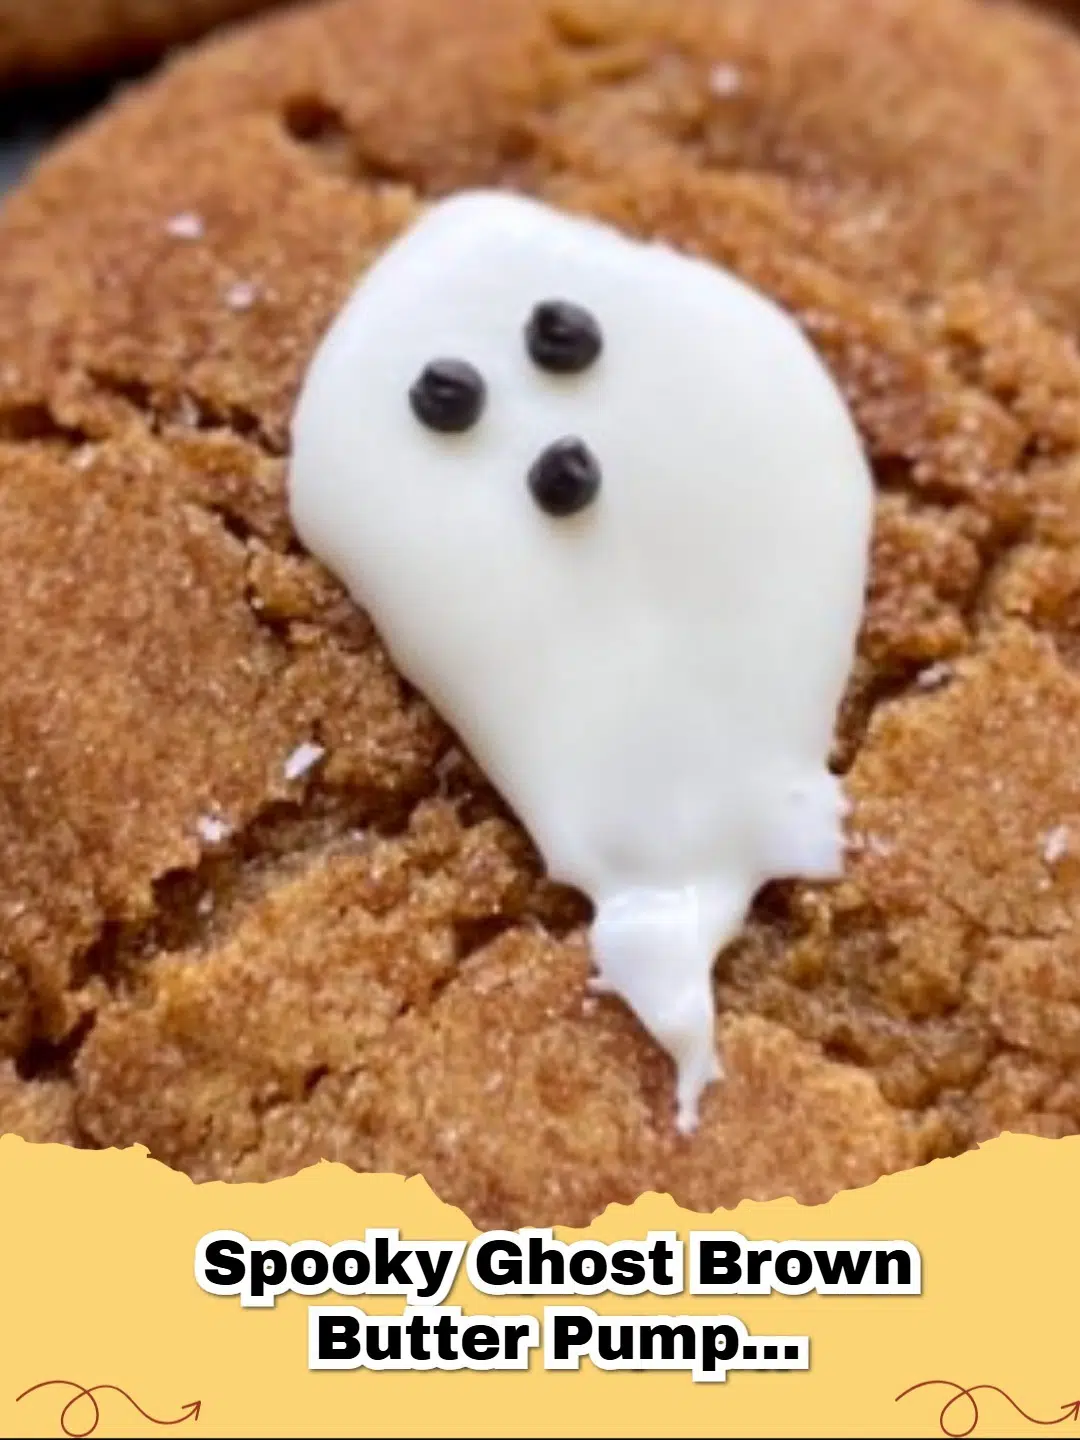
Crafting Your Spooky Ghosts
The ghost decorations are what make these cookies truly spooky and fun! It’s a simple process that adds a huge visual impact. You’ll need good quality white chocolate and a bit of black candy melts for the eyes.
Decorating Tips for Ghostly Goodness
Once your cookies are fully cooled, it's time to bring the ghosts to life:
- Melt your white chocolate gently. You can use a microwave in 30-second intervals, stirring in between, or a double boiler. For best results when working with chocolate, using a Quality Chef's Knife to finely chop the chocolate before melting can help it melt more smoothly and evenly.
- Transfer the melted white chocolate into a piping bag with a small round tip, or simply snip a tiny corner off a Ziploc bag.
- Pipe ghost shapes onto the cooled cookies. Don't worry about perfection; rustic, slightly uneven ghosts add to the charm!
- Before the white chocolate sets, use a toothpick or another piping bag with a tiny dot of black candy melt to create two small eyes for each ghost.
- Allow the chocolate to set completely before stacking or storing. You can pop them in the fridge for a few minutes to speed this up.
These Spooky Ghost Brown Butter Pumpkin Cookies are truly a magical way to celebrate the Halloween season. They combine sophisticated fall flavors with playful, easy decorating, making them a hit with both kids and adults. Bake a batch, gather your loved ones, and enjoy the delicious and delightful spookiness!
FAQs
Can I make these Spooky Ghost Brown Butter Pumpkin Cookies ahead of time?
Yes, you can! You can prepare the cookie dough and chill it for up to 2-3 days before baking. Once baked and decorated, the cookies can be stored in an airtight container at room temperature for up to 3-4 days, though they are best enjoyed fresh.


What's the trick to getting perfect brown butter?
The key to perfect brown butter is patience and constant stirring. Melt the butter over medium heat, stirring frequently, until it foams and then develops nutty brown flecks at the bottom and a beautiful amber color. Watch it carefully, as it can burn quickly! Pour it immediately into a heat-safe bowl to stop the cooking process.
What type of chocolate is best for the ghost decorations?
Good quality white chocolate chips, baking bars, or white candy melts work best for the ghost decorations. Candy melts are often easier to work with as they temper well and set quickly. Ensure you melt them slowly and gently, either in a microwave in short bursts or over a double boiler, to prevent seizing.
How can I make sure my pumpkin cookies stay soft and chewy?
To ensure soft and chewy pumpkin cookies, avoid over-mixing the dough once the flour is added. Also, be careful not to overbake them; they should look slightly underdone in the center when you pull them from the oven, as they will continue to set as they cool. Using brown sugar also contributes to a chewier texture.

Spooky Ghost Brown Butter Pumpkin Cookies
- Total Time: 45 minutes (plus chilling time)
- Yield: 24 cookies 1x
- Diet: Vegetarian
Description
Delightful chewy pumpkin cookies with a rich brown butter and maple flavor, topped with adorable spooky white chocolate ghosts, perfect for Halloween!
Ingredients
1 cup (2 sticks) unsalted butter
1 1/2 cups all-purpose flour
1 teaspoon baking soda
1/2 teaspoon baking powder
1/2 teaspoon ground cinnamon
1/4 teaspoon ground nutmeg
1/4 teaspoon ground ginger
1/8 teaspoon ground cloves
1/2 teaspoon salt
1/2 cup granulated sugar
1/2 cup packed light brown sugar
1/2 cup canned pumpkin puree (not pie filling)
1 large egg
1 teaspoon vanilla extract
1/2 teaspoon maple extract (optional, for extra flavor)
6 ounces white chocolate, chopped or white candy melts
1 tablespoon black candy melts or black icing gel
Instructions
Step 1: Brown the butter. In a light-colored saucepan, melt the unsalted butter over medium heat. Stir constantly until it turns a golden-brown color and nutty brown bits form at the bottom. Immediately pour into a heat-safe bowl and let cool slightly.
Step 2: In a medium bowl, whisk together the flour, baking soda, baking powder, cinnamon, nutmeg, ginger, cloves, and salt. Set aside.
Step 3: In a large bowl, combine the slightly cooled brown butter with granulated sugar and brown sugar. Beat with an electric mixer until light and fluffy, about 2 minutes.
Step 4: Add the pumpkin puree, egg, vanilla extract, and maple extract (if using) to the butter mixture. Beat until well combined.
Step 5: Gradually add the dry ingredients to the wet ingredients, mixing on low speed until just combined. Be careful not to overmix.
Step 6: Cover the dough and chill in the refrigerator for at least 30 minutes, or up to 2 hours. Chilling helps prevent the cookies from spreading too much.
Step 7: Preheat oven to 375°F (190°C). Line baking sheets with parchment paper or silicone mats. Use a medium cookie scoop (about 1.5 tablespoons) to drop dough onto the prepared baking sheets, leaving about 2 inches between cookies.
Step 8: Bake for 12-15 minutes, or until the edges are set and lightly golden, but the centers still look slightly soft. They will firm up as they cool.
Step 9: Let cookies cool on the baking sheets for 5 minutes before transferring them to a wire rack to cool completely.
Step 10: Once cookies are completely cool, melt the white chocolate or white candy melts. You can do this in a microwave in 30-second intervals, stirring well after each, or over a double boiler. Transfer melted white chocolate to a piping bag with a small round tip or a Ziploc bag with a tiny corner snipped off.
Step 11: Pipe ghost shapes onto the cooled cookies. Don't worry about perfection; slightly irregular shapes add to the charm.
Step 12: While the white chocolate is still wet, melt the black candy melts (if using) or use black icing gel to create two small dots for the ghost eyes. Alternatively, you can use a toothpick dipped in black food coloring.
Step 13: Allow the white chocolate ghosts to set completely before storing. You can place them in the refrigerator for 5-10 minutes to speed up the setting process. Enjoy your spooky treats!
Notes
For an extra festive touch, you can add a pinch of cinnamon or pumpkin pie spice to the white chocolate before piping for a subtly spiced ghost! Ensure your pumpkin puree is thick; if it's watery, gently blot out excess moisture with a paper towel.
- Prep Time: 25 minutes
- Cook Time: 12-15 minutes
- Category: Dessert, Holiday
- Method: Baking, Decorating
- Cuisine: American
Nutrition
- Serving Size: 1 cookie
- Calories: 210 kcal
- Sugar: 18g
- Sodium: 140mg
- Fat: 10g
- Saturated Fat: 6g
- Unsaturated Fat: 3g
- Trans Fat: 0g
- Carbohydrates: 28g
- Fiber: 1g
- Protein: 2g
- Cholesterol: 35mg


Leave a Reply