
Prepare to amaze your taste buds and impress your guests with this truly spectacular Decadent Strawberry Chocolate Fantasy Ice Cream Cake! This no-bake masterpiece combines luscious layers of rich chocolate and vibrant strawberry ice cream atop a crunchy cookie crust, all crowned with a velvety ganache and fresh strawberries. It’s a show-stopping dessert that’s surprisingly easy to assemble, making it perfect for birthdays, holidays, or any time you crave a luxurious, frozen treat.
Why This No-Bake Ice Cream Cake is Your New Favorite
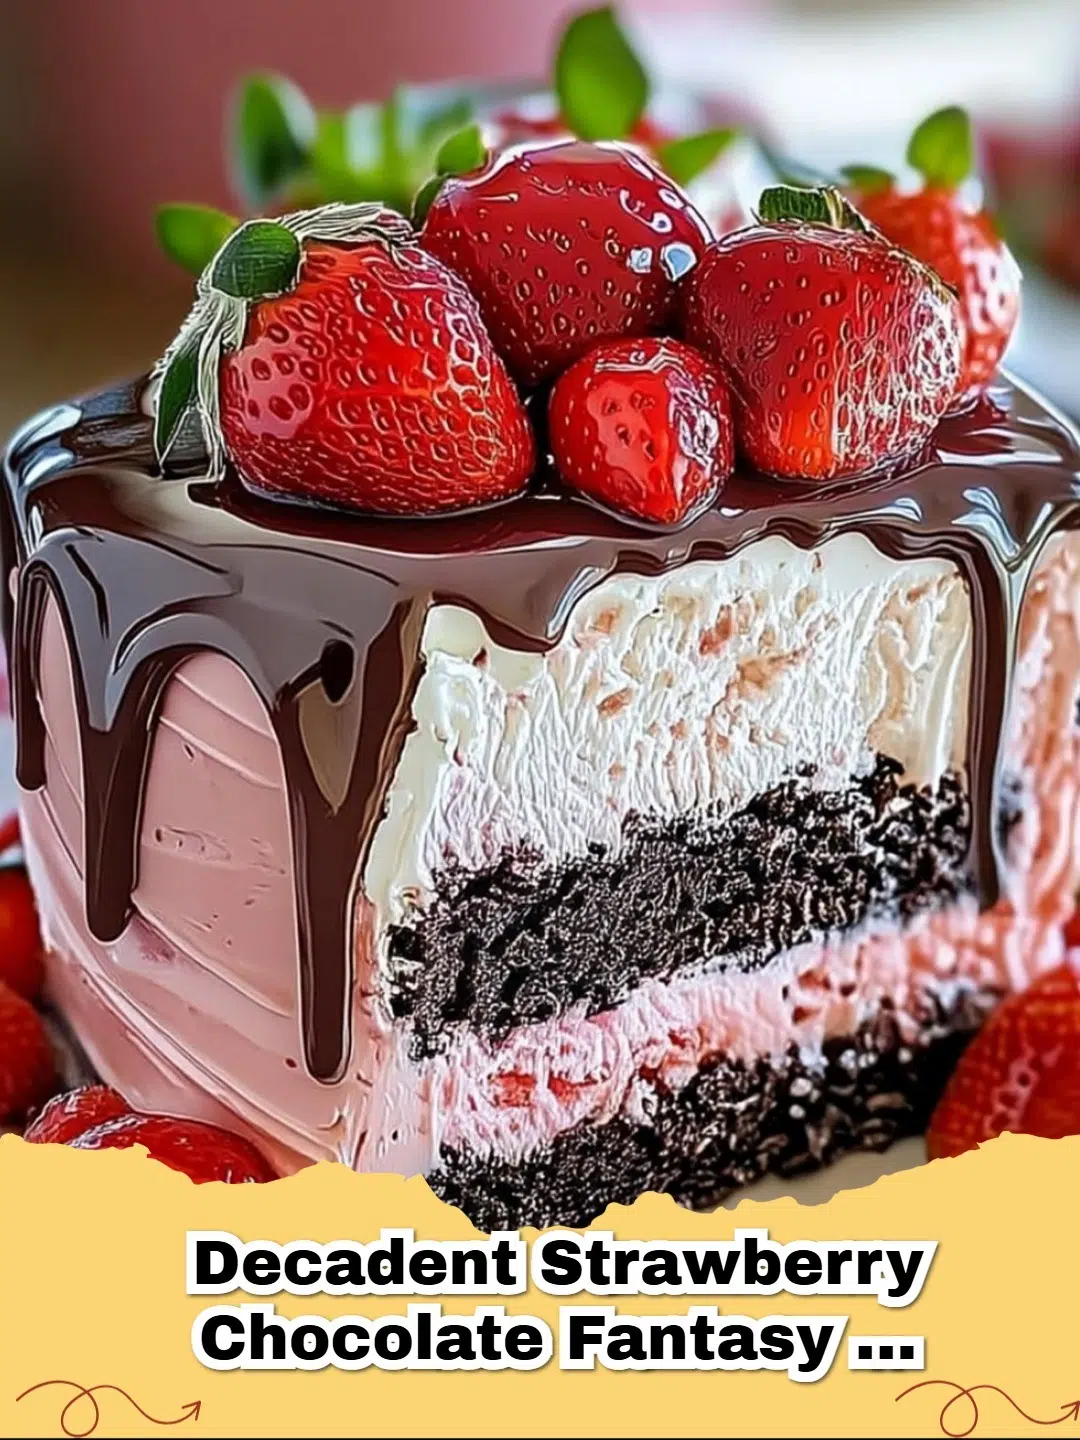
Imagine the perfect bite: the satisfying crunch of a chocolate cookie crust, followed by the creamy coolness of strawberry ice cream, then the deep, indulgent flavor of chocolate ice cream, all brought together by a smooth, rich ganache. This cake isn't just a dessert; it's an experience!
Beyond its incredible taste and visual appeal, here’s why you’ll fall in love with this recipe:
- No-Bake Bliss: Forget turning on the oven! This entire cake comes together in your freezer, keeping your kitchen cool.
- Effortlessly Elegant: The layered design looks incredibly impressive, but the process is straightforward, perfect for any skill level.
- Make-Ahead Marvel: Prepare it days in advance, freeing up your time on the day of your event.
- Customizable Fun: Easily swap ice cream flavors or toppings to suit your preferences.
If you're a fan of easy yet impressive desserts, you might also enjoy our Easy Brownie Mix Cookies: Your Shortcut to Chewy, Chocolatey Bliss for another simple chocolate delight.
Gather Your Ingredients for a Frozen Dream
Creating this fantasy cake requires just a handful of quality ingredients. The beauty lies in the combination of classic flavors that everyone loves. You’ll find the complete list in the recipe card below, but here’s what you’ll need to get started:
- Chocolate wafer cookies for the irresistible crust
- Melted butter to bind those crumbs
- Generous amounts of premium strawberry ice cream
- Rich chocolate ice cream for depth of flavor
- Whipped topping (or homemade whipped cream)
- Fresh strawberries for that perfect garnish
- Ingredients for a simple, decadent chocolate ganache
How to Assemble Your Decadent Masterpiece
Putting together this ice cream cake is a fun and rewarding process. It’s all about layering and patient freezing, which means much of the work can be done in stages. Don't rush the freezing steps – they are key to achieving those beautiful, distinct layers. For more dessert inspiration, check out our Juicy Pineapple Heaven Cake: Your Easiest Tropical Dessert!
Tips for Perfect Layers and Slices
- Soften Ice Cream Gently: Let your ice cream sit at room temperature for 10-15 minutes before spreading. It should be soft enough to spread easily but not melted.
- Press the Crust Firmly: A well-packed crust is crucial for a stable base. Use the back of a glass or your hands to create an even, firm layer.
- Freeze Between Layers: This is the most important tip! Allow each ice cream layer to freeze solid before adding the next. This prevents colors and flavors from bleeding and creates defined lines.
- Cool Your Ganache: Ensure your ganache has cooled slightly before pouring. It should be pourable but not hot, to avoid melting the whipped topping.
- Hot Knife for Serving: For clean slices, dip your knife in hot water, wipe it dry, and then slice. Repeat for each cut.
Delicious Variations to Explore
While the strawberry and chocolate combination is pure magic, feel free to customize your ice cream cake!
- Flavor Swaps: Experiment with other ice cream flavors like mint chip, coffee, or even a berry swirl.
- Crust Alternatives: Try an Oreo crust, graham cracker crust, or a mixture of different cookies.
- Mix-ins: Fold in chopped candy bars, chocolate chips, or crushed nuts into your ice cream layers before freezing.
- Extra Fruit: Add a thin layer of fresh raspberries or a drizzle of raspberry sauce between the ice cream layers.
Serving, Storing, and Enjoying
When it's time to unveil your creation, remove the cake from the freezer about 10-15 minutes before serving to allow it to soften slightly for easier slicing. Once cut, leftovers should be stored immediately back in the freezer. Wrap the cake tightly in plastic wrap, then foil, to prevent freezer burn and keep it tasting fresh for up to two weeks. For more general insights into ice cream cakes, you can find a wealth of information on Wikipedia's page about ice cream cakes.
Get ready to slice into pure bliss with this Decadent Strawberry Chocolate Fantasy Ice Cream Cake. It's truly a dessert that brings joy to every gathering!
FAQs
Can I prepare this ice cream cake in advance?
Yes, absolutely! This Decadent Strawberry Chocolate Fantasy Ice Cream Cake is an excellent make-ahead dessert. You can assemble it up to a week before your event. Just ensure it's tightly wrapped in plastic wrap and then foil to prevent freezer burn, and stored in the coldest part of your freezer.


What are some alternative ice cream flavors I can use?
The beauty of this ice cream cake is its versatility! Feel free to experiment with your favorite ice cream combinations. Vanilla, mint chocolate chip, coffee, or even a swirl of cherry ice cream would be delightful. You could also swap the chocolate ice cream for a chocolate fudge ripple for an extra rich experience.
How do I prevent the cookie crust from becoming soggy?
To ensure a perfectly crisp crust, make sure your chocolate wafer cookie crumbs are thoroughly mixed with melted butter and pressed very firmly into the springform pan. Freezing the crust before adding the ice cream layers also helps create a barrier against moisture. Additionally, work quickly when adding and spreading the softened ice cream to minimize melting.
What's the best method for slicing an ice cream cake cleanly?
For clean, beautiful slices, remove the cake from the freezer and let it sit at room temperature for about 10-15 minutes to soften slightly. Then, warm a sharp knife under hot water, wipe it dry, and slice. Repeat this warming and wiping process for each cut. This technique helps the knife glide smoothly through the frozen layers without sticking, ensuring perfect servings every time.

Decadent Strawberry Chocolate Fantasy Ice Cream Cake
- Total Time: 6 hours 30 minutes (includes freezing)
- Yield: 12-16 servings 1x
- Diet: Vegetarian
Description
A show-stopping no-bake ice cream cake featuring layers of crunchy chocolate cookie crust, creamy strawberry and chocolate ice cream, and a rich chocolate ganache, perfect for any celebration.
Ingredients
2 cups chocolate wafer cookie crumbs (about 25-30 cookies)
1/2 cup unsalted butter, melted
1.5 quarts (approx 6 cups) premium strawberry ice cream, slightly softened
1.5 quarts (approx 6 cups) rich chocolate ice cream, slightly softened
1 (8 ounce) container whipped topping (like Cool Whip), thawed, or 2 cups homemade whipped cream
1 cup fresh strawberries, sliced, for garnish
1/2 cup heavy cream
1 cup semi-sweet chocolate chips
Instructions
Step 1: Prepare the crust. In a medium bowl, combine chocolate wafer cookie crumbs and melted butter until well mixed. Press the mixture firmly and evenly into the bottom of a 9-inch springform pan. Freeze for 15-20 minutes to set.
Step 2: Layer the strawberry ice cream. Spread the slightly softened strawberry ice cream evenly over the frozen crust. Return the pan to the freezer and freeze for at least 1 hour, or until firm.
Step 3: Layer the chocolate ice cream. Once the strawberry layer is firm, spread the slightly softened chocolate ice cream evenly over it. Return to the freezer and freeze for at least 2 hours, or until very firm.
Step 4: Add whipped topping. Spread the thawed whipped topping evenly over the firm chocolate ice cream layer. Freeze for another 30 minutes.
Step 5: Prepare the ganache. In a small saucepan, heat the heavy cream over medium heat until it just begins to simmer. Remove from heat and pour over the chocolate chips in a heatproof bowl. Let sit for 5 minutes, then whisk until smooth and glossy. Let the ganache cool slightly (about 10-15 minutes) until it's pourable but not hot.
Step 6: Finish the cake. Carefully pour the cooled ganache over the whipped topping layer, spreading gently to cover the top. Immediately arrange fresh strawberry slices on top of the ganache.
Step 7: Final freeze. Return the ice cream cake to the freezer for at least 4 hours, or preferably overnight, until completely firm.
Step 8: Serve. To serve, remove the springform pan sides. For easier slicing, let the cake sit at room temperature for 10-15 minutes before cutting with a hot, dry knife. Enjoy your decadent treat!
Notes
For a richer crust, you can add 2 tablespoons of cocoa powder to the cookie crumbs. If you prefer homemade whipped cream, whisk 1 cup of cold heavy cream with 2 tablespoons of powdered sugar and 1/2 teaspoon of vanilla extract until stiff peaks form.
- Prep Time: 30 minutes
- Cook Time: 0 minutes
- Category: Dessert
- Method: No-Bake, Freezing
- Cuisine: American
Nutrition
- Serving Size: 1 slice
- Calories: 480 kcal
- Sugar: 50g
- Sodium: 120mg
- Fat: 25g
- Saturated Fat: 15g
- Unsaturated Fat: 8g
- Trans Fat: 0g
- Carbohydrates: 65g
- Fiber: 3g
- Protein: 6g
- Cholesterol: 70mg


Leave a Reply