
Welcome to Clara's Recipes, where we turn everyday moments into delicious celebrations! Today, we're diving into a dessert that promises creamy, crunchy bliss with minimal effort: the Butterfinger Cheesecake Pie. If you're a fan of the iconic candy bar's flaky peanut butter crunch and the luscious texture of cheesecake, prepare to meet your new favorite no-bake treat.
Why You'll Love This No-Bake Butterfinger Cheesecake Pie
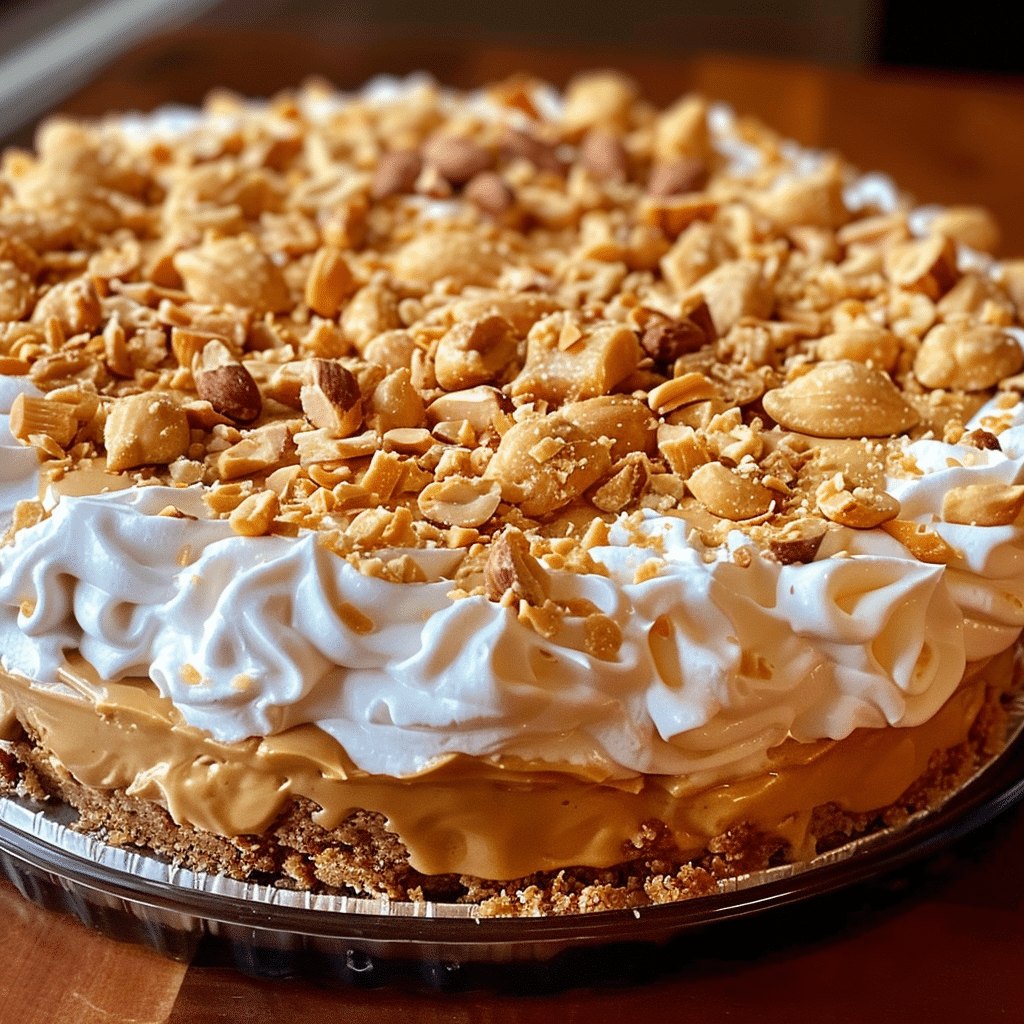
This isn't just any dessert; it's a showstopper that requires no oven time, making it perfect for summer gatherings, busy holidays, or simply satisfying that sweet tooth craving without breaking a sweat. Imagine a rich, velvety peanut butter cheesecake filling generously studded with crunchy Butterfinger pieces, all nestled in a crisp graham cracker crust. It's an explosion of flavor and texture that's surprisingly easy to achieve.
We'll guide you through every step to ensure your pie is a masterpiece. From selecting the right ingredients to mastering the chill time, you'll learn all the secrets to a perfect slice every time. Get ready to impress your friends and family with this irresistible Butterfinger Cheesecake Pie!
Creamy & Crunchy Butterfinger Cheesecake Pie Recipe
Here’s how to make this delightful dessert. The full recipe card with exact measurements and detailed instructions is below.
Mastering Your Butterfinger Cheesecake Pie
Even though this pie is simple and no-bake, a few strategic tips can help you take it from good to unforgettable. The key to mastering Butterfinger Cheesecake Pie lies in handling the ingredients correctly and optimizing each step for best results.
Use room temperature cream cheese
Cold cream cheese leads to a lumpy filling. Leave it out for about 30–45 minutes before starting so it blends smoothly with the sugar and peanut butter.Don’t overmix the whipped topping
Gently folding in the whipped topping preserves the pie’s airy texture. Overmixing can deflate it, making your pie dense and heavy instead of light and creamy.Choose the right peanut butter
Avoid natural or oily peanut butter. Stick with smooth, shelf-stable varieties like Jif or Skippy, which blend best and hold texture.Prevent a soggy crust
If using a homemade graham cracker or chocolate crust, chill it in the freezer for 10 minutes before filling. This helps firm it up and avoid sogginess.Add Butterfinger at the right time
Stir crushed Butterfinger candy bars into the filling last, just before pouring it into the crust. This keeps the candy from becoming too soft or blending into the filling.Chill long enough
Refrigerate for a minimum of 4 hours, but ideally overnight for the best texture. A well-chilled pie slices cleanly and holds its shape on the plate.Top it like a pro
Garnish with extra crushed Butterfinger, a chocolate drizzle, or even mini whipped cream swirls.
Perfecting these simple techniques makes a big difference in the final dessert. Whether you’re serving this to family or guests, these tweaks ensure your Butterfinger Cheesecake Pie is as flawless as it is delicious.
Crust Variations and Alternatives
One of the best things about Butterfinger Cheesecake Pie is how customizable it is—especially the crust. The crust adds structure and flavor, and switching it up can make the dessert even more exciting. Whether you’re accommodating dietary needs or just changing things up, here are some creative crust alternatives:
Chocolate cookie crust
A go-to for chocolate lovers. Crushed chocolate sandwich cookies (like Oreos) with melted butter form a rich, bold base. Ideal when you want to boost the chocolate flavor.Graham cracker crust
The classic. A graham cracker crust offers a mildly sweet contrast to the creamy filling and crunchy topping. For another delightful fall dessert, check out our Pumpkin Caramel Cheesecake: 10 Essential Tips for a Flawless Fall Dessert.Pretzel crust
For a sweet-and-salty twist, crush salted pretzels and mix with butter and a touch of brown sugar. This crust adds a crunchy texture and unexpected flavor punch.Gluten-free crust
Use certified gluten-free graham crackers or cookies to make your crust. You can also explore crust alternatives made with almond flour or oats.Store-bought vs. homemade
Store-bought crusts save time, but a homemade one lets you control flavor and texture.
Changing the crust gives the pie a new personality without altering the easy prep process. Choose based on your taste preference or occasion.
Butterfinger Cheesecake Pie Add-ins and Toppings
While the basic recipe is a winner, you can take your Butterfinger Cheesecake Pie to the next level with fun toppings and mix-ins. These additions can enhance flavor, texture, or presentation depending on the vibe you’re going for.
Toppings:
Melted chocolate drizzle – Use semi-sweet or milk chocolate to complement the peanut butter filling.
Extra crushed Butterfingers – Pile them high for crunch and visual appeal.
Whipped cream swirls – Pipe around the edge for a bakery-style finish.
Caramel sauce – Adds a buttery richness that pairs perfectly with the candy bar topping.
Add-ins:
Mini chocolate chips – Fold in a handful for extra bursts of chocolate.
Chopped peanuts – Add crunch and bring out the peanut flavor.
Peanut butter cups – Chop and stir into the filling for a twist. This is also a great idea for our Easy Brownie Mix Cookies: Your Shortcut to Chewy, Chocolatey Bliss!
Toppings not only enhance flavor but also add to the pie’s visual appeal.
Make-Ahead and Storage Guide
This dessert was made for planning ahead. Whether you need it ready for a party or want leftovers to last, here’s how to store Butterfinger Cheesecake Pie properly.
Make-ahead tips
Assemble the pie the night before and keep it refrigerated. The longer chill time allows the filling to set fully and the flavors to meld.How long it lasts in the fridge
Store tightly covered in the refrigerator for up to 4 days. Beyond that, the crust may soften and candy bits can lose their crunch.Freezing instructions
Yes, you can freeze it. Wrap the entire pie in plastic wrap and then in foil. Freeze for up to 1 month. Thaw overnight in the fridge before serving.

Keeping the crust crisp
Avoid overfilling and don’t add wet toppings (like sauces) until ready to serve. If making a homemade crust, bake it briefly for extra stability.

For more make-ahead dessert tips, planning ahead for delicious treats is always a great strategy!
Serving Suggestions
Presentation matters—especially for desserts meant to impress. Here are a few ways to serve Butterfinger Cheesecake Pie that will wow your guests.
Slice size
This pie is rich, so smaller slices go a long way. Use a sharp knife and wipe clean between cuts for tidy slices.Serving chilled
Always serve straight from the refrigerator. Let it sit at room temperature for no more than 10 minutes before slicing.Plating ideas
Drizzle with chocolate or caramel
Add a dollop of whipped cream
Garnish with a mini Butterfinger bar on each slice
Want even more inspiration? A little creativity can elevate any dessert's presentation.
Common Mistakes to Avoid
Avoiding these common errors ensures your Butterfinger Cheesecake Pie turns out perfectly every time.
Using cold cream cheese
Cold cream cheese doesn’t mix well and creates a lumpy filling.Overmixing whipped topping
Stirring too hard can flatten the pie and make it dense.Skipping the chill time
Four hours minimum chilling is non-negotiable for structure and taste.Too much filling
Overfilling can cause spillage or sogginess, especially if using a shallow crust.Wrong peanut butter type
Natural varieties can separate and ruin the creamy texture. Use a no-stir, creamy type.
For more ideas on avoiding dessert fails, check out Food Network's easy pie tutorials for visual tips and tricks.
Variations: Butterfinger Pie vs. Butterfinger Cheesecake Pie
These two desserts are often confused, but they differ in ingredients, texture, and structure.
Butterfinger Pie
Often uses instant pudding, whipped topping, and candy, with less focus on cream cheese. It’s lighter, almost mousse-like, and super quick to make.Butterfinger Cheesecake Pie
Uses cream cheese for a denser, richer filling. Think of it as a cheesecake hybrid—a bit more indulgent with more structure.Mini pies and bars
The same filling works great in mini tart shells, jars, or pressed into a baking dish and cut into bars.
Depending on your occasion or time, you can choose the version that suits your needs.
Frequently Asked Questions About Butterfinger Cheesecake Pie
Here are some common questions we get about making this delightful pie.
We hope these tips and the recipe help you create the perfect Butterfinger Cheesecake Pie every time. Happy baking (or rather, no-baking)!
FAQs
Can I use homemade whipped cream instead of Cool Whip?
Yes, but make sure itu2019s whipped to stiff peaks and used immediately. Store-bought whipped topping is more stable for longer storage.
How do I crush Butterfinger bars without making a mess?
Place the bars in a sealed plastic bag and crush with a rolling pin. You can also freeze them first to reduce stickiness.
What kind of peanut butter works best for Butterfinger Pie?
Use smooth, shelf-stable peanut butter like Jif or Skippy. Avoid natural types that separate.
Can Butterfinger Pie be frozen?
Absolutely. Wrap well and freeze for up to a month. Thaw in the fridge before serving.

Creamy & Crunchy Butterfinger Cheesecake Pie
- Total Time: 4 hours 20 minutes
- Yield: 8-10 servings 1x
- Diet: Contains dairy, nuts, and sugar.
Description
A decadent, no-bake Butterfinger cheesecake pie featuring a rich peanut butter cream cheese filling, a crisp crust, and plenty of crushed Butterfinger candy.
Ingredients
1 1/2 cups graham cracker crumbs
1/2 cup unsalted butter, melted
1/4 cup granulated sugar
2 (8 ounce) packages cream cheese, softened
1 cup creamy peanut butter (Jif or Skippy recommended)
1 1/4 cups powdered sugar
1 teaspoon vanilla extract
1 (8 ounce) container whipped topping (Cool Whip), thawed
8-10 Fun Size Butterfinger candy bars, crushed (about 1.5 cups)
Optional: Chocolate syrup for drizzle
Optional: Extra crushed Butterfinger for garnish
Instructions
Step 1: Prepare the crust. In a medium bowl, combine graham cracker crumbs, melted butter, and granulated sugar until well mixed. Press firmly into the bottom and up the sides of a 9-inch pie dish. Chill in the freezer for 10-15 minutes while you prepare the filling.
Step 2: In a large mixing bowl, beat the softened cream cheese with an electric mixer until smooth and creamy. Add the creamy peanut butter and beat until fully combined.
Step 3: Gradually add the powdered sugar, beating until smooth and no lumps remain. Stir in the vanilla extract.
Step 4: Gently fold in the thawed whipped topping until no white streaks remain. Be careful not to overmix, as this can deflate the filling.
Step 5: Stir in about 1 cup of the crushed Butterfinger candy bars into the cheesecake filling.
Step 6: Pour the filling into the chilled pie crust, spreading evenly. Sprinkle the remaining crushed Butterfinger over the top.
Step 7: Refrigerate the pie for at least 4 hours, or preferably overnight, until thoroughly set. For best results, chill overnight.
Step 8: Before serving, if desired, drizzle with chocolate syrup or garnish with extra whipped cream and mini Butterfinger bars.
Notes
For an extra twist, consider adding a thin layer of melted chocolate or chocolate ganache to the bottom of the crust before adding the filling for an even richer chocolate base.
- Prep Time: 20 minutes
- Cook Time: 0 minutes
- Category: Dessert
- Method: No-Bake, Chilling
- Cuisine: American
Nutrition
- Serving Size: 1 slice
- Calories: 450 kcal
- Sugar: 35g
- Sodium: 350mg
- Fat: 30g
- Saturated Fat: 15g
- Unsaturated Fat: 12g
- Trans Fat: 0g
- Carbohydrates: 45g
- Fiber: 2g
- Protein: 10g
- Cholesterol: 70mg


Leave a Reply to Kathy Gentry Cancel reply