
Introduction to the Ultimate Handheld Dessert
Cherry Pie Cookies are the ultimate solution for anyone who craves the comforting flavors of a traditional lattice-topped pie but wants the handheld convenience of a chewy dessert. There is something profoundly nostalgic about the combination of tart fruit and buttery pastry that resonates across generations. Whether you are preparing for a summer backyard barbecue or looking for a vibrant addition to your winter holiday cookie platter, these cookies bridge the gap between two worlds of baking. The aroma of simmering cherries combined with the rich, vanilla-scented dough creates a sensory experience that begins long before the first bite is taken.
In this comprehensive guide, we will explore the nuances of creating the perfect texture—a base that is sturdy enough to hold the fruit but soft enough to melt on your tongue. When we think of Cherry Pie Cookies, we think of Sunday afternoons, family gatherings, and the simple joy of a treat made from scratch. The beauty of this recipe lies in its versatility. While it may seem like a complex task to miniaturize a whole pie, the process is surprisingly approachable for bakers of all skill levels. By focusing on quality ingredients and precise technique, you can elevate a simple cookie into a gourmet experience that rivals the finest bakeries.
As we delve into the world of stone fruits and shortbread-style doughs, it is important to acknowledge the historical significance of the cherry in culinary traditions. From the wild forests of Eurasia to the organized orchards of Michigan, cherries have been a staple of sweet and savory dishes for centuries. By incorporating them into a cookie format, we are paying homage to the classic American fruit pie while modernizing the delivery system for today's busy lifestyle. Let's embark on this journey to create the most decadent and impressive cookies in your repertoire.
Why You’ll Love These Cherry Pie Cookies
You will fall in love with these cookies because they offer a sophisticated flavor profile with minimal effort. One of the most satisfying elements of this recipe is the contrast in textures. The outer edge of the cookie provides a slight crunch, while the center remains soft and infused with the sweet-tart juices of the cherry filling. Unlike a full-sized pie, which requires slicing and serving on a plate, these Cherry Pie Cookies are perfectly portioned and ready to grab and go. They are the ideal solution for potlucks where you want to provide a high-impact dessert without the mess of forks and napkins.
Furthermore, this recipe is highly customizable. You can adjust the sweetness of the dough, the tartness of the cherries, or even add a glaze to create a professional finish. If you enjoy experimenting with different flavor profiles, you might find that this method works beautifully with other fruits as well. For instance, if you are a fan of unique fruit-filled treats, you should definitely check out The Most Dreamy Lemon Meringue Pie Cookies That Will Transport You to Summer Bliss. Much like these cherry-centered delights, the lemon version offers a bright, citrusy alternative that is equally addictive.
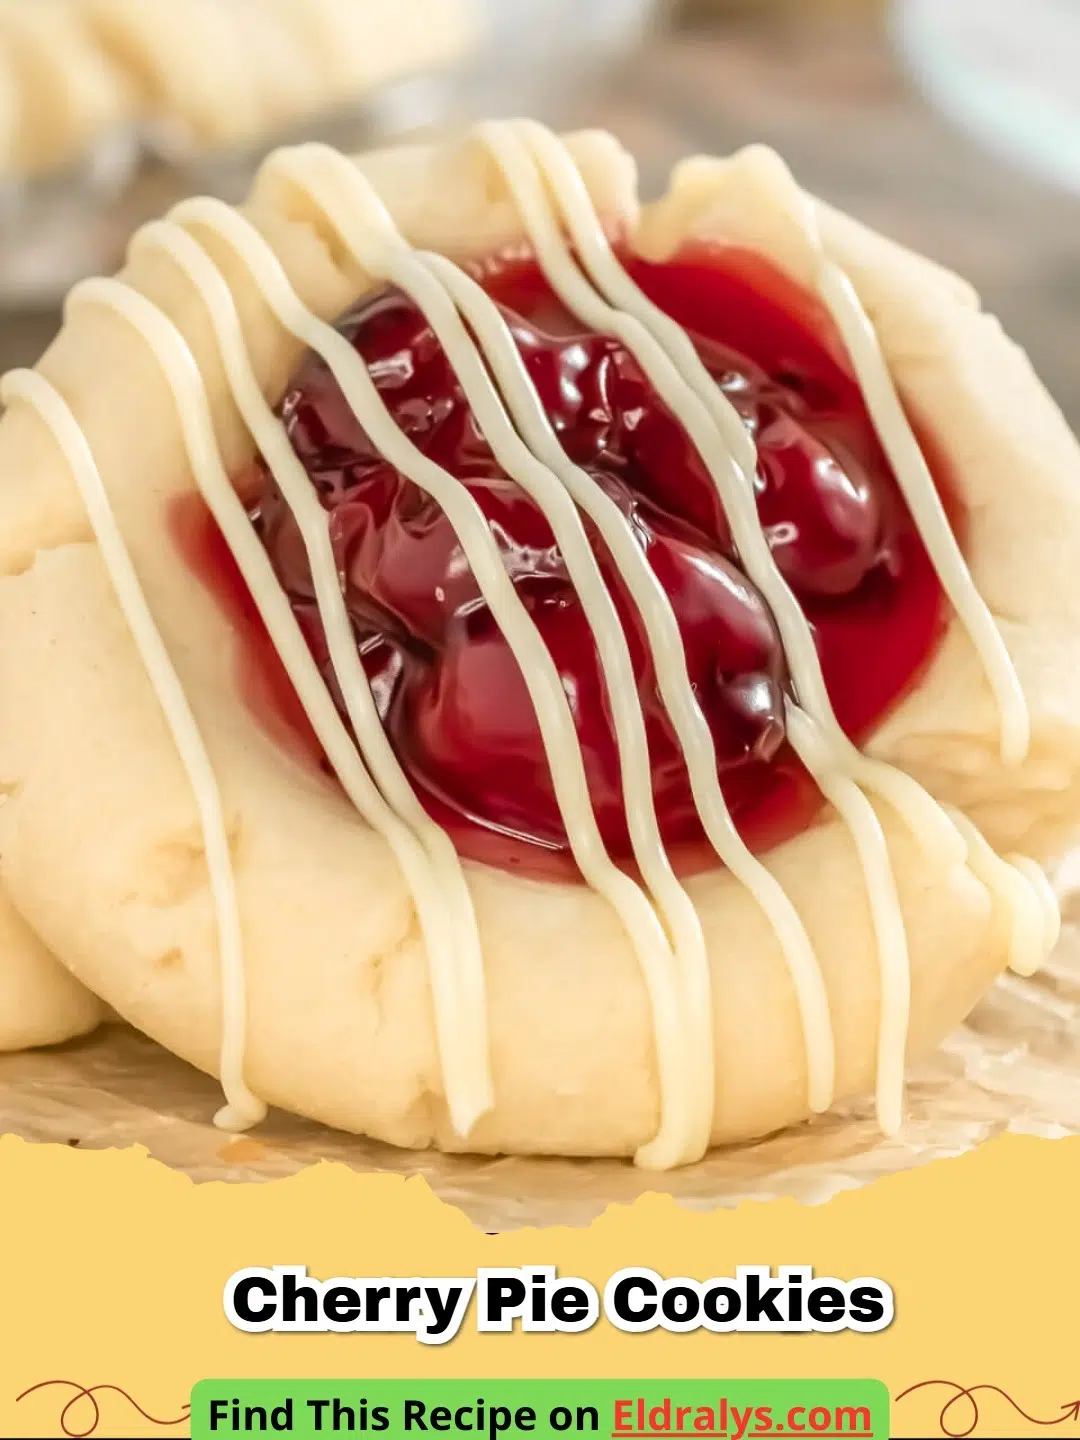
Another reason to love these cookies is their aesthetic appeal. The deep, ruby-red center surrounded by a golden, buttery ring of dough looks stunning on any dessert table. It evokes the feeling of a professional patisserie without requiring a degree in culinary arts. When you serve these, you aren't just serving a cookie; you are serving a conversation piece. They are also fantastic for seasonal gifting. Packaging a dozen of these in a vintage-style tin makes for a thoughtful and delicious gift that shows your loved ones exactly how much you care.
The Essential Ingredients for Success
Creating the perfect cookie requires a balance of fats, leavening agents, and flavor enhancers. For this recipe, we use high-quality unsalted butter to ensure a rich base that doesn't become overly salty. The choice of sugar is equally important; a blend of granulated and powdered sugar often results in a tender crumb that mimics the flakiness of a pie crust. You will also need all-purpose flour, which provides the necessary protein structure to hold the heavy fruit center without collapsing.
Notes and Substitutions
- Butter: Always use room temperature butter. If the butter is too cold, it won't cream properly with the sugar; if it's melted, the cookies will spread too much.
- Cherries: While high-quality canned pie filling is convenient, you can also use frozen cherries cooked down with a bit of sugar and lemon juice. According to the botanical classifications found on Britannica, tart cherries are often preferred for baking due to their higher acidity, which balances the sugar in the dough.
- Extracts: Almond extract is the secret weapon of cherry desserts. A small drop enhances the natural flavor of the fruit, giving it a professional, complex taste.
- Flour: If you need a gluten-free option, a 1:1 baking flour substitute works well, though the texture may be slightly more delicate.
Precision is key when measuring your dry ingredients. I recommend using a kitchen scale for the most consistent results. However, if you are using measuring cups, the spoon-and-level method is essential to avoid packing too much flour into the dough, which would result in a dry, crumbly cookie. If you appreciate a well-structured dessert with a moist crumb, you might also enjoy learning about the balance of flavors in The Ultimate Moist & Spiced Carrot Cake with Cream Cheese Frosting, which uses similar principles of moisture control.
Equipment You Will Need
To achieve professional results, you don't need a commercial kitchen, but a few key tools will make the process much smoother. You will need a large mixing bowl and either a stand mixer or a hand-held electric mixer to cream the butter and sugar effectively. A standard cookie scoop (approximately 1.5 to 2 tablespoons) is vital for ensuring all your cookies are the same size, which guarantees even baking across the tray. Additionally, parchment paper or silicone baking mats are necessary to prevent the cherry juices from sticking to your baking sheets.
Step-by-Step Instructions
- Step 1: Begin by preheating your oven to 350°F (175°C) and lining two large baking sheets with parchment paper. This allows the oven time to reach a stable temperature, which is critical for the initial rise of the cookie.
- Step 2: In your main mixing bowl, cream together the softened butter and sugars until the mixture is light, fluffy, and significantly lighter in color. This usually takes about 3 to 5 minutes of high-speed mixing.
- Step 3: Add the egg and vanilla and almond extracts. Beat until fully incorporated, scraping down the sides of the bowl to ensure no streaks of butter remain. The almond extract will immediately fill your kitchen with a delightful aroma.
- Step 4: Sift the flour, baking powder, and salt together, then gradually add them to the wet ingredients. Mix on low speed until just combined. Overmixing at this stage can lead to a tough cookie, so stop as soon as the last streak of flour disappears.
- Step 5: Using your cookie scoop, portion the dough into balls and place them on the prepared sheets about 2 inches apart. Use the back of a small spoon or your thumb to create a deep well in the center of each ball. This is where your Cherry Pie Cookies get their signature look.
- Step 6: Carefully place a spoonful of cherry filling into each well. If using standard canned filling, try to get at least 2 or 3 whole cherries in each cookie for the best fruit-to-dough ratio.
- Step 7: Bake for 12 to 14 minutes, or until the edges are just starting to turn a light golden brown. The centers should still look slightly soft. Remove from the oven and allow them to cool on the baking sheet for at least 10 minutes before transferring them to a wire rack to cool completely.
Pro Tips for the Perfect Batch
One of the biggest challenges when making Cherry Pie Cookies is managing the moisture from the fruit. If your filling is particularly runny, the juice may overflow and cause the cookie base to become soggy. To prevent this, you can drain some of the excess syrup from the filling before placing it in the dough wells. Another expert tip is to chill the portioned dough balls for 15 minutes before making the thumbprint and adding the fruit; this helps the cookie maintain its height and prevents excessive spreading during the baking process.
Furthermore, ensure your oven is calibrated correctly. Many home ovens run hot or cold, which can drastically affect the texture of your cookies. Using an oven thermometer can save you from a batch of burnt or undercooked treats. Lastly, if you want a truly decadent finish, consider drizzling the cooled cookies with a simple powdered sugar and milk glaze. This adds an extra layer of sweetness and makes the cookies look like they came straight from a gourmet bakery window.
Serving, Storage & Variations
These cookies are best served slightly warm or at room temperature. They pair beautifully with a cold glass of milk, a cup of hot tea, or even a scoop of vanilla bean ice cream for a truly indulgent dessert. For storage, keep your Cherry Pie Cookies in an airtight container at room temperature for up to three days. If you need them to last longer, they can be refrigerated for up to a week, though the crust may soften slightly due to the moisture in the fruit center.
Variations are endless! For a "Black Forest" twist, add 1/4 cup of cocoa powder to the dough and top the finished cookies with a chocolate drizzle. For a crunchier texture, add chopped toasted pecans or walnuts to the dough before baking. You can also experiment with different fruit fillings like blueberry, raspberry, or peach to keep the recipe fresh throughout the year.


Nutrition Information
| Nutrient | Amount |
|---|---|
| Calories | 185 kcal |
| Protein | 2g |
| Carbohydrates | 26g |
| Fat | 8g |
| Saturated Fat | 5g |
| Sodium | 95mg |
| Sugar | 14g |
Note: The nutritional information provided is an estimate based on standard ingredients and serving sizes. Actual values may vary depending on specific brands used.
Conclusion
Mastering the art of Cherry Pie Cookies is a rewarding experience that brings a touch of whimsical elegance to your baking routine. By combining the heart of a traditional pie with the simplicity of a cookie, you create a treat that is guaranteed to impress friends and family alike. Remember that baking is as much about the process as it is about the result. Take your time, enjoy the aromas of your kitchen, and savor every bite of these fruity, buttery masterpieces. We hope this guide inspires you to fire up your oven and start baking today!
FAQs
Can I use fresh cherries for this recipe?
Yes, you can use fresh cherries to make a homemade compote, but ensure you thicken it with cornstarch so the juice doesn't make the cookie base soggy.
How do I prevent my cookies from spreading?
Chilling the dough for at least 30 minutes before baking is the most effective way to ensure the butter remains solid enough to maintain the cookie's structure.
Can I freeze these cookies?
Absolutely! You can freeze the baked cookies for up to 3 months. Just ensure they are layered with parchment paper in an airtight container.

Homemade Cherry Pie Cookies
- Total Time: 34 minutes
- Yield: 24 cookies 1x
- Diet: Vegetarian
Description
A delightful fusion of buttery shortbread cookie and classic cherry pie filling, perfect for any occasion.
Ingredients
1 cup unsalted butter, softened
1/2 cup granulated sugar
1/2 cup powdered sugar
1 large egg
1 tsp vanilla extract
1/4 tsp almond extract
2 1/4 cups all-purpose flour
1/2 tsp baking powder
1/4 tsp salt
1 can (21 oz) cherry pie filling
Instructions
Step 1: Preheat your oven to 350°F (175°C) and line baking sheets with parchment paper.
Step 2: Cream butter and sugars in a large bowl until light and fluffy.
Step 3: Mix in the egg, vanilla extract, and almond extract until fully combined.
Step 4: Gradually stir in the flour, baking powder, and salt on low speed until a soft dough forms.
Step 5: Scoop 1.5 tablespoon portions of dough, roll into balls, and place on baking sheets. Use a thumb to create a deep well in each.
Step 6: Fill each well with 2-3 cherries and a small amount of the pie filling syrup.
Step 7: Bake for 12-14 minutes until edges are barely golden. Cool on the pan for 10 minutes before moving to a rack.
Notes
Ensure your butter is truly softened at room temperature for the best texture. If the dough is too soft to handle, refrigerate for 30 minutes before scooping.
- Prep Time: 20 minutes
- Cook Time: 14 minutes
- Category: Dessert
- Method: Baking
- Cuisine: American
Nutrition
- Serving Size: 1 cookie
- Calories: 185 kcal
- Sugar: 14g
- Sodium: 95mg
- Fat: 8g
- Saturated Fat: 5g
- Unsaturated Fat: 3g
- Trans Fat: 0g
- Carbohydrates: 26g
- Fiber: 1g
- Protein: 2g
- Cholesterol: 25mg
Related posts:
 The Most Heavenly Chocolate Peanut Butter Cottage Cheese Parfaits That Will Melt Your Heart
 The Ultimate Strawberry Cheesecake Pancakes: A Gourmet Breakfast Dream
 The Most Enchanting Rose Chocolate Chip Cookies Recipe: A Floral Twist on a Classic
 The Most Unforgettable Cheddar Bay Crab Cakes with Lemon Butter Drizzle You'll Ever Crave

Leave a Reply