
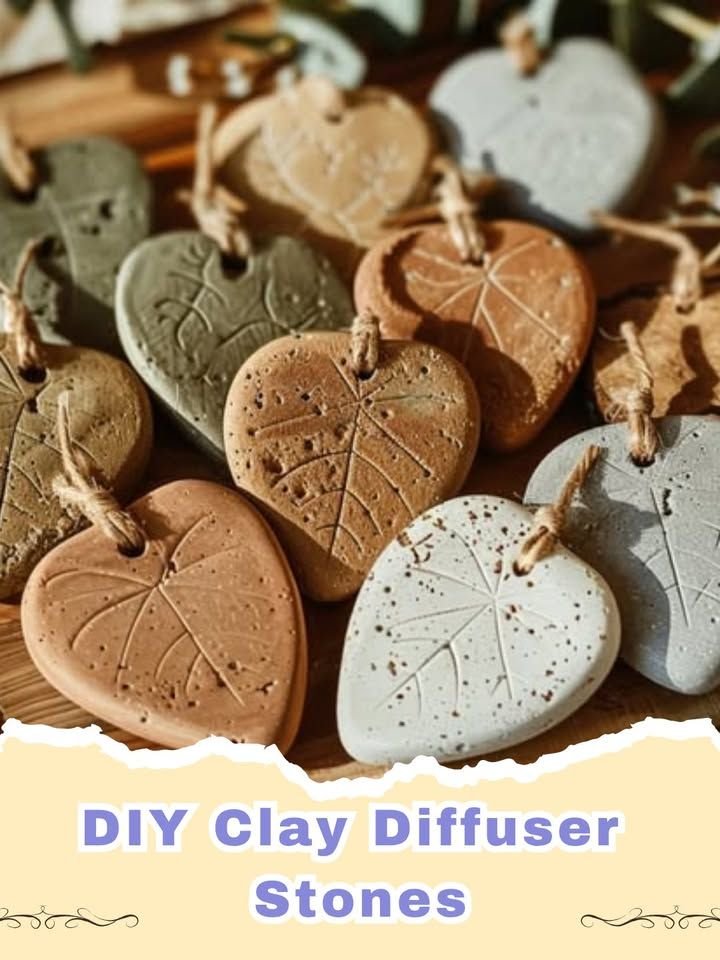
Are you looking for a delightful, chemical-free way to bring inviting scents into your home? Look no further than DIY clay diffuser stones! These charming, handcrafted pieces offer a simple yet elegant solution for natural home scenting. Made from humble air-dry clay, they gently release the aromatic goodness of your favorite essential oils, transforming any space into a serene sanctuary.
Crafting your own diffuser stones is a wonderfully creative and surprisingly straightforward project. It's a fantastic opportunity to personalize your home's ambiance, allowing you to choose scents that uplift, relax, or energize you. Plus, these beautiful creations make incredibly thoughtful, unique gifts for friends and family. Gather a few basic supplies and let's embark on this journey to infuse your surroundings with natural fragrance and handmade charm!
Why Embrace DIY Clay Diffuser Stones?
Beyond their simple beauty, homemade clay diffuser stones offer a wealth of advantages:
- Pure Aromatherapy: Bid farewell to artificial fragrances and questionable chemicals often found in commercial air fresheners. With essential oils, you control the purity of the air you breathe. For an in-depth understanding of the therapeutic qualities of essential oils, explore resources like NAHA (National Association for Holistic Aromatherapy).
- Tailored Scents: Whether you prefer calming lavender, invigorating citrus, or a unique seasonal blend, these stones allow for endless customization to match your mood or the occasion.
- Eco-Conscious Choice: Reusable and durable, clay diffuser stones are an environmentally friendly alternative to disposable air fresheners, helping reduce household waste.
- Budget-Friendly Craft: Made with inexpensive air-dry clay, this project is an affordable way to enjoy the benefits of aromatherapy and create beautiful decor.
- Aesthetic Appeal: Design your stones to perfectly complement your interior decor, turning functional items into pieces of art.
- Heartfelt Gifts: Handcrafted diffuser stones are personalized presents that show care and creativity, perfect for any occasion.
Essential Supplies for Your Diffuser Stones
Getting your materials ready is the first step to a fun and fulfilling crafting session. Most items are readily available at craft stores or even at home.
- Air-dry clay (white or terra cotta are popular choices)
- Your favorite essential oils
- A rolling pin
- Cookie cutters in various shapes and sizes
- Parchment paper or a non-stick work surface
- A skewer, toothpick, or straw for creating holes (optional, for hanging)
- Optional tools: decorative stamps, lace, or natural elements for imprints
Crafting Your Clay Diffuser Stones: The Simple Steps
Follow these easy instructions to create your own unique and fragrant diffuser stones:
Step 1: Prepare Your Clay
Begin by kneading a portion of your air-dry clay until it's pliable and smooth. On a piece of parchment paper or a non-stick surface, use your rolling pin to roll the clay to an even thickness, about 1/4 inch. This consistent thickness ensures uniform drying and durability.
Step 2: Shape and Personalize Your Stones
Now for the fun part! Use your cookie cutters to press out various shapes from the rolled clay. If you wish to hang your diffusers, use a skewer or straw to create a small hole at the top of each shape before removing it from the clay sheet. For added texture and charm, gently press stamps, lace, or leaves onto the clay surfaces.
Step 3: Dry Your Creations
Carefully transfer your shaped clay pieces to a clean, flat surface, ensuring they have good air circulation around them. Allow them to dry completely according to the clay manufacturer's instructions, typically 24-72 hours. Patience is key here; fully dry stones are crucial for optimal essential oil absorption and to prevent issues like mold. Rotate them occasionally if needed to ensure even drying.
Step 4: Add Your Favorite Scents and Enjoy!
Once your clay diffuser stones are thoroughly dry and firm, they are ready for their aromatic purpose. Apply 3-5 drops of your chosen essential oil directly onto the stone. The porous clay will absorb the oil and slowly release the scent into your environment. Place them in bathrooms, bedrooms, offices, or even your car. Just as a homemade treat can fill your kitchen with inviting aromas, these diffuser stones will bring a similar natural freshness to any room.
Creating a pleasant home environment is a true joy, whether through crafting or baking up something wonderful like a Heavenly Honeycrisp Apple Cake: Your Ultimate Fall Dessert. Enjoy the serene and naturally scented atmosphere your new clay diffuser stones bring!
FAQs
What type of clay is best for DIY diffuser stones?
Air-dry clay is the ideal choice for making diffuser stones. It's easy to sculpt, doesn't require baking, and its porous nature allows it to absorb and slowly release essential oils effectively.


How do I add essential oils to my finished clay stones?
Once your clay diffuser stones are completely dry and hardened, simply apply a few drops of your desired essential oil directly onto the surface. The clay will absorb the oil, gradually diffusing the scent into your space. Reapply as needed to refresh the aroma.
Can I use different scents on the same diffuser stone?
Yes, you can apply various essential oils to the same stone. However, be aware that over time, scents may blend. For distinct fragrances, you might consider having dedicated stones for specific oil blends or allowing a previous scent to fully dissipate before introducing a new one.
How long does it take for clay diffuser stones to dry?
The drying time for air-dry clay diffuser stones can vary, typically taking 24 to 72 hours, depending on the thickness of your stones and the humidity of your environment. Ensure they are completely dry before adding essential oils to prevent issues like mold.

DIY Clay Diffuser Stones
- Total Time: 24 hours 30 minutes - 72 hours 30 minutes
- Yield: 10-15 stones (depending on size) 1x
Description
Learn how to craft beautiful, natural clay diffuser stones using air-dry clay and essential oils for a chemical-free way to scent your home.
Ingredients
1 block (approx. 1 lb) air-dry clay (white or terra cotta)
Essential oils of your choice
1 rolling pin
Assorted cookie cutters
Parchment paper or non-stick mat
1 skewer, toothpick, or straw (optional, for holes)
Optional: decorative stamps, lace, or natural elements for imprints
Instructions
Step 1: Prepare Your Clay. Begin by kneading a portion of your air-dry clay until it's pliable and smooth. On a piece of parchment paper or a non-stick surface, use your rolling pin to roll the clay to an even thickness, about 1/4 inch. This consistent thickness ensures uniform drying and durability.
Step 2: Shape and Personalize Your Stones. Use your cookie cutters to press out various shapes from the rolled clay. If you wish to hang your diffusers, use a skewer or straw to create a small hole at the top of each shape before removing it from the clay sheet. For added texture and charm, gently press stamps, lace, or leaves onto the clay surfaces.
Step 3: Dry Your Creations. Carefully transfer your shaped clay pieces to a clean, flat surface, ensuring they have good air circulation around them. Allow them to dry completely according to the clay manufacturer's instructions, typically 24-72 hours. Patience is key here; fully dry stones are crucial for optimal essential oil absorption and to prevent issues like mold. Rotate them occasionally if needed to ensure even drying.
Step 4: Add Your Favorite Scents and Enjoy! Once your clay diffuser stones are thoroughly dry and firm, they are ready for their aromatic purpose. Apply 3-5 drops of your chosen essential oil directly onto the stone. The porous clay will absorb the oil and slowly release the scent into your environment. Place them in bathrooms, bedrooms, offices, or even your car.
Notes
Experiment with different essential oil blends to create unique aromas for various moods or seasons. These stones can be refreshed with new oil applications as the scent fades. For a longer-lasting aroma, consider using a more concentrated essential oil blend.
- Prep Time: 30 minutes
- Cook Time: 24-72 hours (drying time)
- Category: Home Decor
- Cuisine: Craft Project


Leave a Reply to grace Cancel reply