
Oh, the internet! One minute you're scrolling through cat videos, the next you're utterly captivated by a viral food trend that demands your immediate attention. That's exactly what happened to me when the incredible dubai chocolate bar recipe exploded across my feed. It wasn't just another pretty dessert; it was a symphony of textures and flavors – creamy chocolate, crunchy pistachios, and crisp, delicate kataifi. I remember seeing those mesmerizing break-apart videos and thinking, "I *have* to try that!" My kitchen quickly became a chocolate laboratory, with trials and errors, melted mishaps, and glorious successes. My kids, usually picky eaters when it comes to anything 'new,' were absolutely enthralled. The first time I perfected it, their eyes lit up with that specific kind of joy only a truly decadent dessert can bring. It's more than just a chocolate bar; it’s an experience, a moment of pure, unadulterated bliss that transports you straight to a luxurious Middle Eastern bazaar with every bite. And trust me, making this dubai chocolate bar recipe at home is far easier and more rewarding than you might think. Let's dive in!
Why This Dubai Chocolate Bar Recipe is a Must-Try
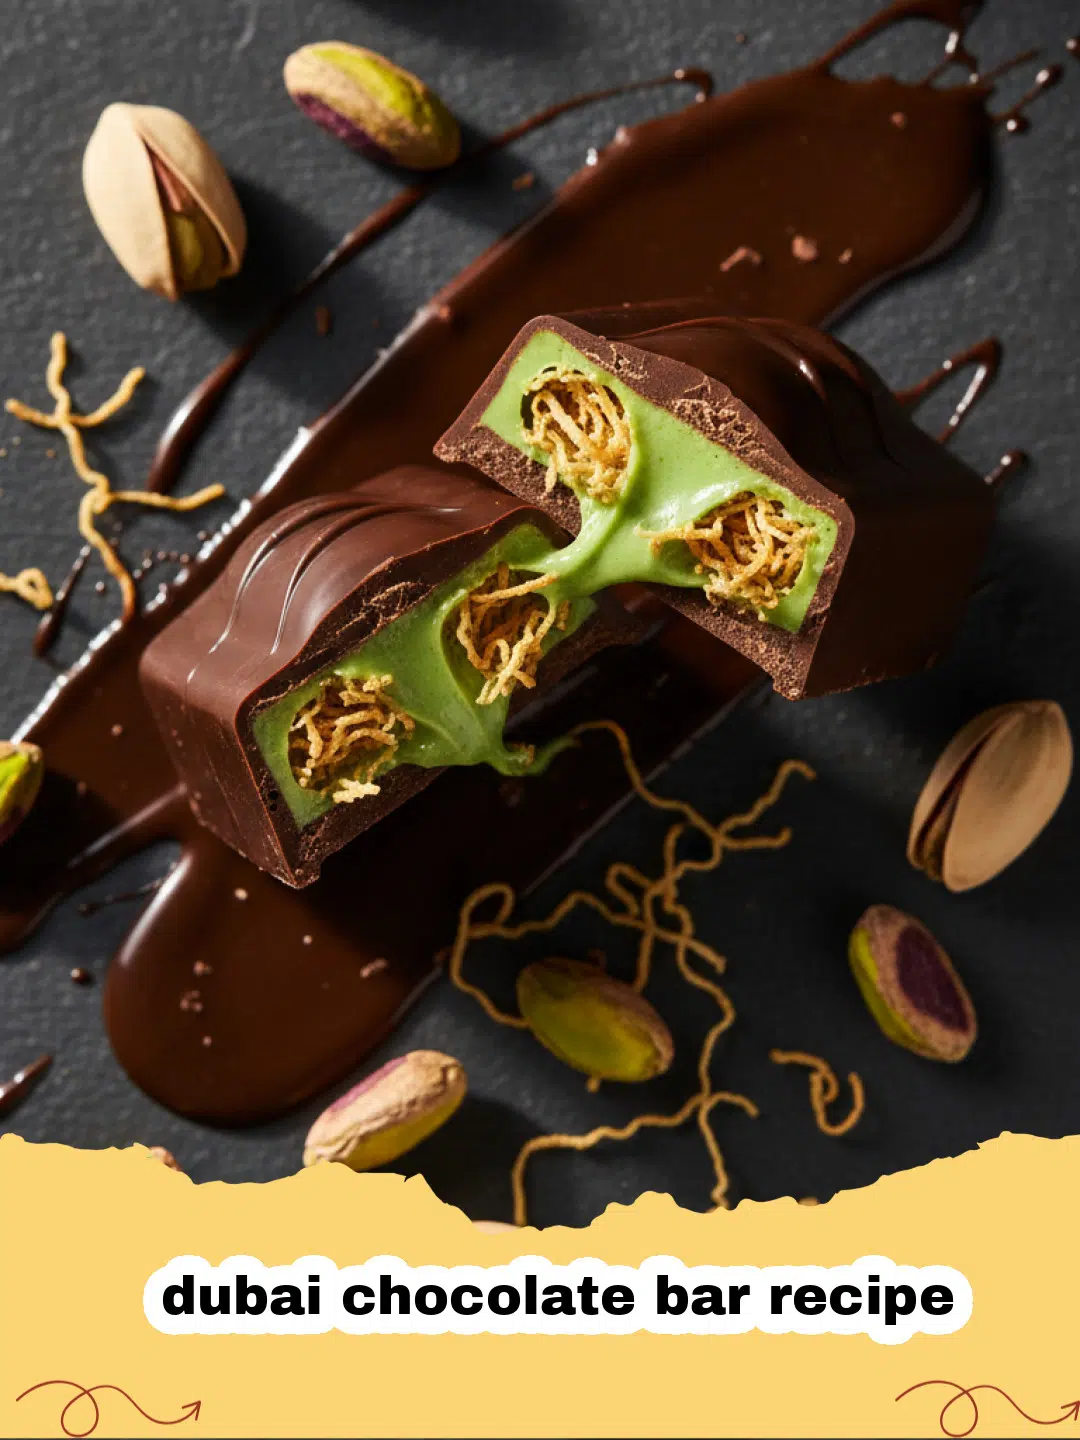
- Unforgettable Texture Play: The star of this dubai chocolate bar recipe is undoubtedly the contrast between the smooth, rich chocolate and the crispy, nutty filling. It’s an adventure for your palate.
- Surprisingly Simple to Master: Despite its gourmet appearance, this dubai chocolate bar recipe requires no baking and mostly relies on melting, mixing, and chilling. Perfect for all skill levels!
- Customizable Delights: While the classic version is divine, this recipe offers endless possibilities for customization. You can easily adapt it to your favorite nuts, chocolates, and even add a hint of spice.
- The Ultimate Showstopper: Serve this homemade dubai chocolate bar recipe at your next gathering, and watch as jaws drop. It’s beautiful, unique, and incredibly impressive. If you're looking for more showstopping sweets, check out our guide on Mastering the Dubai Chocolate Bar Recipe at Home for advanced techniques and presentation tips!
Key Ingredient Notes for Your Dubai Chocolate Bar Recipe
While the overall process for this dubai chocolate bar recipe is straightforward, the quality of your ingredients truly makes a difference. Here are a few to pay special attention to:
Good Quality Chocolate
This is a chocolate bar, so the chocolate itself needs to shine. Don't skimp here! I recommend using a high-quality milk chocolate for the base, around 30-40% cocoa solids, and a darker chocolate (60-70% cocoa) for the top layer or a swirl, if desired. Avoid overly sweet baking chocolates; opt for a brand you enjoy eating on its own. Good quality chocolate melts smoothly and sets beautifully, giving your dubai chocolate bar recipe that professional finish.
Kataifi (Shredded Phyllo Dough)
This is the secret weapon for that incredible crunch. Kataifi is finely shredded phyllo dough, readily available in the frozen section of most Middle Eastern or Mediterranean grocery stores, and increasingly in larger supermarkets. It toasts up incredibly crispy and light, providing the perfect textural contrast to the smooth chocolate. Make sure to bake or pan-fry it until it's golden brown and really crunchy before mixing it into the filling for your dubai chocolate bar recipe.
Pistachios
Unsalted, roasted pistachios are ideal. Their vibrant green color and distinct flavor are classic in Middle Eastern desserts and pair perfectly with chocolate and kataifi in this dubai chocolate bar recipe. If you can only find raw pistachios, a quick toast in a dry pan or oven will bring out their best flavor and enhance the overall taste of your homemade chocolate bar.

Step-by-Step Guide with Pro Tips for Your Dubai Chocolate Bar Recipe
Ready to make your own viral sensation? This dubai chocolate bar recipe is simpler than it looks!
- Step 1: Prepare Your Kataifi. Preheat your oven to 350°F (175°C). Spread the kataifi evenly on a baking sheet. Drizzle with a tablespoon of melted butter or neutral oil. Bake for 10-15 minutes, tossing halfway through, until golden brown and crispy. Keep a close eye on it as it can burn quickly. Once done, remove from oven and let cool completely.
- Step 2: Prepare Your Pistachios. If using raw pistachios, spread them on a separate baking sheet and toast in the same oven for 5-7 minutes, until fragrant. If using roasted, simply chop them roughly.
- Step 3: Melt the Filling Chocolate. In a heatproof bowl set over a saucepan of simmering water (bain-marie) or using a microwave in 30-second intervals, melt 100g (about 3.5 oz) of milk chocolate chips or chopped milk chocolate until smooth.
- Step 4: Create the Filling. In a large bowl, combine the cooled crispy kataifi, chopped pistachios, and the melted milk chocolate. Add the tahini and gently fold everything together until well combined. The mixture should be sticky but still have distinct pieces of kataifi and pistachio.
- Step 5: Prepare Your Mold. Line an 8x4 inch (or similar size) loaf pan or a specific chocolate bar mold with parchment paper, leaving an overhang on the sides to help lift the finished bar out easily.
- Step 6: Melt the Base Chocolate. Melt the remaining 200g (about 7 oz) of milk chocolate using the same bain-marie or microwave method until completely smooth and glossy.
- Step 7: Build the Base Layer. Pour about two-thirds of the melted milk chocolate into the prepared mold. Use an offset spatula or the back of a spoon to spread it evenly across the bottom and slightly up the sides, creating a shell. Place in the refrigerator for 5-10 minutes to set, until just firm but not completely hard.
- Step 8: Add the Filling. Spoon the kataifi-pistachio filling evenly over the set chocolate base. Gently press it down with the back of a spoon or your fingers to create a compact, even layer.
- Step 9: Top with Remaining Chocolate. Pour the remaining melted milk chocolate over the filling, spreading it carefully to cover the entire surface. Tap the mold gently on the counter a few times to release any air bubbles and ensure an even top.
- Step 10: Chill to Perfection. Place the chocolate bar in the refrigerator for at least 2-3 hours, or until completely firm. For best results and easy storage, I recommend using quality Basics Glass Food Storage containers once set.
- Step 11: Slice and Serve. Once fully set, use the parchment paper overhang to lift the bar out of the mold. Place it on a cutting board and, using a sharp knife, carefully slice it into individual bars. Warm the knife under hot water and wipe it dry for cleaner cuts if desired. Enjoy your magnificent homemade dubai chocolate bar recipe!
Variations & Serving Suggestions for Your Dubai Chocolate Bar Recipe
This dubai chocolate bar recipe is fantastic as is, but here are some ideas to make it uniquely yours:
- Nutty Affairs: Swap out pistachios for almonds, hazelnuts, or even a mix of your favorite nuts. Toast them for extra flavor!
- Chocolate Exploration: Experiment with different types of chocolate. A white chocolate base with a milk chocolate swirl on top, or a dark chocolate shell for a more intense flavor profile, would be divine.
- Spice It Up: Add a pinch of cardamom, cinnamon, or even a tiny dash of chili powder to the filling for an exotic twist on this dubai chocolate bar recipe.
- Fruit & Zest: Incorporate finely chopped dried apricots or candied orange peel into the filling for a burst of fruity flavor and chewiness. A little orange zest in the chocolate would also be lovely.
- Serving Suggestions: These bars are rich, so a small piece is usually enough! Serve them with a cup of strong Arabic coffee, a soothing mint tea, or as a decadent dessert after a special meal. They also make fantastic edible gifts for friends and family, showcasing your skills with this viral dubai chocolate bar recipe.
Nutrition Information
Please note that these values are estimates and can vary based on specific ingredients and brands used in your dubai chocolate bar recipe.
| Nutrient | Amount (per serving) |
|---|---|
| Calories | 310 kcal |
| Carbohydrates | 28g |
| Cholesterol | 15mg |
| Fat | 22g |
| Fiber | 3g |
| Protein | 6g |
| Saturated Fat | 12g |
| Sodium | 30mg |
| Sugar | 20g |
| Trans Fat | 0.1g |
| Unsaturated Fat | 9g |
Conclusion
There you have it – your very own homemade dubai chocolate bar recipe, ready to impress and delight! This isn't just a dessert; it's a culinary journey, a testament to how simple ingredients can come together to create something truly extraordinary. Whether you're making it for a special occasion, a sweet treat for yourself, or to jump on the viral trend, you're in for a real indulgence. Every bite is a delightful crunch followed by smooth, rich chocolate, making it an experience you'll want to revisit again and again. Go ahead, whip up this amazing dubai chocolate bar recipe and savor the magic. If you love easy, impressive no-bake treats, you might also enjoy our Ultimate No-Bake M&M Cookie Dough Fudge Recipe. Happy chocolate making!
FAQs
What is a Dubai Chocolate Bar?
The Dubai Chocolate Bar is a viral dessert sensation featuring a luxurious chocolate shell filled with a crunchy mixture of toasted kataifi (shredded phyllo dough), pistachios, and often a creamy element like tahini or pistachio butter. It's known for its incredible textural contrast and rich flavor profile.


Is this Dubai Chocolate Bar Recipe difficult to make?
No, this Dubai Chocolate Bar recipe is surprisingly easy to make at home! It's a no-bake recipe that primarily involves melting chocolate, toasting kataifi, mixing ingredients, and chilling. Even beginners can achieve a professional-looking and tasting result.
Where can I find kataifi for the Dubai Chocolate Bar?
Kataifi, or shredded phyllo dough, can typically be found in the frozen desserts or international foods section of most Middle Eastern, Mediterranean, or larger well-stocked grocery stores. It's essential for achieving the signature crunch in your Dubai Chocolate Bar recipe.
How long does the homemade Dubai Chocolate Bar last?
When stored in an airtight container in the refrigerator, your homemade Dubai Chocolate Bar can last for up to 1-2 weeks. The crunchy filling might slightly soften over time, but it will still be delicious.

Homemade Viral Dubai Chocolate Bar
- Total Time: 2 hours 45 minutes
- Yield: 10-12 bars 1x
Description
Recreate the viral sensation at home with this irresistible Dubai Chocolate Bar recipe, featuring a luxurious blend of milk chocolate, crunchy toasted kataifi, and rich pistachios. This no-bake treat offers an incredible textural experience that will transport your taste buds.
Ingredients
250g (about 8.8 oz) good quality milk chocolate (divided)
100g (about 3.5 oz) good quality milk chocolate chips or chopped milk chocolate, for the filling
75g (about 2.6 oz) kataifi (shredded phyllo dough)
1 tbsp melted butter or neutral oil (for kataifi)
100g (about 3.5 oz) unsalted roasted pistachios, roughly chopped
2 tbsp tahini (sesame paste)
Instructions
Step 1: Prepare Your Kataifi. Preheat your oven to 350°F (175°C). Spread the kataifi evenly on a baking sheet. Drizzle with a tablespoon of melted butter or neutral oil. Bake for 10-15 minutes, tossing halfway through, until golden brown and crispy. Keep a close eye on it as it can burn quickly. Once done, remove from oven and let cool completely.
Step 2: Prepare Your Pistachios. If using raw pistachios, spread them on a separate baking sheet and toast in the same oven for 5-7 minutes, until fragrant. If using roasted, simply chop them roughly.
Step 3: Melt the Filling Chocolate. In a heatproof bowl set over a saucepan of simmering water (bain-marie) or using a microwave in 30-second intervals, melt 100g (about 3.5 oz) of milk chocolate chips or chopped milk chocolate until smooth.
Step 4: Create the Filling. In a large bowl, combine the cooled crispy kataifi, chopped pistachios, and the melted milk chocolate. Add the tahini and gently fold everything together until well combined. The mixture should be sticky but still have distinct pieces of kataifi and pistachio.
Step 5: Prepare Your Mold. Line an 8x4 inch (or similar size) loaf pan or a specific chocolate bar mold with parchment paper, leaving an overhang on the sides to help lift the finished bar out easily.
Step 6: Melt the Base Chocolate. Melt the remaining 250g (about 8.8 oz) of milk chocolate using the same bain-marie or microwave method until completely smooth and glossy.
Step 7: Build the Base Layer. Pour about two-thirds of the melted milk chocolate into the prepared mold. Use an offset spatula or the back of a spoon to spread it evenly across the bottom and slightly up the sides, creating a shell. Place in the refrigerator for 5-10 minutes to set, until just firm but not completely hard.
Step 8: Add the Filling. Spoon the kataifi-pistachio filling evenly over the set chocolate base. Gently press it down with the back of a spoon or your fingers to create a compact, even layer.
Step 9: Top with Remaining Chocolate. Pour the remaining melted milk chocolate over the filling, spreading it carefully to cover the entire surface. Tap the mold gently on the counter a few times to release any air bubbles and ensure an even top.
Step 10: Chill to Perfection. Place the chocolate bar in the refrigerator for at least 2-3 hours, or until completely firm.
Step 11: Slice and Serve. Once fully set, use the parchment paper overhang to lift the bar out of the mold. Place it on a cutting board and, using a sharp knife, carefully slice it into individual bars. Warm the knife under hot water and wipe it dry for cleaner cuts if desired. Enjoy!
Notes
Ensure all ingredients are at room temperature before melting chocolate for the smoothest finish. When melting chocolate, do so gently to prevent seizing. If you don't have a specific bar mold, a lined loaf pan works perfectly.
- Prep Time: 30 minutes
- Cook Time: 15 minutes
- Category: Desserts & Baked Goods
- Cuisine: Middle Eastern-inspired
Nutrition
- Serving Size: 1 bar
- Calories: 310 kcal
- Sugar: 20g
- Sodium: 30mg
- Fat: 22g
- Saturated Fat: 12g
- Unsaturated Fat: 9g
- Trans Fat: 0.1g
- Carbohydrates: 28g
- Fiber: 3g
- Protein: 6g
- Cholesterol: 15mg


Leave a Reply