
Introduction
Graduation Cap Cookies are the ultimate way to celebrate the hard-earned success of the students in your life. As graduation season approaches, families everywhere are looking for that one signature treat that captures the joy, relief, and excitement of completing an academic journey. These cookies aren't just snacks; they are edible symbols of late-night study sessions, long exams, and the bright future that lies ahead. Whether you are celebrating a kindergarten promotion, a high school diploma, or a doctoral degree, these whimsical treats fit every occasion. The tradition of graduation food has evolved over decades, moving from formal seated dinners to vibrant, social open houses where handheld desserts reign supreme. Graduation Cap Cookies have become a staple in this new landscape because they are visually stunning yet surprisingly simple to assemble. They bridge the gap between high-end pastry art and the nostalgic comfort of familiar candies like peanut butter cups and chocolate squares. In this comprehensive guide, we will explore everything from the symbolic history of the mortarboard to the technical nuances of chocolate adhesion, ensuring your graduation celebration is as sweet as the diploma itself. Making Graduation Cap Cookies is a meditative process that allows you to reflect on the graduate's achievements while creating something that will undoubtedly be the star of the dessert table.
Why You’ll Love It
You will absolutely fall in love with Graduation Cap Cookies because they provide a maximum visual impact with minimum effort. In the chaotic days leading up to a graduation ceremony, nobody has time for temperamental sponges or complex multi-day baking projects. These cookies utilize high-quality store-bought components that come together in minutes, allowing you to focus on the graduate. Furthermore, they are highly customizable; by simply changing the color of the candy tassel or the icing 'button,' you can match the specific school colors of any institution. This level of personalization makes the graduate feel seen and celebrated. The combination of creamy peanut butter, rich dark or milk chocolate, and tangy fruit-flavored tassels provides a flavor profile that appeals to both children and adults. Everyone at the party will be asking where you ordered these 'custom' treats, and you can take pride in knowing they were handmade with love. They are also incredibly sturdy, making them perfect for outdoor summer parties where other delicate desserts might wilt.
The Symbolic History of the Mortarboard
Before we dive into the assembly, it is fascinating to consider why we shape these Graduation Cap Cookies as we do. The mortarboard, or the square academic cap, has its roots in the 14th and 15th centuries, evolving from the 'biretta' used by Catholic clerics. The square shape is said to represent the master’s level of masonry, symbolizing the building of knowledge and the solid foundation of education. By recreating this iconic shape in cookie form, you are participating in a tradition that spans centuries. The tassel, another key component of our Graduation Cap Cookies, historically indicated the wearer's status or field of study. Today, the 'turning of the tassel' from right to left is the climactic moment of the ceremony. Incorporating these elements into your dessert table adds a layer of depth and meaning to your celebration, making the act of eating them a shared tribute to the graduate's transition into a new chapter of life.
Ingredients
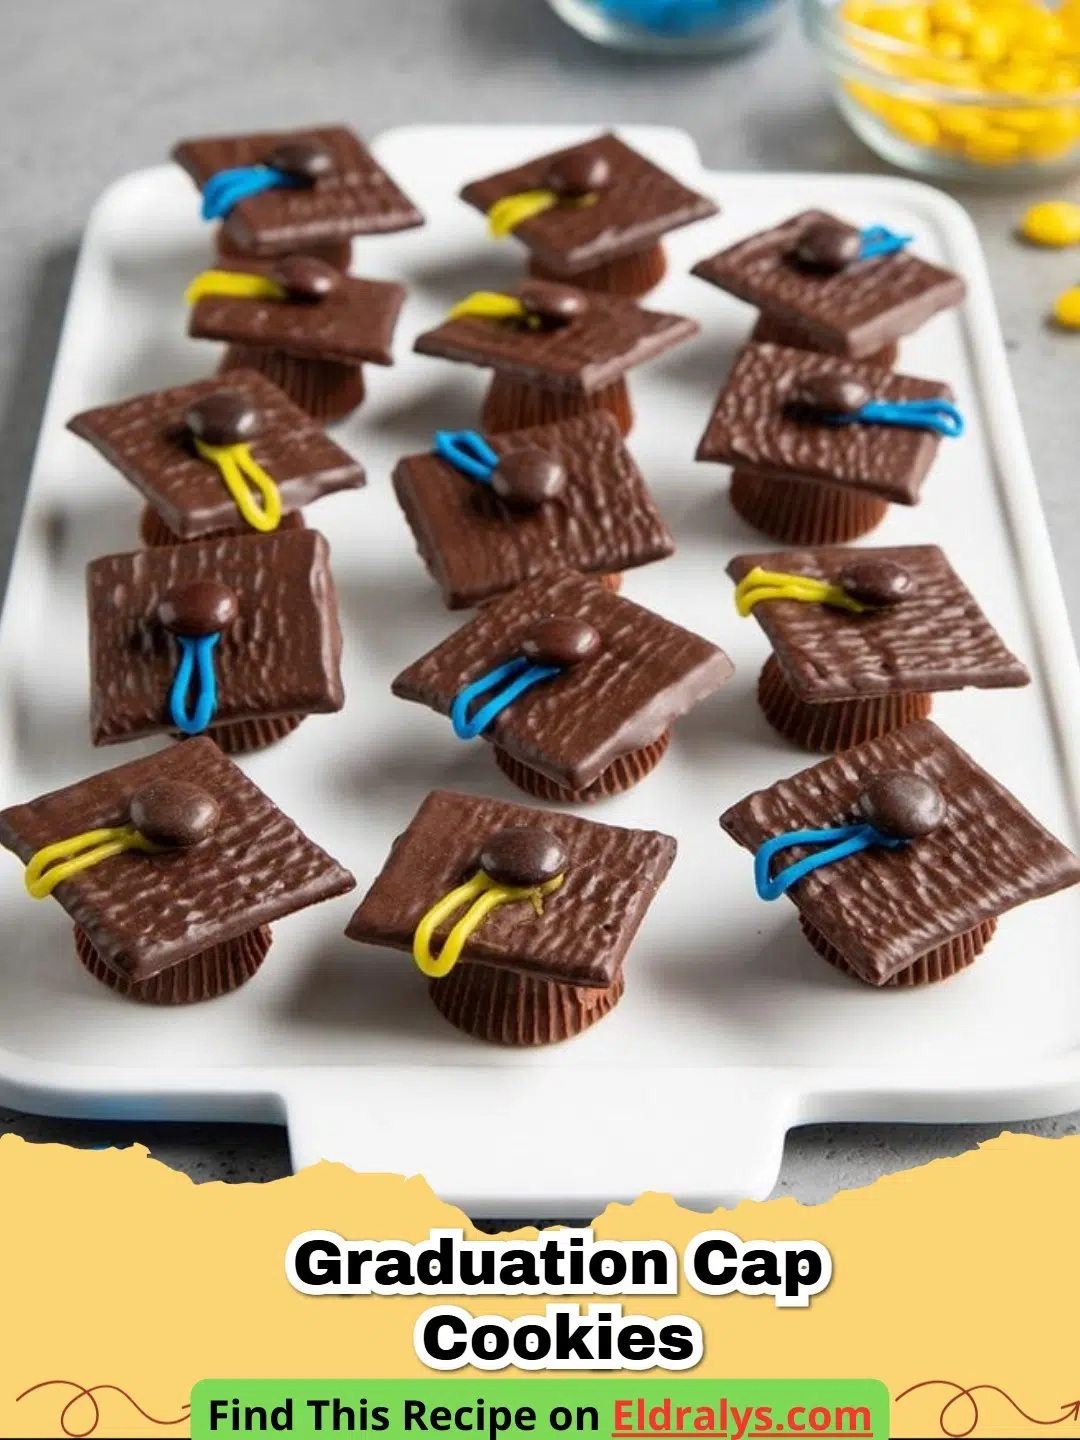
To create the perfect batch of Graduation Cap Cookies, you will need a few key components that provide both structure and flavor. The base of the cap is typically formed using miniature chocolate peanut butter cups, which provide the 'crown' of the hat. For the 'mortarboard' or square top, thin chocolate squares are essential. Ghirardelli is a popular choice due to their consistent size and high-quality finish. To attach the pieces, you will need a small amount of 'glue,' which can be melted chocolate chips or a thick royal icing. The tassels can be made from thin strips of sour gummy belts, licorice laces, or even pulled taffy. Finally, a small round candy, like an M&M or a nonpareil, serves as the button on top.
Notes and Substitutions
- Chocolate Type: If you have a peanut allergy, substitute the peanut butter cups with Rolo candies or miniature fudge-filled cookies.
- Mortarboard Alternatives: Square crackers dipped in chocolate or even square shortbread cookies can work if you prefer a less chocolate-heavy treat.
- Tassel Colors: Look for multi-colored sour belts to find the perfect school colors.
Equipment
The beauty of Graduation Cap Cookies is that they require very little specialized equipment. You will need a microwave-safe bowl to melt your chocolate 'glue,' a few toothpicks or a small piping bag for precise application, and a large parchment-lined baking sheet to set the finished cookies. A sharp pair of kitchen shears is also necessary for cutting the candy tassels to the correct length. No ovens or heavy mixers are required for this project.
Instructions
Follow these steps to ensure your cookies look professional and stay assembled throughout your event.
- Step 1: Prepare your workstation by lining a large flat surface with parchment paper. This prevents any stray chocolate from sticking and makes cleanup much easier.
- Step 2: Unwrap all your miniature peanut butter cups and place them upside down (wide side down) on the parchment paper. These will serve as the stable base for your Graduation Cap Cookies.
- Step 3: Carefully unwrap your chocolate squares. If the chocolate has 'bloomed' (showing white streaks), you can lightly buff them with a clean finger to restore the shine.
- Step 4: Using kitchen shears, cut your sour belts or licorice into 1.5-inch strips. Fringe the ends of the strips slightly to mimic the look of a real fabric tassel.
- Step 5: Melt a small handful of chocolate chips in the microwave in 15-second intervals until smooth. This will be your adhesive.
- Step 6: Dip a toothpick into the melted chocolate and apply a small dot to the center of the bottom (now facing up) of the peanut butter cup.
- Step 7: Gently press a chocolate square onto the peanut butter cup, ensuring it is centered. Hold it for five seconds to allow the 'glue' to begin setting.
- Step 8: Apply another tiny dot of chocolate to the center of the square top. Place one end of your candy tassel onto this dot.
- Step 9: Immediately place an M&M candy on top of the tassel end to act as the cap's button. Press down firmly but gently.
- Step 10: Allow the cookies to set completely at room temperature for at least 30 minutes before moving them. Do not refrigerate unless the room is exceptionally hot, as this can dull the chocolate.
Pro Tips for Professional Results
To make your Graduation Cap Cookies look like they came from a high-end bakery, consistency is key. Ensure all your tassels are cut to the exact same length using a ruler. When applying the chocolate adhesive, less is more; too much chocolate will ooze out the sides and create a messy look. If you are struggling with the chocolate squares sliding off the cups, wait for your melted chocolate 'glue' to cool and thicken slightly before applying. For a truly vibrant display, consider making a batch of The Most Enchanting Earth Day Sugar Cookies Recipe to Celebrate Our Beautiful Planet alongside these to offer variety in texture and color. Remember that humidity is the enemy of chocolate; if you are working in a damp environment, using a small desk fan to circulate air can help the cookies set faster and maintain their structural integrity.
The Science of Chocolate Adhesion
Understanding why Graduation Cap Cookies stay together involves a bit of food science. When you melt chocolate, you are breaking down its crystalline structure. As it cools, it re-solidifies, acting as a powerful bonding agent. This is known as 'crystallization.' For the best bond, the surfaces you are joining should be at room temperature. If the peanut butter cups are too cold, the melted chocolate will seize too quickly, preventing a strong bond. Conversely, if they are too warm, the 'glue' will take forever to set. This balance is crucial for ensuring the mortarboards don't slide off during transport. For more party inspiration, you might want to serve these cookies with a side of Whip Up Happiness: The Ultimate Funfetti Dip Recipe for Instant Joy!, which adds a festive flair to any graduation gathering.
Decorating with School Colors
Personalization is what makes Graduation Cap Cookies truly special. Most graduates are incredibly proud of their school colors, and reflecting these in the treats shows a high level of thoughtfulness. If you cannot find the right color of sour belts, you can use colored royal icing to pipe the tassels directly onto the chocolate squares. You can even add the graduation year (e.g., '2025') using a fine-tip edible ink marker or a very thin piping of white chocolate. This attention to detail transforms a simple cookie into a cherished memory. If you are celebrating a graduation from a maritime or nautical school, you might consider pairing these with themes from academic history to give your guests a full educational experience even during the party.
Serving, Storage & Variations
Serve your Graduation Cap Cookies on a tiered stand or a flat platter decorated with graduation confetti. They look best when grouped together, creating a 'sea of caps' effect. For storage, keep them in a single layer in an airtight container at room temperature. Avoid stacking them, as the weight of the top cookies can cause the mortarboards below to crack or detach. These cookies will stay fresh for up to five days, making them an excellent make-ahead option for busy party planners. For variations, try using white chocolate squares and white peanut butter cups for a 'purity' or nursing graduation theme. You can also experiment with different base flavors, such as using mini peppermint patties or caramel-filled chocolates, provided they have the necessary flat surface for the cap to sit upon.
Nutrition Information
While these are a celebratory treat, it is helpful to know the estimated nutritional breakdown for your guests. These values are calculated based on standard chocolate components.
| Nutrient | Amount |
|---|---|
| Calories | 185 kcal |
| Protein | 3g |
| Carbohydrates | 22g |
| Fat | 10g |
| Sugar | 18g |
| Sodium | 45mg |
Note: The nutritional information provided is an estimate and can vary based on the specific brands and sizes of the candies used.


Conclusion
In conclusion, Graduation Cap Cookies are a delightful, meaningful, and easy addition to any graduation festivity. They prove that you don't need to be a master pastry chef to create something memorable and beautiful. By following the simple assembly steps and incorporating a few pro tips, you can produce a dessert that honors the hard work of the graduate in a fun and delicious way. As the class of 2025 steps out into the world, let these cookies be a sweet reminder of how far they have come and how much they are loved. Congratulations to all the graduates!
FAQs
Can I make Graduation Cap Cookies ahead of time?
Yes, you can assemble these cookies 2-3 days in advance. Store them in a cool, dry place in an airtight container to prevent the chocolate from blooming or the tassels from getting sticky.
What is the best way to attach the tassel to Graduation Cap Cookies?
The most effective way is using a small dot of melted chocolate or royal icing. Place the tassel candy (like a sour belt strip) on the square top and secure it with a small M&M on top to look like a button.
Which chocolate works best for the mortarboard top?
Ghirardelli chocolate squares are the gold standard because they are perfectly flat and thin. However, you can also use square-shaped fudge cookies or thin chocolate wafers.

Graduation Cap Cookies
- Total Time: 20 minutes
- Yield: 24 cookies 1x
- Diet: Vegetarian
Description
A whimsical, no-bake graduation treat made from peanut butter cups and chocolate squares.
Ingredients
24 miniature chocolate peanut butter cups
24 thin chocolate squares (such as Ghirardelli)
24 small round candies (M&Ms or nonpareils)
3-4 sour gummy belts (any color)
1/4 cup chocolate chips (for melting)
Instructions
Step 1: Unwrap the peanut butter cups and place them upside down on a parchment-lined tray.
Step 2: Slice the sour gummy belts into thin 1.5-inch strips to create tassels.
Step 3: Melt the chocolate chips in the microwave until smooth to act as edible glue.
Step 4: Apply a dot of melted chocolate to the top of each peanut butter cup and center a chocolate square on it.
Step 5: Dab a tiny bit of chocolate in the center of the square and attach the gummy tassel and a round candy button.
Step 6: Let the cookies set at room temperature for 30 minutes until the chocolate glue is firm.
Notes
Ensure the chocolate glue is not too hot when applying, or it may melt the squares.
- Prep Time: 20 minutes
- Cook Time: 0 minutes
- Category: Dessert
- Method: Assembly
- Cuisine: American
Nutrition
- Serving Size: 1 cookie
- Calories: 185 kcal
- Sugar: 18g
- Sodium: 45mg
- Fat: 10g
- Saturated Fat: 6g
- Unsaturated Fat: 3g
- Trans Fat: 0g
- Carbohydrates: 22g
- Fiber: 1g
- Protein: 3g
- Cholesterol: 5mg
Related posts:
 The Most Heavenly Chocolate Peanut Butter Cottage Cheese Parfaits That Will Melt Your Heart
 The Ultimate Strawberry Cheesecake Pancakes: A Gourmet Breakfast Dream
 The Most Divine Peach Upside-Down Skillet Cake with Salted Caramel That Will Melt Your Heart
 The Most Decadent Chocolate Chia Pudding That Will Change Your Breakfast Forever

Leave a Reply