
My kitchen has always been a place of joy, a canvas for culinary experiments, and sometimes, a vibrant explosion of sprinkles and frosting. There was this one particularly rainy afternoon, my daughter, Lily, was feeling a bit down, having missed a playdate due to the weather. I wanted to cheer her up, and what better way than with something truly magical? That's when the idea of a unicorn poke cake sparked. I remember pulling out all the food coloring, the sprinkles I had been saving for a 'special occasion' (this was it!), and a box of white cake mix. The anticipation in her eyes as we mixed the batter, divided it into different colors, and watched it bake was priceless. The real fun began with the poking and filling, turning a simple cake into a dazzling, whimsical creation that instantly brought a huge smile to her face. It wasn't just a dessert; it was an experience, a memory baked with love and a dash of pure imagination. And ever since that day, this delightful unicorn poke cake has become a family favorite for birthdays, celebrations, or just because we need a little sprinkle of magic in our lives. It's surprisingly easy to make, and the 'wow' factor is off the charts, making you feel like a true dessert wizard!
Why This Recipe is a Must-Try
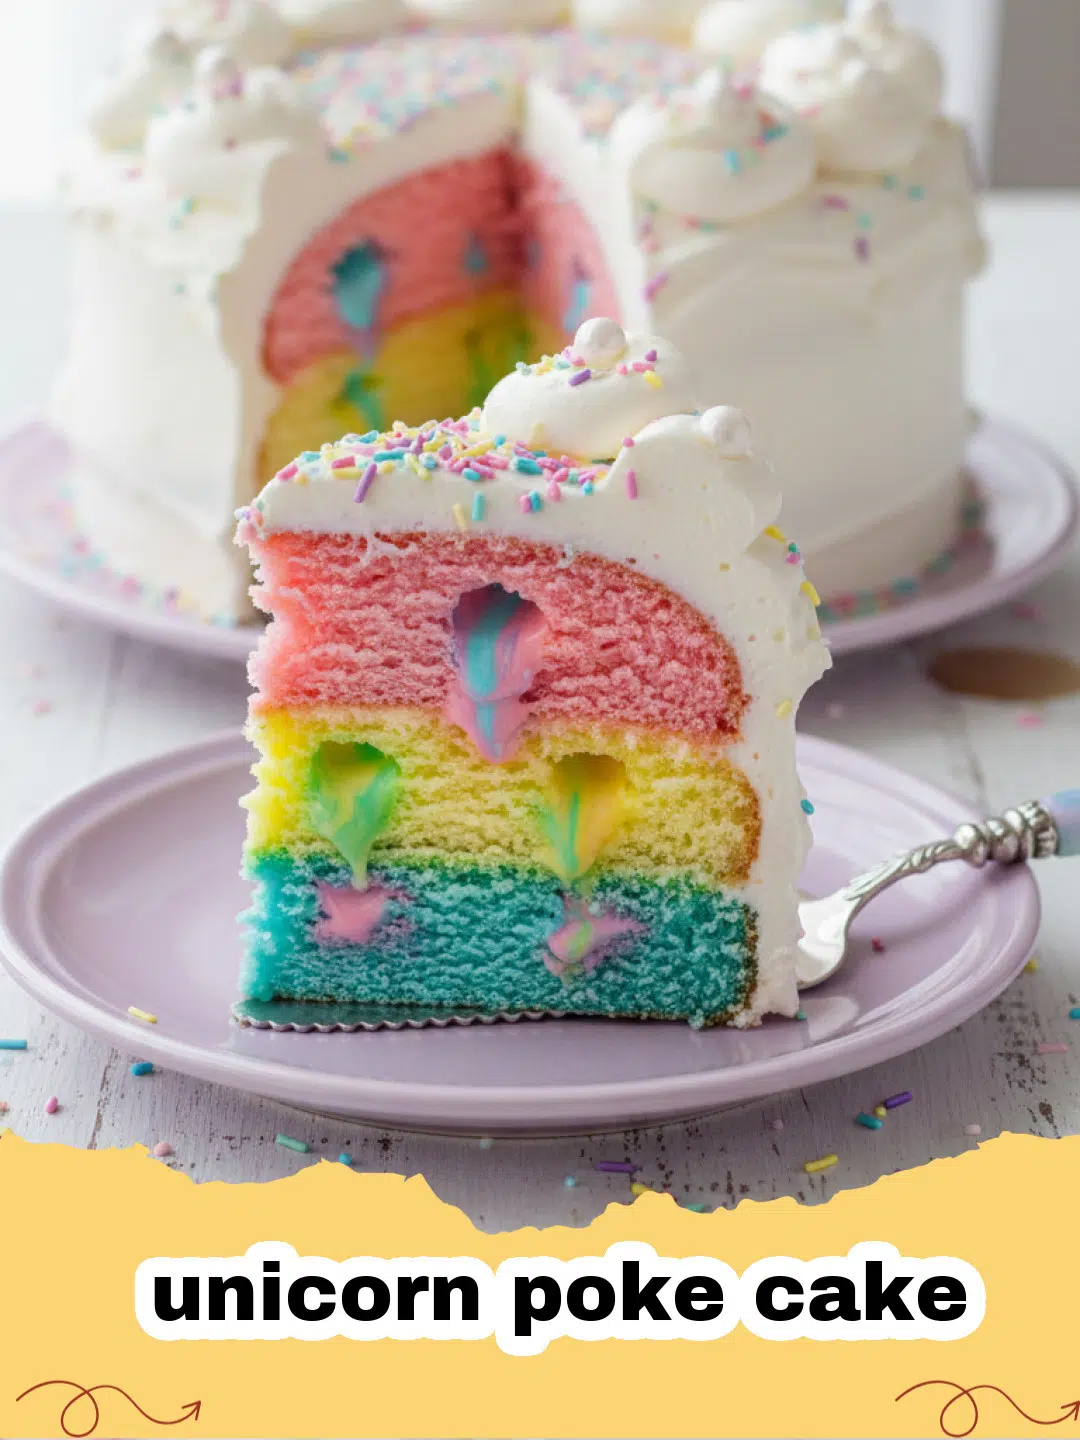
- Visually Stunning: The vibrant, rainbow layers and whimsical topping make this cake an absolute showstopper, perfect for parties and special occasions.
- Incredibly Moist: The 'poke' method allows the sweet condensed milk and whipped topping to seep into the cake, creating an unbelievably moist and tender crumb.
- Surprisingly Easy: Despite its elaborate appearance, this unicorn poke cake uses a simple cake mix base and straightforward steps, making it accessible for bakers of all skill levels.
- Customizable Fun: From varying the colors and flavors to experimenting with different toppings, this recipe offers endless possibilities for personalization.
Key Ingredient Notes
Creating a truly magical unicorn poke cake relies on a few key ingredients working in harmony. Understanding their role can elevate your baking game and ensure a picture-perfect result every time.
White Cake Mix
While you can certainly make this cake from scratch, a good quality white cake mix is your best friend for convenience and consistency. It provides a reliable base that's light enough to absorb the colorful gelatin and creamy topping without becoming too dense. For the best outcome, follow the package directions for preparing the cake, but don't be afraid to add an extra egg yolk or a splash of vanilla extract to enhance its richness and flavor. This simple hack can transform a basic mix into something truly special. Remember, the goal is a fluffy, white canvas ready to be transformed into a rainbow.
Sweetened Condensed Milk
This is the secret weapon that gives our unicorn poke cake its incredible moisture and sweet richness. Unlike evaporated milk, sweetened condensed milk is already thick and sugary, ready to soak into the poked holes of your cake. When it combines with the whipped topping, it creates a luscious, creamy layer throughout the cake. Don't substitute this ingredient; its unique texture and sweetness are essential to the signature poke cake experience. Make sure to choose full-fat for the best results, as it contributes significantly to the cake's decadent mouthfeel. This is where a lot of the magic happens, transforming a simple cake into a rich, moist delight.
Whipped Topping (Cool Whip style)
A fluffy, stable whipped topping like Cool Whip is crucial for the frosting layer and helps contain the vibrant gelatin colors within the cake. It's lighter than traditional buttercream, providing a perfect balance to the rich cake and gelatin. Ensure it's fully thawed but still very cold before spreading. If you prefer to make your own whipped cream, stabilize it with a bit of powdered sugar and cream of tartar or a touch of unflavored gelatin to prevent it from deflating. The stability of the whipped topping is key, especially if you plan on adding a lot of sprinkles and decorations, which can be quite heavy. This also makes the unicorn poke cake easier to transport and enjoy.

Step-by-Step Guide with Pro Tips
Let's dive into the enchanting process of bringing your unicorn poke cake to life! Follow these steps carefully, and don't forget the pro tips for a flawless finish.
Bake the Cake
- Step 1: Preheat your oven to 350°F (175°C) and grease and flour a 9x13 inch baking pan.
- Step 2: Prepare the white cake mix according to package directions. For an extra touch of richness, consider using milk instead of water and adding an extra egg yolk.
- Step 3: Pour the batter into the prepared pan and bake for 28-32 minutes, or until a wooden skewer inserted into the center comes out clean.
- Step 4: Once baked, remove the cake from the oven and let it cool in the pan on a wire rack for about 15-20 minutes. This cooling period is crucial before the next step.
Poke and Fill
- Step 5: While the cake is still warm (but not hot!), use the blunt end of a wooden spoon or a large straw to poke holes all over the top of the cake, about 1 inch apart. Don't go all the way through to the bottom.
- Step 6: In separate bowls, prepare your colored gelatin mixes according to the "jiggly" directions on the box, typically using less water than standard. You'll want vibrant colors, so use a good amount of food coloring if your gelatin colors aren't strong enough.
- Step 7: Carefully pour different colors of gelatin into alternating holes. Get creative with your pattern! For a true unicorn poke cake effect, aim for a rainbow of colors.
- Step 8: Gently pour the sweetened condensed milk evenly over the entire cake, allowing it to seep into all the holes and saturate the cake.
- Step 9: Place the cake in the refrigerator for at least 2-3 hours, or preferably overnight, to allow the gelatin to set and the milk to fully absorb. This chilling time is non-negotiable for the best results.
Frost and Decorate
- Step 10: Once the cake is completely chilled and set, spread the thawed whipped topping evenly over the top. Use an offset spatula for a smooth finish.
- Step 11: Now for the fun part – decorating! This is where your unicorn poke cake truly comes to life. Generously apply a variety of rainbow sprinkles, edible glitter, mini marshmallows, or even edible pearls. Consider piping small rosettes of colored whipped cream around the edges for an extra flourish.
- Step 12: If desired, create a "horn" and "ears" from fondant or melted candy melts and place them on top for the ultimate unicorn look. You can also add edible eyes if you're feeling extra whimsical.
- Step 13: Return the finished unicorn poke cake to the refrigerator until ready to serve. This helps the topping stay firm.
Pro Tips for Success:
- Don't Over-Bake: An over-baked cake will be dry and won't absorb the gelatin and milk as well.
- Vibrant Colors: Don't be shy with food coloring for your gelatin mixtures. Gel food coloring provides the most intense hues.
- Chill Time is Key: Rushing the chilling process will result in runny gelatin and a less defined 'poke' effect. Patience is a virtue here!
- Clean Pokes: Twist your poking tool slightly as you remove it to ensure clean holes.
- Storage: Store leftover unicorn poke cake in an airtight container in the refrigerator for up to 3-4 days. For longer storage, you can freeze individual slices. For excellent storage, consider using Basics Glass Food Storage containers.
Variations & Serving Suggestions
The beauty of this unicorn poke cake recipe is its versatility. Once you've mastered the basic technique, feel free to unleash your inner artist and customize it to suit any occasion or preference!
Flavor Twists:
- Fruity Fantasy: Instead of traditional gelatin, try using fruit purees mixed with a touch of unflavored gelatin for a more natural fruit flavor. Raspberry, strawberry, or mango would be delightful.
- Chocolate Dream: Use a chocolate cake mix and chocolate pudding instead of gelatin. Top with chocolate whipped cream and mini chocolate chips for a decadent twist.
- Citrus Burst: Incorporate lemon or lime zest into your cake batter and use citrus-flavored gelatins. A dollop of lemon curd mixed into the whipped topping would be heavenly.
- Seasonal Spendor: For fall, think pumpkin spice cake with caramel sauce and cream cheese frosting. For winter, perhaps peppermint cake with white chocolate pudding.
Decorating Delights:
- Mermaid Magic: Swap unicorn colors for blues, greens, and purples. Use edible glitter, white chocolate shells, and mermaid tail sprinkles. If you love whimsical desserts, you might also enjoy our Whimsical & Wonderful: The Ultimate Cookie Monster Cake Jars Recipe! for another fun and colorful treat.
- Galaxy Glow: Use dark food coloring for the cake and vibrant blues, purples, and pinks for the gelatin. Top with dark blue whipped cream and star sprinkles.
- Personalized Perfection: Add edible letters to spell out a name or a special message for a birthday celebration. You can also use themed cookie cutters to create fondant shapes to adorn your cake.
Serving Suggestions:
This unicorn poke cake is a celebration in itself, but a few accompaniments can make it even more special:
- Serve with a side of fresh berries to cut through the sweetness.
- A scoop of vanilla bean ice cream would be a luxurious addition, especially if the cake is slightly warm (though best served chilled).
- Pair with a whimsical drink, like a sparkling pink lemonade or a homemade fruit punch, to complete the festive atmosphere. Or, for another no-bake layered dessert that's equally divine, check out our Divine Layers of Sweetness: The Easiest No Bake Strawberry Lasagna Recipe!
- For individual servings, cut neat slices and present them on pretty dessert plates. The vibrant layers are a joy to behold.
No matter how you choose to customize and serve your unicorn poke cake, it's sure to bring smiles and a touch of magic to any gathering. It's truly a centerpiece dessert!
Nutrition Information
While this unicorn poke cake is undoubtedly a treat, here's an estimated nutritional breakdown per serving to help you plan your indulgence. Please note that these values are approximate and can vary based on specific ingredients and brands used.
| Nutrient | Amount Per Serving |
|---|---|
| Calories | 380 kcal |
| Total Fat | 15 g |
| Saturated Fat | 9 g |
| Trans Fat | 0.5 g |
| Unsaturated Fat | 5 g |
| Cholesterol | 50 mg |
| Sodium | 310 mg |
| Total Carbohydrate | 55 g |
| Dietary Fiber | 0.5 g |
| Total Sugars | 45 g |
| Protein | 4 g |
| Serving Size | 1 slice (approx. 1/12 of cake) |
And there you have it – your very own magical unicorn poke cake, ready to dazzle and delight! This recipe isn't just about baking a dessert; it's about creating joy, sparking imagination, and making cherished memories with loved ones. Whether it's for a special occasion or just a whimsical treat on a gloomy day, this vibrant, moist, and utterly delicious cake is guaranteed to be a hit. So go ahead, embrace the sprinkles, unleash your inner unicorn, and prepare to spread some serious smiles. Happy baking!


FAQs
What is a unicorn poke cake?
A unicorn poke cake is a whimsical and colorful dessert made from a baked cake (often white or vanilla), poked with holes, and then filled with vibrant, fruit-flavored gelatin mixtures and sweetened condensed milk. It's typically topped with whipped cream and an array of rainbow sprinkles and decorations to resemble a magical unicorn.
Can I make unicorn poke cake ahead of time?
Absolutely! A unicorn poke cake is an excellent make-ahead dessert. You can prepare the cake, poke it, fill it with gelatin and condensed milk, and refrigerate it overnight. Add the whipped topping and decorations a few hours before serving for the freshest look, though it will hold up well for up to 24 hours once fully decorated.
What kind of cake mix is best for unicorn poke cake?
A white or vanilla cake mix is typically best for a unicorn poke cake. The light color of the cake base allows the vibrant gelatin colors to really shine through, creating that beautiful rainbow effect. You can enhance the flavor by using milk instead of water and adding an extra egg yolk to the mix.
How do I get the gelatin colors to be so bright?
To achieve truly bright and vibrant colors in your unicorn poke cake, use good quality gelatin mixes and don't be afraid to add a few drops of gel food coloring to each gelatin mixture before pouring them into the cake holes. Gel food coloring provides much more intense hues than liquid food coloring.

Magical Unicorn Poke Cake
- Total Time: 3 hours 15 minutes (includes chilling)
- Yield: 12-16 servings 1x
Description
This vibrant and whimsical Unicorn Poke Cake is a show-stopping dessert that's surprisingly easy to make. Featuring a tender white cake infused with colorful gelatin, topped with a fluffy whipped frosting and an abundance of sprinkles, it's perfect for birthdays, parties, or any occasion that calls for a touch of magic. The 'poke' method ensures every bite is incredibly moist and bursting with sweet flavor.
Ingredients
1 (15.25 ounce) box white cake mix (plus ingredients to prepare, like eggs, oil, water/milk)
1 (14 ounce) can sweetened condensed milk
3 different colors of gelatin dessert mix (e.g., strawberry, lime, berry blue) (3 ounce boxes)
3 cups hot water, divided (1 cup per gelatin flavor)
1 (8 ounce) container frozen whipped topping, thawed (like Cool Whip)
Assorted rainbow sprinkles, edible glitter, mini marshmallows, or other unicorn-themed decorations
Instructions
Step 1: Preheat your oven to 350°F (175°C). Grease and flour a 9x13 inch baking pan.
Step 2: Prepare the white cake mix according to package directions. For a richer cake, use milk instead of water and add an extra egg yolk.
Step 3: Pour the batter into the prepared pan and bake for 28-32 minutes, or until a wooden skewer inserted into the center comes out clean.
Step 4: Once baked, remove the cake from the oven and let it cool in the pan on a wire rack for about 15-20 minutes.
Step 5: While the cake is still warm (but not hot), use the blunt end of a wooden spoon or a large straw to poke holes all over the top of the cake, about 1 inch apart. Don't go all the way through to the bottom.
Step 6: In three separate bowls, prepare each gelatin mix. Dissolve one packet of gelatin in 1 cup of hot water (follow 'jiggly' directions on the box for best setting results). Stir until completely dissolved.
Step 7: Carefully pour different colors of gelatin into alternating holes across the cake. Aim for a vibrant rainbow pattern.
Step 8: Gently pour the entire can of sweetened condensed milk evenly over the entire cake, ensuring it seeps into all the holes and saturates the cake.
Step 9: Place the cake in the refrigerator for at least 2-3 hours, or preferably overnight, to allow the gelatin to set and the milk to fully absorb. This chilling time is essential.
Step 10: Once the cake is completely chilled and set, spread the thawed whipped topping evenly over the top, using an offset spatula for a smooth finish.
Step 11: Decorate generously with assorted rainbow sprinkles, edible glitter, mini marshmallows, or other unicorn-themed embellishments.
Step 12: For an ultimate unicorn look, you can add fondant or candy melt 'horn' and 'ears' to the top of the cake. Place them just before serving.
Step 13: Return the finished cake to the refrigerator until ready to serve. This helps the topping stay firm.
Notes
For the most vibrant colors, use gel food coloring in your gelatin mixtures. Ensure the cake is fully chilled before adding the whipped topping and decorating for the best structural integrity and cleanest cuts. This cake is best served cold.
- Prep Time: 45 minutes
- Cook Time: 30 minutes
- Category: Desserts & Baked Goods
- Cuisine: American
Nutrition
- Serving Size: 1 slice (approx. 1/12 of cake)
- Calories: 380 kcal
- Sugar: 45 g
- Sodium: 310 mg
- Fat: 15 g
- Saturated Fat: 9 g
- Unsaturated Fat: 5 g
- Trans Fat: 0.5 g
- Carbohydrates: 55 g
- Fiber: 0.5 g
- Protein: 4 g
- Cholesterol: 50 mg


Leave a Reply